how to increase wifi speed in laptop windows 7
Title: How to make Internet speed faster on Windows 7
Channel: 8ashka
How to make Internet speed faster on Windows 7 by 8ashka
how to increase wifi speed in laptop windows 7, how to increase wifi speed in pc windows 7, how to increase internet speed in laptop windows 7, how to increase wifi speed in laptop windows 10
**Windows 7 WiFi Speed? This ONE Trick Will SHOCK You!**
Unveiling the Truth: How to Supercharge Your Windows 7 WiFi—Prepare to Be Amazed!
Are you still clinging to your trusty Windows 7 machine? Many of us are, and for good reason. After all, it's a reliable operating system. But, is your WiFi speed leaving you wanting more? Does it feel like molasses in January? Well, get ready. I have a secret that might just revolutionize your online experience. It is a trick that will genuinely shock you.
The WiFi Woes of Windows 7: A Lingering Frustration
Let's be honest, the WiFi performance on older systems can be a true test of patience. The initial setup can be easy. However, slow download speeds and intermittent connections can quickly turn your happy mood sour. Downloading files can feel like an eternity. Streaming your favorite shows becomes a buffering nightmare. So, how do you fix this?
The Magical Secret: Optimizing Your Wireless Adapter Settings
Here's where the magic happens. Prepare yourself. You're about to discover a simple tweak. This tweak can have a colossal impact. It involves adjusting your wireless adapter settings. It is a game-changer. Trust me. This isn't some tech mumbo jumbo. It's a practical step you can take right now. This can dramatically improve your WiFi speed.
Step-by-Step Guide: Unleashing WiFi Turbo Power
Alright, let’s dive into the nitty-gritty. Follow these steps. I'll guide you. You'll be surfing the web at lightning speed in no time.
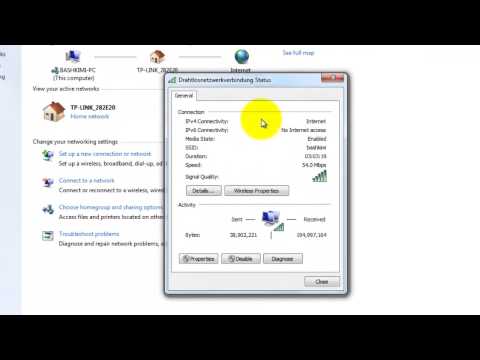
Accessing the Device Manager: First, you must open the Device Manager. You can do this by searching for it in the Start Menu. Alternatively, right-click on "Computer" or "This PC," then select "Manage." Then, select Device Manager. It will appear for you to explore.
Locating Your Wireless Adapter: Next, find "Network adapters." Expand this section. Here, you'll see your wireless network adapter listed. It's usually labeled with something like "Wireless Network Adapter" or similar. The name may vary.
Opening the Properties: Now, right-click on your wireless adapter. Then, select "Properties." A window will open. It will lead you to the next step.
Navigating to "Advanced" Tab: In the Properties window, click on the "Advanced" tab. This is where the real power lies. Here, you'll find a list of settings related to your adapter's performance.
Making the Crucial Tweaks: This is the most important part. Carefully adjust the following settings. This is the key. Different adapters may have slightly different options. Nevertheless, the core concepts remain the same.
- Wireless Mode: Set this to the highest possible option. For instance, it might be "802.11a/b/g/n/ac." The highest setting gives you the best speeds.
- 802.11n Channel Width: Choose "Auto" or the highest setting. This helps improve speed.
- Roaming Aggressiveness: Set this to "Medium" or "Low." This minimizes channel switching.
- Transmit Power: Choose "Highest." This maximizes the signal’s strength.
Applying and Restarting: Click "OK" to save your changes. Now, restart your Windows 7 computer. This final step is crucial. It makes the changes active.
Beyond the Basics: Further WiFi Optimization
The process doesn't stop there. Here are a few additional tips to further boost your WiFi speed:
- Update Your Driver: As a matter of fact, outdated drivers can cripple performance. Visit your adapter manufacturer’s website. Then, download the latest drivers for your device.
- Router Position: Your router's position matters. Move it closer to your computer. Furthermore, consider elevating it for better signal distribution.
- Interference: Consider looking for any possible source of interference. Examples are microwaves, Bluetooth devices, and cordless phones. Try to minimize interference.
- Security Protocols: Ensure your connection is secure. Strong encryption like WPA2 or WPA3 is crucial. This is a must for safety.
The Shocking Results: Prepare to Be Impressed
After making these adjustments, prepare to be amazed. You'll likely notice a significant improvement in your WiFi speed. Websites will load faster. Downloads will complete quicker. Streaming will be smoother. You might find yourself wondering why you waited so long to try this! This is often overlooked.
Final Thoughts: Breathe New Life into Your Windows 7 WiFi
It's not always about upgrading. Sometimes, an old dog can learn new tricks. This simple trick can breathe new life into your Windows 7 WiFi. This will allow you to enjoy a much faster and more enjoyable online experience. So, go ahead. Give it a try. I think you'll be pleasantly shocked. Now, go forth, and enjoy your newfound speed!
Unlock Insane Wi-Fi Range on Your Laptop: This Secret Software Will Blow You Away!Windows 7 WiFi Speed? This ONE Trick Will SHOCK You!
Hey everyone, ever feel like your Windows 7 laptop is stuck in dial-up hell, even though you're paying for blazing-fast internet? We've all been there! You’re staring at that spinning wheel, feeling like you're waiting for the internet to catch up with the 21st century. Well, good news! Today, we're diving deep into a ridiculously simple trick that can dramatically boost your Windows 7 WiFi speed. Seriously, prepare to be amazed. I've used this myself, and the difference was like trading in a beat-up bicycle for a rocket ship!
The Frustration of Slow Windows 7 WiFi
Let’s be honest, Windows 7, while a classic, isn’t exactly a speed demon when it comes to WiFi. The technology is a bit dated, and sometimes, it just doesn't play nice with modern routers and internet speeds. Consider this: you're trying to stream a movie, and it buffers every five seconds. You’re trying to video call your loved ones, and the video is choppy. Downloading a file feels like watching paint dry. The frustration is real, and it's enough to make you want to throw your laptop out the window (metaphorically speaking, of course!).
Diagnosing the WiFi Speed Blues: Is It Really Your Internet?
Before we dive into the magic bullet, let's make sure the issue is actually your Windows 7 WiFi. It's easy to blame the OS, but sometimes the problem lies elsewhere.
- Test Your Speed: Run a speed test on a different device (phone, tablet, another computer) connected to the same WiFi network. If those devices are getting the speeds you're paying for, then the issue is likely your Windows 7 machine.
- Router Reset: A quick reset of your router is a classic troubleshooting step. Unplug it for 30 seconds, plug it back in, and see if that helps. Sometimes routers just need a little reboot to get back on track.
- Proximity Problems: Are you far from your router? Strong WiFi signals diminish over distance. Try moving closer to the router and see if that makes a difference. Think of it like trying to yell across a canyon – the further away you are, the harder it is to be heard!
If you've checked these things and still suspect your Windows 7 is the culprit, then buckle up, because we're about to reveal the secret weapon.
The Secret Weapon: Wireless Adapter Settings (And Why They Matter!)
Here it is, the one trick that could shock you back to the internet age: adjusting your wireless adapter settings. This is the single most impactful thing you can do to speed up your Windows 7 WiFi, and it’s surprisingly easy. It's like a secret tuning knob just waiting to be adjusted.
Accessing Your Wireless Adapter Properties
- Open the Control Panel: Click the Windows "Start" button and then select "Control Panel."
- Navigate to Network and Sharing Center: In the Control Panel, click on "Network and Internet" and then "Network and Sharing Center."
- Change Adapter Settings: On the left side of the "Network and Sharing Center" window, you'll see "Change adapter settings." Click on that.
- Identify Your Wireless Adapter: You’ll see a list of your network connections. Look for the one that says "Wireless Network Connection" or something similar. This is your WiFi adapter.
The Crucial Settings Tweaks
Once you’ve identified your wireless adapter:
- Right-Click and Properties: Right-click on your Wireless Network Connection and select "Properties."
- Configure: In the Properties window, click the "Configure" button next to the name of your network adapter.
- Advanced Tab: In the new window that pops up, click on the "Advanced" tab. This is where the magic happens!
- Key Settings to Optimize: This is where you’ll find a list of settings. The specific options may vary slightly based on your adapter, but here are the ones we're most interested in:
- 802.11n Channel Width: Look for this setting. Change its value to "Auto" or "20/40 MHz" (if available). This allows your adapter to use a wider bandwidth, potentially boosting speeds.
- Wireless Mode: This setting will often be labeled "Mode" or something similar. Select the best option that is supported by all WiFi devices you intend to use. If your router supports it, select a mode with the latest protocol (802.11n, 802.11ac, or 802.11ax). Do not select settings that explicitly state "g" if possible.
- Power Saving Mode: Disable this setting! Power saving modes can throttle your WiFi performance.
Once you've adjusted these settings:
- Restart Your Computer: A restart is usually required for the changes to take effect.
- Test Your Speed Again: Run another speed test and see the difference! You should notice a significant improvement.
Beyond the Basics: Additional Speed-Boosting Tips
While adjusting your adapter settings is the big game-changer, let's explore some additional tweaks to squeeze every last drop of performance from your Windows 7 WiFi.
- Update Your Wireless Adapter Driver: Outdated drivers can cause compatibility issues. Go back to the properties screen and find the "Driver" tab. Check and update the driver from the "Device Manager" screen.
- Optimize Router Placement: Position your router in a central location, away from walls, metal objects, and other electronics that can interfere with the signal. Think of it like a lighthouse – you want it unobstructed and in a prime location to cast its beam!
- Change Your Router Channel: Your router broadcasts on a specific channel. If your neighbors are using the same channel, it can cause interference and slow down your speeds. Access your router's settings (usually by typing your router's IP address into your web browser) and try changing the channel to a less congested one.
- Limit Network Congestion: Close unnecessary applications and background processes that might be using up bandwidth. Like a busy highway, fewer cars (devices) on the network, the faster everyone can travel.
- Consider a Newer Router: Okay, I know we're focused on Windows 7, but remember the router is a very important element. If you're still experiencing issues after trying everything, consider upgrading to a newer router that supports the latest WiFi standards. It's like upgrading your car's engine – you might need the upgrade if you want to go faster!
Troubleshooting Common Windows 7 WiFi Problems
Even after applying these tricks, you might encounter difficulties. Let's troubleshoot some common pitfalls:
- "Limited Access" or "No Internet Access": This often points to a network configuration issue. Double-check your WiFi password, make sure your router is connected to the internet, and try restarting your router and computer. Don't be afraid to check the basics!
- Slow Speeds Despite Adjustments: If you've made all the recommended tweaks and speeds are still slow, the problem might lie outside of Windows 7. Contact your internet service provider (ISP) to check for any service outages or throttling. They are like the mechanic who can fix everything, even your internet!
- Intermittent Connection Drops: This could be due to interference, a weak signal, outdated drivers, or a problem with your router. Try the troubleshooting steps above, and consider moving your router or changing the channel it broadcasts on for optimal performance.
The Power of Patience and Persistence
I know, IT troubleshooting can be frustrating. But don't give up! Each step you take, from checking your speed to the advanced settings adjustments, brings you closer to WiFi bliss. Think of it like a puzzle – each piece you put together reveals a clearer picture of the problem and solution.
The Future of WiFi on Windows 7
While this trick can work wonders, it's important to acknowledge the reality. Windows 7 is an outdated OS, it's no longer supported by Microsoft. In a world of ever-evolving technology, your WiFi performance might be constrained by the age of your operating system and adapter.
When to Consider an Upgrade
Here's a dose of tough love: if you continue to struggle with WiFi speed and performance, it might be time to consider upgrading your hardware and operating system. Upgrading your operating system to Windows 10 or 11 and upgrading your hardware (like your WiFi adapter or even your entire computer) is the ultimate solution. It's like trading in your old dial-up modem for fiber optic cable.
Don't Give Up on Windows 7 Just Yet!
Don't let the age of your OS discourage you. With the information we've shared, your Windows 7 device can remain a viable machine for many tasks. The one trick explored in this article is your secret weapon!
From Zero to Hero: Reaping the Rewards
Once you've applied these tips and tricks, you'll be amazed at the difference. You'll finally be able to stream videos without buffering, hold video calls without the dreaded lag, and download files at a reasonable pace. It’s like finally being able to breathe freely after being underwater!
The Takeaway: Embrace the
Download HP Windows 8 WiFi Drivers NOW! (Fix Your Connection!)Make Your Laptop's Wifi Signal Faster On Windows 1087 Tutorial

By MDTechVideos Make Your Laptop's Wifi Signal Faster On Windows 1087 Tutorial by MDTechVideos
How to Increase Your Internet Speed Increase WiFi Speed on Laptop

By Tweak Library How to Increase Your Internet Speed Increase WiFi Speed on Laptop by Tweak Library
Make Your Laptop's WiFi Signal Faster On Windows 111087

By EasyTechGeek Make Your Laptop's WiFi Signal Faster On Windows 111087 by EasyTechGeek
Title: How to Increase Your Internet Speed For Windows 108.17 Slow Internet Speed Problem Solved
Channel: Technical worktips
How to Increase Your Internet Speed For Windows 108.17 Slow Internet Speed Problem Solved by Technical worktips
Wifi On Laptop
Windows 7 WiFi Speed? This ONE Trick Will SHOCK You!
We've all been there: staring at a buffering video, the frustration mounting with each agonizing second. You're on your Windows 7 machine, connected to your WiFi, and the internet seems to be crawling. You run a speed test and the results are… disappointing. What gives? Before you throw your hands up in exasperation and blame your internet service provider, consider this: the problem might be staring right back at you, hidden within the settings of your aging, but still capable, Windows 7 system. This isn't just about a quick fix; it's about understanding the subtle nuances of network configuration and how they can dramatically impact your perceived WiFi speed. Prepare to be amazed.
Understanding the Bottlenecks: Why Your WiFi Might Be Slow
Before revealing the "one trick," let's briefly examine the common culprits behind sluggish WiFi on Windows 7. Often, it's not about the raw speed of your internet connection. Modern routers, even older ones, broadcast a signal capable of handling significantly more bandwidth than many users realize. The problem often lies within the interpretation of that signal by your Windows 7 machine. Consider the following: outdated network drivers, incorrect wireless mode settings, interference from other electronic devices, and the number of devices competing for bandwidth. While these factors undeniably play a role, the "one trick" we’re about to reveal often provides an immediate, and substantial, performance boost.
The Shocking Truth: The Power of the Wireless Adapter Settings
The core of the solution lies within your wireless network adapter's settings. This is where the magic happens, where you can fine-tune your Windows 7 system to communicate optimally with your router. Forget about complicated router configurations for a moment; focus instead on your computer's internal settings. The changes you make here can often instantly translate into faster downloads, smoother streaming, and a more responsive online experience.
Step-by-Step Guide: Unveiling the Secret
Here’s how to unlock the hidden potential of your Windows 7 WiFi connection:
Accessing the Network Adapter Settings:
- Click the Start button.
- Type "Device Manager" in the search box and select it from the results.
- In the Device Manager window, expand the "Network adapters" category.
- Locate your wireless network adapter. The name often contains "Wireless" or "WiFi." Double-click it to open its properties.
Navigating the Advanced Tab:
- In the properties window for your wireless adapter, click on the "Advanced" tab. This tab is the key to unlocking improved performance.
The Crucial Settings to Adjust:
- Wireless Mode: This is where the "one trick" truly shines. Look for an option labeled "Wireless Mode" (or something similar, depending on your adapter). The default setting on many older Windows 7 systems might be a compatibility mode (like 802.11b/g). The crucial step is to change this to the most advanced protocol available that your router supports. This is usually 802.11n or 802.11ac. If you are unsure, consult your router's manual. This single change can dramatically improve speed because it enables the adapter to utilize the latest wireless communication protocols designed for speed. Ensure the setting that you select is compatible with the capabilities of your wireless router.
- 802.11n Channel Width: This controls the width of the communication channel being used. Setting this to "Auto" will allow the adapter to dynamically adjust the channel width. With a more advanced router, you might choose 20/40 Mhz if facing connectivity challenges or a congested wireless environment. For maximum speed, consider setting it to 40 Mhz if you have a router and a wireless card that support this configuration.
- Roaming Aggressiveness: This setting controls how aggressively your adapter searches for a better WiFi signal. Experimenting with this can affect speed and signal stability. You can try setting this to "Medium" or "High" if experiencing dropped connections, or "Low" if you frequently move around.
- Transmit Power: This controls the signal strength of your wireless adapter. Setting this to "Highest" can help with coverage and potentially speed, provided your router is close by. However, balance this with your router's transmit power setting to determine the optimal performance.
Applying the Changes and Testing:
- After making your adjustments, click "OK" to save the changes.
- Restart your computer. This ensures that the new settings are fully implemented.
- Once your computer restarts, reconnect to your WiFi network.
- Run a speed test to measure the impact of the changes (speedtest.net is a reliable option). Observe the difference in download and upload speeds, and see if the buffering issue has improved by streaming a video or browsing the internet.
Deeper Dive: Fine-Tuning Your Settings
Beyond the core settings, there are other factors to consider for optimizing your wireless adapter's performance.
- Updating Your Drivers: Outdated drivers can significantly impede performance. Within the Device Manager, right-click on your wireless network adapter and select "Update driver software." Select "Search automatically for updated driver software." Windows will search for and install any available updates. Alternatively, check the manufacturer's website for the latest drivers.
- Investigating Router Compatibility (Advanced): Even the best adapter settings won’t compensate for an old, underpowered router. Ensure your router supports at least 802.11n (and ideally 802.11ac or 802.11ax) and that its firmware is up-to-date and that its settings are optimized as well.
- Channel Selection (Expert): Wireless routers operate on different channels. If your neighborhood has many WiFi networks, they may be causing interference. In your router’s settings, try selecting a less congested channel (channels 1, 6, and 11 are generally recommended). This might require some experimentation to find the optimal channel for your environment.
Beyond the Basics: Troubleshooting Common WiFi Problems
Even after implementing these recommendations, you may encounter persistent issues. Here's a brief guide to addressing common problems.
- Slow Speed: If you're still experiencing slow speeds, double-check all your settings (adapter and router). Ensure that you have a stable internet connection by testing using a hardwired connection.
- Intermittent Connectivity: This could stem from interference, router distance, or outdated drivers. Consider placement of the router as well. For example, keep your router away from appliances generating electro magnetic waves, such as microwave ovens. Review the Roaming Aggressiveness options.
- Weak Signal: Check the physical distance between your computer and your router. Use a WiFi analyzer app on your phone to identify potential sources of interference. Consider purchasing a WiFi range extender.
The Shocking Conclusion: Unleash Your WiFi's Potential
The "one trick" isn't a magic bullet, but it is often the crucial first step in revitalizing your Windows 7 WiFi speed. By understanding your wireless adapter settings and making strategic adjustments, you can unlock a level of performance you might not have thought possible. Combine this with regular maintenance, driver updates, and a bit of troubleshooting, and you'll be well on your way to enjoying a fast, reliable, and satisfying online experience, even on your tried-and-true Windows 7 machine. Prepare to be amazed.
