how to connect to wifi pineapple on laptop
Title: Windows Internet Connection Sharing - WiFi Pineapple Mark V - Pineapple University
Channel: Hak5
Windows Internet Connection Sharing - WiFi Pineapple Mark V - Pineapple University by Hak5
WiFi Pineapple on Laptop: The SHOCKINGLY Easy Guide!
Unlocking the Digital Orchard: A Surprisingly Simple Guide to WiFi Pineapple Magic on Your Laptop!
So, you're curious. You’ve heard whispers. Tales of digital mischief and network exploration dance in your head. Chances are, you've bumped into the WiFi Pineapple. It’s a fascinating piece of kit, isn't it? It unlocks possibilities that were, until recently, the domain of movie hacking scenes. You might believe it's complicated, but prepare to be pleasantly surprised. We’re going to demystify the process.
What Exactly Is a WiFi Pineapple?
Think of a WiFi Pineapple as a Swiss Army knife for network pen-testing. It's a purpose-built device. In essence, it's designed to interact with wireless networks. It allows you to sniff for information. Further, you can potentially gather data. But, remember that ethical considerations are paramount. We're talking about responsible exploration here. The goal is to understand how networks work. It's also about learning how to protect yourself.
Why Your Laptop is the Perfect Launchpad
Why use a laptop, you might wonder? Well, it allows for portability. You can set it up almost anywhere. Secondly, laptops possess processing power. They allow you to analyze data. Finally, they offer a familiar interface. So, it is much more straightforward.
Gathering Your Arsenal: Essentials for Pineapple Adventure
First, you'll need a WiFi Pineapple. You'll find various models. Consequently, research which suits your requirements best. Next, you’ll need a laptop, of course. And obviously, we can't forget the necessary software. This usually includes tools designed to interact with the Pineapple. You’ll likely need a USB connection. You can use this to connect the Pineapple to your laptop. Also, a network adapter can be helpful.
Setting Up Your Digital Playground: The Initial Steps
The initial setup involves connecting your Pineapple to your laptop. This is done via USB. Next, you will need to configure your laptop. You will need to download necessary software. Be sure to review the instructions. You should be able to find them online. This will make the process smoother. Remember, patience is key. It is vital to understand everything.
Diving into the Interface: Navigating the GUI
The WiFi Pineapple has a graphical user interface (GUI). This can be accessed through your web browser. This makes it user-friendly. The GUI allows you to control the device. You can configure different parameters. You can launch various attacks. Familiarize yourself with the interface. Explore the different menu options. In this way, you will get a good feel for it.
Unleashing the Power: Exploring Key Features
The WiFi Pineapple unlocks several powerful features. First, there's the ability to capture data. You can use this to analyze network traffic. Next, you can perform evil twin attacks. This involves setting up a fake access point. This can be tricky. Moreover, there's the ability to log data.
Ethical Considerations: Walking the High Wire of Network Security
It’s essential that you use this knowledge responsibly. Don't misuse it. Never try to access networks without authorization. Use your skills only for ethical purposes. Think about network security. This is important to protect you. Respect privacy. Be mindful of the legal ramifications. Also, be aware of the ethical consequences.
Troubleshooting the Trenches: Common Bumps and How to Smooth Them Out
Problems can arise. But don't worry. First, double-check your connections. Make sure everything is properly linked. Second, verify that your software is correctly installed. Sometimes, a simple restart is all it takes. In addition, you should consult online resources. The community offers help and solutions. Finally, remember to consult the user manual.
Expanding Your Horizons: Next Steps in Network Exploration
Once you have mastered the basics, continue learning. Explore more advanced features. Experiment in a controlled environment. Learn from experienced users. In the end, practice and constant learning are the keys to success.
Conclusion: The Journey Begins Now
You’ve now entered the world of WiFi Pineapple use. It’s an exciting and fascinating field. Your journey of discovery begins now. This knowledge can empower you. So, explore with curiosity. Protect yourself and others. With responsibility, you can discover its full potential.
Laptop to Printer Wireless Setup: The Easiest Way EVER!WiFi Pineapple on Laptop: The SHOCKINGLY Easy Guide!
Alright, buckle up, because we're about to dive headfirst into the world of ethical hacking, wireless security, and the coolest little gadget you might not have heard of: the WiFi Pineapple! Now, before your heart starts racing and you imagine yourself in a black trench coat, let me clarify: this guide is all about learning, understanding, and responsibly exploring the potential of a WiFi Pineapple. Think of it as a digital Swiss Army knife for the network enthusiast, a tool that, when used correctly, can illuminate the hidden world of wireless communication. And the best part? We’re going to learn how to use it on a laptop, making it super accessible.
1. Unveiling the Mystery: What IS a WiFi Pineapple?
Imagine a tiny, unassuming box, but instead of holding pineapple chunks (though a tasty snack wouldn't hurt!), it houses a powerful suite of tools designed to sniff out and analyze Wi-Fi networks. Think of it as a sophisticated eavesdropper, but one armed with the capability to actively probe, test, and understand the vulnerabilities of a wireless environment. We're talking about a device specifically built for penetration testing – ethically, of course. Think of it as a digital locksmith trying to pick the locks of various networks, but instead of stealing anything, they’re merely checking to see if the locks are any good.
2. Why a Laptop? Maximizing Pineapples’ Power
Now, you might be thinking, "Why not just use the Pineapple's built-in interface?" And you're right, there are some models that are stand-alone. But using a WiFi Pineapple on a laptop unlocks a whole new world of possibilities. Think of your laptop as the command center, the brains of the operation. It gives you:
- Increased Processing Power: Your laptop’s got more juice than the Pineapple alone, allowing for faster data analysis and more complex operations.
- Larger Screen: Seeing the data in a clear, organized way is crucial. Big screen, big insights!
- Customization: You can install additional software tools alongside the Pineapple interface, enhancing its capabilities.
- Mobility: Taking your Pineapple investigation on the go becomes easier by relying on your laptop’s connectivity.
3. Gathering Your Arsenal: What Do You Need?
This is the easy part! Here's your shopping list:
- A WiFi Pineapple: Duh! Choose the model that fits your budget and hacking ambition. (Beginner to Pro)
- A Laptop: Windows, macOS, or Linux – pick your poison.
- A USB cable: To connect the Pineapple to your laptop. Gotta have a good connection!
- Patience: Because learning takes time. Like mastering the perfect pancake flip.
4. Preparing for Launch: Pineapple Setup and Configuration
Before you charge into the digital wilderness, you’ll need to configure your Pineapple. The precise steps will vary slightly depending on your model, but generally, you'll follow these steps:
- Connect: Plug the Pineapple into your laptop via the USB cable.
- Power Up: Wait for the Pineapple to boot up. Some have indicator lights to show when it’s ready.
- Access the Interface: Open a web browser and navigate to the Pineapple’s IP address. It's usually provided in the documentation. Think of it as the Pineapple's home address.
- Initial Setup: Follow the on-screen instructions to establish a connection!
5. Diving In: Exploring Key Pineapple Modules
The fun begins! The WiFi Pineapple comes equipped with a variety of modules, each designed for a specific task. Familiarize yourself with these key tools:
- PineAP: This is your bread and butter. PineAP is an advanced rogue access point that can impersonate known networks, luring devices to connect. It's like setting up a very attractive fake fishing hole.
- Karma: A slightly older, but still functional, technique – Karma automatically responds to probe requests, tricking devices into connecting.
- Sniffing: This feature lets you capture and analyze wireless traffic, revealing valuable information about network usage, websites visited, and possibly even passwords (which you absolutely should not use except with permission).
- Reporting: The Pineapple will generate reports, making it easier for you to analyze your findings.
6. Ethical Hacking 101: The Golden Rules
Here’s where we get serious. Ethical hacking is all about responsible exploration. Always remember these fundamental rules:
- Get Permission: Never, ever test a network without explicit permission from the owner. This is not a suggestion – it’s the law.
- Respect Privacy: Handle any data you gather with utmost care. Never access personal information without consent.
- Learn and Understand: Use the Pineapple’s capabilities to understand network vulnerabilities, not to exploit them for malicious purposes. Think of it as understanding the fundamentals of a lock to then use a different type of lock.
7. Setting Up PineAP: The Bait for the Digital Fish
Let’s get hands-on. PineAP is generally the first module you’ll use. Depending on the Pineapple setup, you might need to enable it through the control panel. Then configure the settings:
- SSID List: Define which networks you want to mimic.
- Channel Selection: Which frequencies the Pineapple should broadcast on.
- Deauthentication: A very useful feature, it forces devices to disconnect from their networks and prompt them to reconnect to your Pineapple, in the hopes they would select it instead. This is a powerful tool, so use it responsibly.
8. Sniffing the Airwaves: Capturing and Analyzing Traffic
Once PineAP is running, it’s time to sniff the airwaves. This involves capturing the wireless traffic streaming through the environment. You can then delve into this captured data to understand how wireless networks work and to possibly spot any vulnerabilities.
- Enable Sniffing: Activate the sniffing module in the Pineapple’s interface.
- Choose Filters: You can filter the traffic to focus on specific types of data, like HTTP requests or email traffic.
- Analyze Results: Use the Pineapple’s built-in tools or export the data to tools like Wireshark (your laptop's sidekick in this adventure) for in-depth analysis.
9. Unmasking the Weaknesses: What To Look For
Okay, so you've collected data. What do you actually look for? Here are some key things to focus on:
- WPA/WPA2 Vulnerabilities: Is the network using outdated or weak security protocols? This is like seeing a house with a flimsy lock.
- Open Networks: Are there any open, unsecured networks? These are like wide-open doors.
- Password Reuse: Are people using the same password across multiple accounts? This is a common, but dangerous, practice.
- Unencrypted Traffic: Are websites using HTTPS? If not, sensitive data like passwords could be transmitted in the clear.
10. The Power of Knowledge: Using Your Findings Ethically
The goal isn’t to break things; it's to understand how things work and how to make them safer. Use your findings to:
- Educate: Share your knowledge with others ethically, explaining the dangers of weak security.
- Report Vulnerabilities: If you find vulnerabilities in networks you have permission to test, report them to the network administrator so they can be fixed.
- Improve Your Own Security: Apply your learnings to harden the security of your own wireless network, avoiding the weaknesses you've discovered on the road.
11. Troubleshooting: When Things Go Wrong
Expect some bumps in the road. Here’s a quick troubleshooting guide:
- Pineapple Not Connecting: Double-check the USB cable, power, and IP address.
- Interface Not Loading: Make sure your laptop and Pineapple are on the same network. Also, try a different web browser.
- Traffic Not Being Captured: Ensure the Pineapple is properly configured to capture data on the appropriate channels and frequencies.
If you're still stuck, the Pineapple community is a fantastic resource!
12. Level Up: Advanced Techniques and Modules
Once you’re comfortable with the basics, explore the more advanced modules and techniques:
- DNS Spoofing: Redirecting website traffic to a malicious server.
- Man-in-the-Middle Attacks: Intercepting and manipulating communication.
- Custom Scripts: Enhance the Pineapple's functionality with custom scripts.
- Integration with Other Tools: Integrate the Pineapple data with other security auditing and testing tools.
13. Staying Safe: The Legality of WiFi Pineapple Use
As we've emphasized, ethical hacking is crucial. Always operate within the legal boundaries. The legality of using a WiFi Pineapple depends on your location and the network you're testing. Get the appropriate permission, and remain aware of your local laws and regulations.
14. Beyond the Basics: Continuing Your Learning
There's always more to learn! Here are some resources to help you on your journey:
- The WiFi Pineapple Documentation: The official guide.
- Online Forums and Communities: Connect with other users to ask questions and share insights.
- Penetration Testing Courses: Seek out certified courses to deepen your knowledge.
WiFi Pineapple NANO Windows Setup

By Hak5 WiFi Pineapple NANO Windows Setup by Hak5
WiFi Pineapple TETRA Linux Setup

By Hak5 WiFi Pineapple TETRA Linux Setup by Hak5
Wi-Fi Pineapple Mark VII Setup Guide 2024 Easy Step-by-Step Tutorial

By GhostStrats Wi-Fi Pineapple Mark VII Setup Guide 2024 Easy Step-by-Step Tutorial by GhostStrats
Title: Wifi Pineapple Initial Setup and configuration
Channel: The Cybersecurity Blog
Wifi Pineapple Initial Setup and configuration by The Cybersecurity Blog
Wifi On Laptop Phone
WiFi Pineapple on Laptop: Unleash the Power with Effortless Configuration
The world of network security can seem daunting, but with the right tools and the right approach, you can transform your understanding of wireless vulnerabilities and enhance your own security posture. This comprehensive guide breaks down the process of using a WiFi Pineapple with your laptop, making the powerful penetration testing abilities accessible to even the most novice user. Forget the complex setups; we’ll walk you through a streamlined process designed for simplicity and effectiveness.
Getting Started: Assembling Your Arsenal
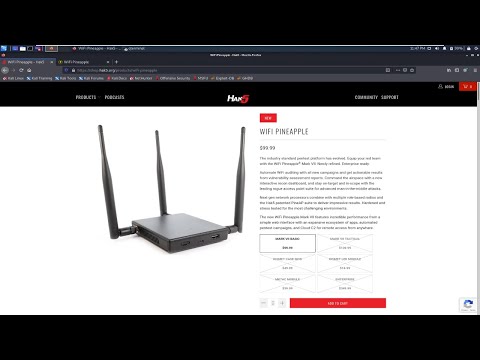
Before you embark on this exciting journey, let’s ensure you have everything you need. The core component, of course, is the WiFi Pineapple. We will focus on the Mark VII version for this guide, as it represents the latest evolution of this powerful tool. For this setup, we will need to use the WiFi Pineapple in combination with a laptop.
- A WiFi Pineapple (Mark VII Recommended): This is your central device, the heart of your wireless penetration testing efforts. Ensure it is fully charged or connected to a power source.
- A Laptop: This is your command center. Any laptop with Wi-Fi capabilities and a web browser will suffice.
- Ethernet Cable: This will be used to connect from your laptop to the WiFi Pineapple device.
- Network Adapter (Optional): In some cases, you might need a USB network adapter for your laptop to allow you to simultaneously connect to your home network and the WiFi Pineapple.
Initial Setup: Priming the Pineapple
The initial setup is the gateway to unlocking the WiFi Pineapple's capabilities. This process ensures your Pineapple is ready to receive commands from your laptop.
- Power Up Your Pineapple and Connect to Your Laptop: Connect the provided ethernet cable from your laptop to the WiFi Pineapple.
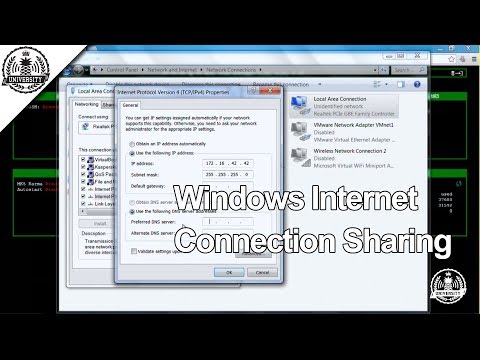
- Configure your Laptop for Static IP: Your laptop needs to be on the same subnet as the Pineapple to establish a connection. You need to configure your laptop's network adapter to use a static IP address.
- For Windows: Navigate to Network and Sharing Center, then click on "Change adapter settings." Right-click on your Ethernet adapter and select "Properties." Double-click on "Internet Protocol Version 4 (TCP/IPv4)." Select "Use the following IP address" and enter the following information:
- IP Address:
172.16.42.42 - Subnet mask:
255.255.255.0 - Default gateway:
172.16.42.1
- IP Address:
- For macOS: Go to System Preferences > Network. Select your Ethernet connection, then click "Advanced." In the TCP/IP tab, configure the IPv4 settings to use:
- Configure IPv4: Manually
- IP Address:
172.16.42.42 - Subnet Mask:
255.255.255.0 - Router:
172.16.42.1
- For Windows: Navigate to Network and Sharing Center, then click on "Change adapter settings." Right-click on your Ethernet adapter and select "Properties." Double-click on "Internet Protocol Version 4 (TCP/IPv4)." Select "Use the following IP address" and enter the following information:
- Access the Pineapple's Interface: Open your web browser and enter
172.16.42.1in the address bar. If prompted, use the default credentials: usernamerootand passwordchangeme. Change this default password immediately after logging in for security.
Navigating the Dashboard: Your Command Center
Once logged in, you'll be greeted by the WiFi Pineapple's intuitive dashboard. This is where you'll manage all aspects of your penetration testing activities. Familiarize yourself with the following sections:
- Dashboard: Provides an overview of the Pineapple's status, including network connection status, and active modules.
- Modules: The heart of the Pineapple's functionality. Here, you'll find a vast library of pre-built modules designed for various tasks, from rogue access point creation to password cracking.
- Config: Where you'll manage the Pineapple's network settings, update the firmware, and configure other system-level options.
- Logs: Tracks activities performed by the Pineapple, including events, errors, and successful exploits.
- CLI: Provides access to the command-line interface (CLI) for advanced configurations and troubleshooting.
Essential Modules: Deploying Key Capabilities
The WiFi Pineapple's power stems from its modular design. A few essential modules form the cornerstone of many penetration tests.
- PineAP: The PineAP module is a powerful tool for creating rogue access points, capturing client probes, and manipulating wireless networks. This module enables the Pineapple to passively monitor and interact with nearby wireless devices. Within PineAP, you can specify the SSIDs (Service Set Identifiers, or network names) that the Pineapple will broadcast, enabling it to lure unsuspecting devices to connect.
- Karma: Karma is another module that is well-matched with PineAP, designed to quickly intercept client connections. Karma works by responding to probe requests by wireless devices. When a device searches for known networks, Karma will respond with the SSID of the networks, even the access points are not available. This can lead to the device connecting to the Pineapple instead.
- DNS Spoof: The DNS Spoof module allows you to redirect DNS (Domain Name System) requests, essentially redirecting users to a malicious website of your choosing. We can set a specific website to redirect to.
- Captive Portal: The captive portal module allows you to create a splash page. The splash page is designed to look like a legitimate network login and can be used to capture login credentials.
Hands-On Examples: Putting the Pineapple to Work
Let's dive into practical examples to illustrate how to leverage the WiFi Pineapple's capabilities.
- Creating a Deceptive Access Point: Using the PineAP Module, you can create a fake network and lure clients to connect, allowing them to sniff traffic.
- Navigate to the Modules section and select PineAP.
- Enable PineAP.
- Under "SSIDs," add the name of your desired target (e.g., a popular public WiFi network).
- Configure any desired settings, especially the channel.
- Save and launch.
- Ensure that you have the appropriate permissions to test the settings. Do not use this to test on a network that you do not have permission to test on.
- Harvesting Credentials via Captive Portal: If you want to capture credentials, it can be done via the Captive Portal module.
- In the Captive Portal module, design a login page that mimics a legitimate network.
- Configure the Pineapple to redirect users to the Captive Portal.
- Monitor the logs.
Staying Safe: Ethical Considerations and Legal Boundaries
Using tools like the WiFi Pineapple comes with significant ethical and legal responsibilities. It is crucial to understand your legal boundaries to avoid causing harm.
- Always Obtain Permission: Never attempt to test a network without explicit permission from the owner.
- Respect Privacy: Refrain from capturing personal data beyond what is necessary for your tests.
- Know Your Local Laws: Network security laws vary by location. Research and comply with all applicable laws and regulations.
- Use For Educational Purposes: The WiFi Pineapple is an extraordinary learning tool. Use it to deepen your understanding of network security in a controlled environment.
Advanced Techniques: Expanding Your Arsenal
Once you become comfortable with the basics, you can explore more advanced techniques.
- Scripting with the CLI: The command-line interface (CLI) offers granular control over the Pineapple. Explore scripting to automate tasks and customize your assessments.
- Module Development: For the truly advanced, consider learning how to create your own modules to extend the Pineapple's capabilities.
Troubleshooting: Common Issues and Solutions
Even the most experienced users encounter issues. Here's how to address some common problems.
- Connectivity Issues: Double-check your network settings and ensure your laptop is properly connected to the Pineapple via Ethernet.
- Module Conflicts: Some modules may conflict with each other. Disable conflicting modules to restore functionality.
- Firmware Problems: Always ensure you have the latest firmware installed.
Conclusion: Mastering the Wireless Realm
Using a WiFi Pineapple with your laptop is a powerful way to understand, and defend against, wireless threats. By following this guide, you've equipped yourself with the knowledge and skills to get started. Remember that learning is an ongoing journey. Continuously explore the features of the WiFi Pineapple, and stay updated with the latest security trends.
