damage antenna wires laptop wifi

Title: Replace the Wireless Antenna Cables HP Pavilion Gaming Notebook HP Support
Channel: HP Support
Replace the Wireless Antenna Cables HP Pavilion Gaming Notebook HP Support by HP Support
Laptop WiFi Dead? Antenna Wire Disaster! (Easy Fix Inside!)
Laptop WiFi Woes? Is Your Antenna Wire the Culprit?
Have you ever stared blankly at your laptop screen, willing the WiFi to connect? That frustrating spinning circle, the dreaded "no internet access" message – we've all been there. It's enough to make you throw your device across the room. But before you succumb to digital despair, there’s a likely suspect for your connection catastrophe: the often-overlooked antenna wire!
Spotting the Sneaky Culprit: The Symptoms of a Broken Antenna Wire
So, how do you know if your WiFi woes are related to this tiny, yet mighty, component? Well, the symptoms are usually pretty obvious. Your laptop might stubbornly refuse to find any wireless networks. Alternatively, it may detect networks but fail to connect. The signal strength might be extremely low, even when you're close to your router. Another possibility is intermittent connection drops. One moment you're surfing smoothly, and the next, you're abruptly cut off. These are all strong indicators that something is amiss with your antenna wire. In essence, you are experiencing a signal problem.
Unveiling the Wireless World Within: Understanding the Antenna's Role
Think of your laptop’s WiFi antenna like a radio receiver. It's tasked with capturing those invisible radio waves that carry your internet signal. The antenna wire acts as the crucial link. This connection transmits data. It connects the antenna to the WiFi card. Damage to this tiny wire, however, can cripple its ability to receive and transmit data effectively. Thus, it ends up hindering your internet access.
Peeling Back the Layers: Locating the Antenna Wire (and the Potential Problems)
Now, let's get a little more hands-on. Locating the antenna wire involves a bit of detective work. You'll need to carefully open up your laptop. First off, power down your laptop and disconnect the power adapter. Then you should remove the battery. Afterward, you will need a screwdriver to remove the screws holding the bottom cover in place. This process varies slightly, depending on your laptop model. Therefore, refer to your laptop's manual or perform a quick online search with your laptop’s model number and the phrase "disassembly."
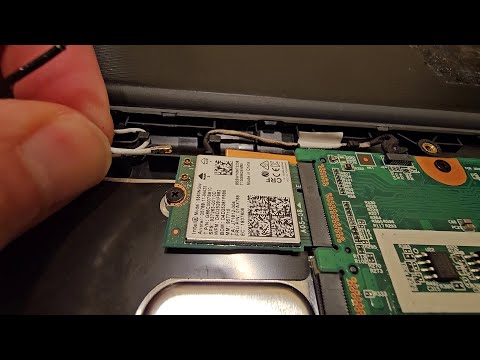
Once you’ve opened your laptop, you'll likely find the WiFi card near the bottom. Now, look closely. You'll see two or three small wires. These are the antenna wires. They are often thin and delicate. They are usually attached to the WiFi card with tiny connectors. Examine the wires. For example, are they disconnected? Are they frayed? Have they been pinched or broken? In addition, check the connections on the WiFi card. Similarly, inspect the points where the wires attach to the antenna itself, which is typically located in the laptop's screen.
Repair Time: Simple Fixes for a Damaged Antenna Wire
If you've identified a problem with the antenna wire, don’t panic! Moreover, there is a good chance you can fix the issue yourself. Here’s how:
Reconnect a Disconnected Wire: If the wire has simply come loose from the WiFi card, gently plug it back in. The connectors are usually small. Consequently, be careful not to force them.
Secure a Loosened Connector: If a connector feels loose, gently crimp it with a small pair of needle-nose pliers.
Replace a Damaged Wire: However, if the wire is frayed or broken, you'll need to replace it. You can purchase replacement antenna wires online. Ensure you get the correct type for your laptop model. Indeed, the different types vary. Disconnect your laptop as mentioned before. Remove the broken wire. Connect the new wire in the same way.
Inspect the Antenna: The antenna itself could be damaged. Therefore, inspect it if necessary.
Preventative Measures: Keeping Your Antenna Wire Happy and Healthy
Prevention is always better than cure. You can take a few simple steps to protect your antenna wire from future problems.
Handle your laptop with care. Avoid dropping it or putting excessive pressure on it.
Be gentle when opening and closing your laptop. Don't force the screen open or closed.
Avoid bending the screen back too far. This can put stress on the antenna wires.
Clean the inside of your laptop regularly. Dust and debris can interfere with the WiFi signal.
Back in the Game: Reaping the Rewards of a Fixed Connection
Once you’ve finished your repair, reassemble your laptop carefully. Then power it on and reconnect to your WiFi network. If you’ve successfully addressed the antenna wire issue, you should see a strong signal. Now your internet access should be back to normal. Finally, you can again enjoy seamless browsing, streaming, and connecting.
Conclusion: Don’t Let WiFi Woes Hold You Back!
A malfunctioning antenna wire can be a frustrating problem. However, as you can see, it’s often a manageable issue. With a little patience and these simple steps, you can get your laptop’s WiFi humming again. So, don't let those connection problems get you down! Take control, troubleshoot, and get back to what matters most.
Laptop WiFi Dead? This One Weird Trick Will SHOCK You!Laptop WiFi Dead? Antenna Wire Disaster! (Easy Fix Inside!)
Alright folks, let’s be honest. There’s nothing quite as frustrating as staring at that little WiFi icon on your laptop and seeing… nothing. Nada. Zilch. The dreaded "No internet connection" message. It’s like being stranded on a digital desert island, miles from the oasis of cat videos and online shopping. We've all been there, right? Panic sets in. Is my internet provider to blame? Is the router possessed? Has the digital apocalypse finally arrived? Before you start blaming everyone and everything, let’s take a deep breath and consider a surprisingly common culprit: the elusive and often-overlooked antenna wire inside your laptop. Trust me, this tiny, often-misunderstood component is the unsung hero (or sometimes, the villain) of your wireless connectivity. This article isn't just about fixing your WiFi; it's about empowering you to become your own tech superhero.
1. The Silent Killer: Why Your Laptop WiFi Suddenly Dies
So, what exactly goes wrong? Well, the antenna wire, in simplest terms, is the messenger. It’s the tiny cable that carries the radio waves that your laptop "listens" to for WiFi signals. Imagine it as a super sensitive ear that's crucial to your laptop's ability to hear the internet. Sometimes, that ear gets muffled, disconnected, or damaged. The most common reasons for a dead antenna wire are:
- Physical Damage: This is the big one. Laptops get tossed around, bumped, dropped, and generally subjected to the rough and tumble of daily life. A sudden impact can dislodge, break, or fray the delicate antenna wire. Think of it like a tiny, fragile thread.
- Age and Wear: Over time, the delicate connections within your laptop can simply wear out. The constant opening and closing of your laptop lid can put stress on the wires near the hinges. It's like a rubber band stretched too many times.
- Manufacturing Defect: While less common, sometimes the antenna wire isn't properly connected during manufacturing, or the wire itself is faulty.
- Overheating: Excessive heat can damage the wire's insulation, leading to signal loss.
2. Symptoms You Can't Ignore: Clues Your Antenna Wire Is the Culprit
Before we dive into the fix, how do you know if the antenna wire is really the problem? Here are some telltale signs:
- Weak or No WiFi Signal: This is the most obvious. You might see a few bars of signal strength, but the connection is incredibly unstable, or you get absolutely nothing at all.
- Intermittent Connectivity: Your WiFi might work for a few minutes, then drop out. This is often a hint that the connection is shaky, like a loose wire causing an electrical short.
- Slow Internet Speed: Even when you are connected, your internet might be agonizingly slow. This can be a sign of signal degradation due to a faulty wire struggling to send and receive data.
- Problems with Bluetooth: In some laptops, the same antenna wire is used for both WiFi and Bluetooth. If your Bluetooth devices aren’t connecting or are glitching, it could be another clue.
- Error Messages: You may see cryptic error messages related to network adapters, or receive messages like "Limited Connectivity" or "Unable to connect to this network."
3. Gathering Your Supplies: What You'll Need (And What You Won't!)
Okay, so you suspect the antenna wire. Now what? Don’t worry, you don’t need to be a tech wizard to tackle this. The good news is that this is often a reasonably straightforward fix. Here's what you'll need:
- A Small Phillips Head Screwdriver Set: You'll need at least one that is very small. Those tiny screws are a killer, so get a good set.
- Isopropanol Alcohol (90% or higher): This is for cleaning the connectors. Be careful. Make sure your laptop is off and unplugged.
- Cotton Swabs: For applying the alcohol to clean things.
- A Well-Lit Workspace: You need to see what you're doing.
- Patience: This isn't a race. Take your time.
- Optional: A Magnifying Glass: Can be very useful, especially if your eyesight isn't what it used to be.
What you won't need: Specialized tools, advanced tech skills, or a trip to the repair shop (probably!).
4. The Grand Disassembly: Opening Up Your Laptop (Carefully!)
This is the part where you feel like a secret agent. But relax! It's less complicated than it looks. Here's the basic process:
- Power Down and Unplug: Always, always shut down your laptop completely and unplug the power adapter before you start.
- Remove the Battery (If Possible): Some laptops have easily removable batteries. If yours does, take it out for added safety.
- Flip Your Laptop Over: Place it screen-down on a soft surface (a blanket, a towel, anything to protect the screen).
- Locate the Screws: There will be screws on the bottom of your laptop. You may need to remove screws to access service panels. Your laptop's service manual or an online guide (search for your laptop model + "disassembly") can show you exactly where they are.
- Keep Track of the Screws: This is crucial. Put them in a small tray, a container, or stick them on a piece of tape in the order you removed them. Trust me, they all look the same until you need them!
- Gently Pry Open the Case: Once you’ve removed the screws, carefully pry the laptop case open. Use a plastic pry tool or a credit card. Go slow and be gentle.
- Refer to a Guide: This is where a tear-down video or guide specific to your laptop model becomes invaluable. Search online for "[Your Laptop Model] disassembly" to find one.
5. Locating the Culprit: Finding the Antenna Wires
Once you're inside, finding the antenna wires is the next step. They usually run along the edges of the laptop screen and connect to the WiFi card (often located near the center of the laptop or the top of the screen). Look for:
- Thin, Coaxial Cables: These are the antenna wires themselves. They'll likely be black, grey, or white and have small connectors on the ends.
- The WiFi Card: This is a small circuit board with a few antennas connected to it.
6. The Inspection: Searching For Issues With the Antenna
Now, for the detective work. Take a close look at the antenna wires and their connectors. Pay close attention to:
- Loose Connections: Are the wires securely attached to the WiFi card? Gently try to wiggle them. They should be snug.
- Damaged Wires: Look for any fraying, kinks, cuts, or breaks in the antenna wires. Any of these can interrupt the signal.
- Corrosion or Residue: Check the connectors for any signs of corrosion or dirt. It's less common, but it can happen, especially near the hinge (if you spilled something there, for example).
7. The Simple Fix: Reseating the Antenna Wires
Often, the problem is as simple as a loose connection. Here's what you can do:
- Disconnect the Wires: Gently pull the antenna wire connectors straight up from the WiFi card. Don't yank on the wires themselves.
- Clean the Connectors: Dip a cotton swab in isopropyl alcohol and gently clean the connectors on both the wires and the WiFi card. Let them dry completely.
- Reconnect the Wires: Carefully push the antenna wire connectors back onto the WiFi card. They should click or snap into place. Make sure they are seated properly.
8. The More Involved Fix: Repairing or Replacing Damaged Wires
If you find a damaged wire, you have a few options:
- Inspect the Damage: Is it a simple kink? You might be able to gently straighten it. But be very careful, as they're easily broken.
- Tape the Wire: Can the wire be taped with electrical tape, but do not cover any connection points.
- Attempt a Repair: This is tricky and only for those comfortable with electronics. You can sometimes solder a broken wire, but you'll need a fine-tip soldering iron and a steady hand.
- Replace the Wire: The best option is to replace the wire entirely. You can usually find replacement antenna wires specifically for your laptop model online. This will involve gently removing the old wire and then snaking the new one through the laptop case.
9. The Reassembly: Putting Everything Back Together
Once you've addressed the antenna wire issue, it's time to put your laptop back together.
- Snap the case back together: Gently close the laptop. Do not force it.
- Screw it back together: Replace all the screws you removed.
- Reinstall the battery Place back into the laptop.
- Reboot and Test: Before, place back into
How to remove and reattach WiFi antenna cables
By James Has Answers How to remove and reattach WiFi antenna cables by James Has Answers
Wifi antenna cable connector repair Kablosuz anten kablosu konnektr onarm

By Merakl Bilgisayarc Wifi antenna cable connector repair Kablosuz anten kablosu konnektr onarm by Merakl Bilgisayarc
How to repair WiFi antenna connector

By CRM How to repair WiFi antenna connector by CRM

Title: Laptop wifi antenna repair Perth
Channel: cirrus Link Repair
Laptop wifi antenna repair Perth by cirrus Link Repair
Laptop Working
Laptop WiFi Dead? Antenna Wire Disaster! (Easy Fix Inside!)
The frustration is palpable. You settle in, ready to work, stream, or connect with loved ones, only to discover your laptop's Wi-Fi connection is stubbornly refusing to cooperate. The little Wi-Fi icon in the system tray, once a reassuring beacon of connectivity, now displays a dreaded red 'X' or perhaps a frustratingly low signal. The internet, that ubiquitous lifeline of the modern world, seems maddeningly out of reach. You've tried the usual troubleshooting steps: restarting your laptop, checking your router, and perhaps even yelling at your device in a moment of exasperation. But still, no luck. The culprit might be simpler, and easier to fix than you think: a disconnected or damaged Wi-Fi antenna wire. Dive in, and let's get you back online.
Understanding the WiFi Antenna and Its Vital Role
Before diving into the fix, let's briefly explore the crucial role the Wi-Fi antenna plays in your laptop's wireless communication. Your laptop's Wi-Fi card, often integrated into the motherboard, translates data into radio waves and vice-versa. These radio waves are then transmitted or received by the antenna. Think of the antenna as the messenger, constantly sending and receiving the signals that allow your laptop to 'talk' to your router and access the internet. Most laptops utilize two or more antennas, often strategically placed within the display lid or around the laptop's frame, to optimize signal reception and transmission. These antennas are connected to the Wi-Fi card via delicate, thin coaxial cables, each ending in a tiny connector that snaps onto the card. These are the antenna wires we're focusing on.
Identifying the Problem: Pinpointing the Antenna Wire Issue
Now, let's diagnose the problem. The most common cause of dead or intermittent Wi-Fi on a laptop is a problem with one or both of these antenna wires. Here's how to investigate:
Visual Inspection: The first step is a visual inspection. This requires opening your laptop, generally a straightforward process, but one that varies slightly between manufacturers and models. (Refer to your laptop's service manual or search online for model-specific disassembly guides before proceeding. These often readily available through a simple Google search.) Disconnect the power adapter and remove the battery for safety. Once inside, carefully examine the Wi-Fi card area. Look for the antenna wires. These are typically very thin, black, gray, or sometimes white coaxial cables. Follow their path. Are any of the wires disconnected from the Wi-Fi card? Are they frayed, pinched, or damaged in any way? Are the connectors loose? This visual check can immediately reveal the source of your Wi-Fi woes.
Symptom Analysis: Consider what happened immediately before Wi-Fi failure. Did you drop your laptop? Did you subject it to extreme temperatures or moisture? Did you recently upgrade or repair other components? These events can often provide clues as to the issue. A physical shock, for example, could dislodge an antenna wire from its connector without any visible external damage.
Software Checks (Secondary): While software issues are less likely to directly cause a total Wi-Fi failure, it's worth checking the basics just in case. Verify that the Wi-Fi adapter is enabled in the Windows settings (or your operating system's network configurations). Open Device Manager (search for it in the Windows search bar) and check for any yellow exclamation marks next to your Wi-Fi adapter, suggesting a driver issue. Uninstalling and reinstalling the Wi-Fi adapter drivers can sometimes resolve software-related problems, but if your antenna wires are the actual culprits, this will prove ineffective.
Step-by-Step Repair: Reconnecting and Replacing Antenna Wires
Assuming your visual inspection reveals a disconnected or damaged antenna wire, here's a step-by-step guide to restoring your Wi-Fi connection:
Gather Your Tools: You'll need a few essential tools:
- A Small Phillips Head Screwdriver: For removing the screws securing the laptop's case.
- A Plastic Pry Tool (or Spudger): A non-conductive tool to gently pry apart the laptop's components. This prevents damage. A guitar pick or even a thin credit card can sometimes work in a pinch.
- Anti-Static Wrist Strap: To ground yourself and prevent electrostatic discharge (ESD) from damaging sensitive electronic components. This is crucial.
- Replacement Antenna Wires (If Necessary): If the wires are damaged, you'll need replacements. Identify your laptop model and search for "Wi-Fi antenna wires for [your laptop model]" online. Ensure you select the correct type, length, and connector style.
- Tweezers (Optional but helpful): For manipulating the tiny antenna connectors.
- Magnifying Glass (Optional but helpful): For better visibility of small connectors and points.
Disassembly (Proceed with Caution): Refer to your laptop’s service manual or online disassembly guide. Carefully remove the screws securing the laptop's case. Use the plastic pry tool to gently separate the case halves. Work slowly and methodically, paying close attention to any clips or latches that secure the panels.
Locate the Wi-Fi Card: The Wi-Fi card is usually a small, rectangular card, often located near the bottom or side of the laptop. It will have the antenna wires connected to it.
Reconnect the Antenna Wires: If a wire has simply become disconnected, this is the easiest fix. Gently align the antenna wire connector with the corresponding connector on the Wi-Fi card. Press the connector down until it clicks into place. Ensure it is firmly seated. If the connector is difficult to access, use tweezers to carefully guide and secure it.
Replace Damaged Antenna Wires: If the antenna wires are damaged, you'll need a replacement. Carefully disconnect the old wires from the Wi-Fi card and the antenna. Note the routing of the wires to replicate properly. Install the replacement wires, ensuring they're properly connected to both the Wi-Fi card and the antennas.
Reassembly and Testing: Carefully reassemble your laptop, reversing the disassembly steps. Make sure all screws are replaced and secure. Reconnect the battery and power adapter. Power on your laptop. Check your Wi-Fi connection. If your Wi-Fi is working, congratulations!
Troubleshooting After the Repair
If, after reconnecting or replacing the antenna wires, your Wi-Fi still does not work, consider these additional troubleshooting steps:
Check Antenna Placement: Ensure that the antennas are correctly positioned within the laptop's lid or frame. Poor placement can significantly reduce signal strength.
Driver Reinstallation: Although less likely to be the primary cause, reinstalling your Wi-Fi adapter drivers can sometimes resolve software-related issues after a hardware repair. Download the latest drivers for your laptop model from the manufacturer's website.
Wi-Fi Card Failure? If both visual inspection and wire replacement have been unsuccessful, the Wi-Fi card itself may be faulty. Replacing the card is a slightly more involved process, but the cost of replacement is often reasonable.
Preventing Future Antenna Wire Disasters
While troubleshooting is essential, prevention is always the best medicine. Here are some precautions:
- Handle Your Laptop with Care: Avoid dropping your laptop or subjecting it to extreme physical stress.
- Gentle Handling: When opening or closing the laptop lid, do so gently. Avoid excessive force, which could damage the antenna wires.
- Safe Environments: Protect your laptop from extreme temperatures and moisture. These can damage internal components.
- Regular Cleaning: Regularly clean the laptop's vents and fan to prevent overheating, which can inadvertently damage components.
By following these steps, you can diagnose and repair antenna wire issues, bringing your laptop's Wi-Fi back to life. And now, no more frustration, just seamless connectivity.
