how to make my laptop a wifi hotspot windows 8.1

Title: Turn Windows 8 Laptop into WiFi HotSpot How To
Channel: TechEmpty
Turn Windows 8 Laptop into WiFi HotSpot How To by TechEmpty
Turn Your Windows 8.1 Laptop into a WiFi Hotspot: The Easiest Trick EVER!
Unleash Your Inner WiFi Wizard: Transforming Your Windows 8.1 Laptop into a Hotspot
Hey there, tech enthusiast! Ever found yourself yearning for a Wi-Fi connection when one’s nowhere in sight? Perhaps you're stuck in a digital desert, desperate to stream your favorite shows or check that crucial email? Well, get ready for a game-changer. I’m about to reveal a super-slick trick. It’s the easiest way to turn your Windows 8.1 laptop into a personal Wi-Fi hotspot. Prepare to be amazed!
Why Bother? The Undeniable Benefits of a Portable Hotspot
Firstly, why should you even care about this nifty ability? Think of it like this: your laptop becomes a personal Wi-Fi fortress. Suddenly, you have a portable internet connection. This is hugely advantageous when you’re on the go. Consider those long train rides or airport layovers. Think of the freedom! You can connect your phone, tablet, or any other Wi-Fi enabled device. Furthermore, it's ideal in situations with limited Wi-Fi access. Imagine a hotel with a sluggish connection or a coffee shop with spotty service.
The Simple Setup: Crafting Your Own Wireless Oasis
So, how do you actually pull this off? It’s shockingly simple. You don’t need to be a tech guru. Thankfully, Windows 8.1 makes it remarkably straightforward. Let’s walk through the process; let's break it down step-by-step.
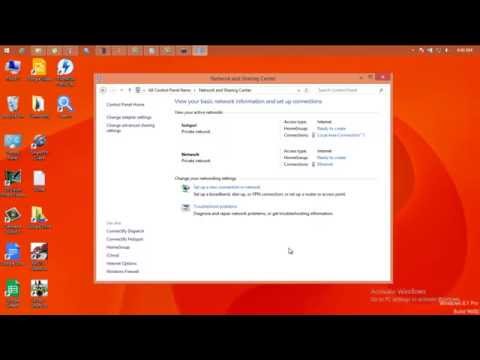
First off, you'll need a working internet connection on your laptop. This could be via Ethernet or a pre-existing Wi-Fi network. Once connected, right-click on the Start button. Then, select "Network Connections." A window will pop up. Now, you'll spot your active network connection. Right click. This is important. Therefore, choose "Open Network and Sharing Center."
Next, navigate to "Change adapter settings" on the left-hand-side of the window. You'll see all your available network adapters. Now, identify the one that's currently providing your internet access. Usually, it will be labeled based on your current connection. For example, "Wi-Fi" or "Ethernet."
Now, right-click on that network adapter. Select "Properties." A properties window will emerge. Here, tap the "Sharing" tab. Crucially, tick the box that says "Allow other network users to connect through this computer's Internet connection."
Configuring Your Hotspot: Creating a Secure Network
After checking the "sharing" box, a "Home network connection" dropdown will likely appear. Choose "Wi-Fi." If not, select the network adapter that corresponds to your Wi-Fi. Now, click "OK".
However, you're not quite done yet. You'll now need to create a password for your hotspot. This vital step protects your connection from unauthorized access. The last thing you want is someone piggybacking on your internet!
Therefore, right-click the Wi-Fi icon in the system tray (bottom right corner). Select "Open Network and Sharing Center." On the left-hand side, choose "Change adapter settings." Right-click on your Wi-Fi adapter. Select "Properties."
On the properties window, go to the "Networking" tab. Scroll down. Now, double-click "Internet Protocol Version 4 (TCP/IPv4)." In the new window, generally, you will not have to change anything here. However, confirm that the settings are set to obtain the IP address and DNS server address automatically. Click "OK". Click "OK" again on the properties window.
Activating the Magic: Turning Your Laptop into a Wi-Fi Beacon
Now, how do you actually enable this hotspot? This is where the fun begins! Because the method relies on a hidden feature, a few small steps are needed. Sadly, the user interface in Windows 8.1 doesn’t provide a direct, intuitive way to toggle the hotspot.
Let’s fire up the Command Prompt. Press the Windows key + R. This will open the Run dialog. Type "cmd" and hit Enter. The Command Prompt window should appear.
Here, you’ll input several commands. First, type netsh wlan set hostednetwork mode=allow ssid=[YourHotspotName] key=[YourPassword] and press Enter. Substitute "[YourHotspotName]" with your desired network name. Replace "[YourPassword]" with a secure password. Use a strong password. This is very important!
Next, type netsh wlan start hostednetwork and press Enter to begin the hotspot. A confirmation message will appear. This indicates your portable hotspot is now broadcasting!
Troubleshooting: Smoothing Out the Bumps Along the Way
Sometimes, even the best-laid plans don't always go smoothly. Experiencing issues? Don't worry! A few common problems can easily be resolved.
Firstly, double-check your internet connection. Make sure your laptop is actually connected to the internet. Secondly, verify you’ve entered the correct commands into the Command Prompt. Thirdly, ensure your laptop's Wi-Fi adapter is enabled. This can be managed through the Network and Sharing Center.
If the hotspot isn’t starting, try restarting your laptop. Occasionally, a simple reset can fix various technical glitches. Additionally, investigate your antivirus or firewall settings. Sometimes, these programs might block the hotspot functionality. Adjust settings accordingly.
Embrace the Freedom: You're Now a Connectivity Connoisseur
Congratulations! You’ve successfully transformed your Windows 8.1 laptop into a Wi-Fi hotspot. Now you can share your internet connection with other devices. Whether it's for work, leisure, or keeping in touch, the possibilities are limitless. Embrace the freedom of a personal Wi-Fi cloud. Enjoy the benefits of having a secure internet connection, wherever you are! So, go forth, and conquer the digital world. The world is yours, one Wi-Fi signal at a time.
Laptop Offline? SHOCKING Google Search Trick!Turn Your Windows 8.1 Laptop into a WiFi Hotspot: The Easiest Trick EVER!
Hey there, tech enthusiasts and fellow internet nomads! Ever found yourself in a situation where you desperately needed Wi-Fi but were staring at a connection-less abyss? Maybe you're in a hotel with crummy Wi-Fi, or perhaps your phone's data is about to hit the wall. Well, guess what? Your Windows 8.1 laptop can be your savior! We're talking about turning your trusty laptop into a fully functional Wi-Fi hotspot. And the best part? It's ridiculously easy. Forget wrestling with complicated software or wading through endless tutorials. We're here to break it down, making it as simple as ordering a pizza (and arguably, more satisfying!).
1. The Wi-Fi Hotspot Revelation: Why You Need This Trick
Think of your laptop as a powerful Wi-Fi router disguised as a portable workstation. This "easiest trick ever" unlocks this hidden superpower, allowing you to share your internet connection with phones, tablets, and even other laptops. It’s like having a personal Wi-Fi bubble wherever you go. Consider the possibilities:
- Sharing a wired connection: You're in a hotel with only an Ethernet cable? Boom! Hotspot activated.
- Data plan extender: Conserve your phone's precious data by using your laptop's connection.
- Emergency connectivity: When public Wi-Fi fails you, your laptop doesn’t (usually!).
It’s a bit like being a modern-day internet Robin Hood, sharing the digital wealth!
2. Prerequisites: What You'll Need Before We Begin
Before we dive in, let's make sure you have everything you need. Luckily, it's a short list!
- A Windows 8.1 laptop: Obvious, right? If you're reading this, chances are you're already halfway there!
- An active internet connection: This could be from an Ethernet cable, a USB data dongle, or even a Wi-Fi network that you can connect to.
- Patience (and a dash of excitement!): This isn’t brain surgery, but it does require a few simple steps.
Got it? Excellent! Let’s roll.
3. Unveiling the Magic: The Command Prompt Approach (The Secret Sauce)
Forget digging through endless menus! The easiest and most reliable way to create a Wi-Fi hotspot on Windows 8.1 involves the Command Prompt. Don't worry; we're not going to write lines of code that look like hieroglyphics. We'll just be typing a few simple commands. Think of it as whispering the magic words!
3.1 Open the Command Prompt as Administrator
This is crucial. You need administrator privileges to make changes to your network settings. Here’s how:
- Press the Windows key and the "X" key simultaneously. A menu will pop up.
- Click on "Command Prompt (Admin)". If you see "PowerShell (Admin)", that's fine, too. They basically do the same thing here.
- You may be prompted to allow the app to make changes to your device. Click "Yes."
3.2 Creating the Virtual Wi-Fi Network (The Genesis)
This is where the fun begins! In the Command Prompt window, type the following commands, and press Enter after each one:
netsh wlan set hostednetwork mode=allow ssid="YourHotspotName" key="YourPassword"- Replace
"YourHotspotName"with the name you want for your Wi-Fi network (e.g., "MyAwesomeHotspot"). Make it memorable, but keep it professional! - Replace
"YourPassword"with a strong password (at least 8 characters). Don't use "password" or your birthday!
- Replace
netsh wlan start hostednetwork
And that's it, folks! You've just created your virtual Wi-Fi hotspot. We told you it was easy!
4. Sharing Your Internet Connection: The Final Step
Now, we need to tell your laptop to share its existing internet connection with the new hotspot.
- Open the Network Connections settings. You can search for "View network connections" in the Start Menu (or by pressing Windows key then "I" and then typing "network").
- Identify your active internet connection (e.g., "Ethernet", or the name of your current Wi-Fi network if you're connected wirelessly).
- Right-click on that connection and select "Properties."
- Click the "Sharing" tab.
- Check the box that says "Allow other network users to connect through this computer's Internet connection."
- In the "Home networking connection" dropdown, select "Local Area Connection [number]" (This is usually created when you set up the hostednetwork). If multiple items are listed, select the one that corresponds to the Microsoft Hosted Network Virtual Adapter.
- Click "OK."
You've now essentially told your laptop to act as a router, sharing its internet connection with the Wi-Fi hotspot you created!
5. Connecting Your Devices: The Moment of Truth
Grab your phone, tablet, or another laptop. Go to the Wi-Fi settings on the device you want to connect. You should see your "YourHotspotName" listed. Select it and enter the password you created. Boom! Connected! You're officially sharing your internet connection, just like a pro. Think of the possibilities; all of your devices connected seamlessly.
6. Troubleshooting Common Hiccups: When Things Go Sideways
Sometimes, things don't go exactly as planned. Here are a few quick fixes for common problems:
- "The hosted network couldn't be started": Make sure your Wi-Fi adapter is working correctly and that you’re connected to the internet. Sometimes, a simple restart solves the problem.
- Devices can connect but have no internet: Double-check your internet connection sharing settings (step 4). Make sure the correct adapter is selected.
- Slow speeds: The speed of your hotspot depends on the speed of your original internet connection. Also, consider that multiple devices sharing the connection will decrease speeds.
Don't panic; most issues are easily resolved.
7. Stopping the Hotspot: Shutting Down the Wi-Fi Party
When you're done with the hotspot, you can easily shut it down to conserve battery and prevent unintended use.
- Open Command Prompt as Administrator (as you did earlier).
- Type
netsh wlan stop hostednetworkand press Enter.
Your Wi-Fi hotspot is now deactivated.
8. Maximizing Performance: Tips and Tricks for a Smooth Experience
- Strong password: A strong password is essential to secure your network.
- Location, location, location: Place your laptop in a central location for better signal coverage.
- Limit connected devices: The more devices connected, the slower the connection will be.
- Consider a wired connection for your laptop: If possible, use an Ethernet cable to connect your laptop to the internet. This will provide a faster and more stable connection for your hotspot.
9. Expanding Your Horizons: Beyond Basic Sharing
Once you've mastered the basics, there's even more you can do with your laptop hotspot
- Monitor usage: Some software can track data usage on your hotspot.
- Set connection limits: Limit the number of devices that can connect for better performance.
- Advanced configurations: Explore advanced settings to customize your hotspot’s behavior.
10. Why Windows 8.1? Still Relevant in a World of Updates
You might be wondering, "Why are we focusing on Windows 8.1?" Well, believe it or not, there are still millions of people out there using this operating system. Maybe you have an older laptop that still chugs along or perhaps prefer the interface. The point is, this trick works flawlessly, keeping older tech alive and kicking.
11. The Beauty of Simplicity: Avoiding Complicated Software
Unlike some other methods, this Command Prompt approach keeps things simple. You don’t need to install bulky software or worry about bloatware slowing down your system.
12. Embracing the Power Within: Your Laptop's Hidden Potential
We often underestimate the power of our laptops. This simple trick is a testament to the hidden capabilities that are just waiting to be unlocked! We are not just using a computer; we are unlocking a portal to digital freedom.
13. The Art of the Digital Nomad: Wi-Fi Freedom on the Go
For those who travel frequently or work remotely, this can be a lifesaver. Think of the peace of mind knowing you always have a backup connection.
14. Beyond the Basics: Exploring Alternative Methods (Briefly)
While the Command Prompt is the easiest method (trust us!), there are alternative ways to create a hotspot:
- Third-party software: Many apps offer hotspot functionality. But, why install extra software when a built-in feature works perfectly?
- Mobile hotspot devices: These are standalone devices, but they cost money and require an extra gadget. By now, you should not need them!
15. Your WiFi Liberation: Wrapping It All
Lenovo Laptop WiFi Nightmare? FIX IT NOW!Turn your Windows 8 Laptop into Wifi Hotspot

By Tricks That Make you Smart Turn your Windows 8 Laptop into Wifi Hotspot by Tricks That Make you Smart
Make a Wi fi Hotspot Using your Windows 8 Laptop

By Syed Shah Zahurullah Hussaini Make a Wi fi Hotspot Using your Windows 8 Laptop by Syed Shah Zahurullah Hussaini
Create WiFi Hotspot in windows 8.1, 8, 7 LaptopPC
By ANDREW CRUZ Create WiFi Hotspot in windows 8.1, 8, 7 LaptopPC by ANDREW CRUZ

Title: How to create wifi hotspot in windows 88.1 Easy method 100 works
Channel: Engineerhoon
How to create wifi hotspot in windows 88.1 Easy method 100 works by Engineerhoon
Laptop Working
Let's get started!
Turn Your Windows 8.1 Laptop into a WiFi Hotspot: The Easiest Trick EVER!
Are you struggling with limited internet connectivity? Do you find yourself tethered to your home or office network, yearning for the freedom to browse, work, or stream from anywhere? If so, you're in for a treat. We're about to unveil a remarkably simple process that transforms your Windows 8.1 laptop into a powerful WiFi hotspot, effectively sharing your existing internet connection with multiple devices. This opens up a world of possibilities, from extending your network’s reach to providing internet access for your friends and family, all without the need for any additional hardware or complicated setup.
Understanding the Power of a Windows 8.1 WiFi Hotspot
Before we delve into the ‘how-to’, let's appreciate the sheer convenience of having a personal WiFi hotspot at your disposal. Imagine being able to connect your smartphone, tablet, or even another laptop to the internet, all using your laptop’s existing connection. This is particularly useful in situations such as:
- Traveling: You can easily share your laptop's internet connection with your other devices in a hotel or public space where only a single device can connect.
- Limited Access: If your primary internet provider is unreliable, you can use your smartphone’s mobile data as a hotspot, and then rebroadcast it through your laptop.
- Guest Connectivity: Need to provide internet access to guests visiting your home, but don’t want to share your primary network password? Your laptop hotspot is the perfect solution.
- Troubleshooting Network Issues: If your home router is malfunctioning, your laptop hotspot can offer a temporary, reliable connection, allowing you to diagnose the problem without losing internet access for critical tasks.
The advantages extend far beyond these specific scenarios. A laptop-turned-hotspot is a versatile tool. Now, let's unlock this potent capability.
Step-by-Step Guide: Creating Your Windows 8.1 WiFi Hotspot
The process of transforming your Windows 8.1 laptop into a WiFi hotspot is surprisingly straightforward. Follow these simple steps, and within minutes, you’ll be broadcasting your own personal network:
Accessing the Command Prompt (as Administrator): This is the nerve center of our operation. To begin, you'll need to open the Command Prompt with administrative privileges. There are several ways to do this:
- Search Bar: Click on the Windows "Start" button. In the search bar, type "cmd." Right-click on "Command Prompt" in the results and select "Run as administrator."
- Power User Menu: Press the "Windows key + X" simultaneously. From the menu that appears, select "Command Prompt (Admin)."
Regardless of the method, ensure you open the Command Prompt as an administrator. Failure to do so will prevent you from executing the necessary commands.
Setting Up the Hosted Network: Now for the technical magic. We will use the
netshcommand, a powerful networking utility. In the Command Prompt, type or copy and paste the following command and press Enter:netsh wlan set hostednetwork mode=allow ssid="YourHotspotName" key="YourPassword"netsh wlan set hostednetwork: This is the command that tells Windows to set up a hosted network.mode=allow: This parameter enables the hosted network.ssid="YourHotspotName": This is crucial. Replace"YourHotspotName"with the name you want to use for your WiFi hotspot. This will be the name that appears when devices scan for available WiFi networks. Choose a name that is easy to remember, and perhaps even a little distinctive, to avoid confusion with other networks that might be nearby.key="YourPassword": Replace"YourPassword"with a strong, secure password for your hotspot. This password protects your network from unauthorized access. Choose a password that is at least eight characters long, combines uppercase and lowercase letters, numbers, and symbols. Consider using a password manager to generate and store your passwords securely.
After executing the command, the result will be confirmation on the command prompt screen that confirms the settings: "The hosted network mode has been set to allowed." and "The SSID of the hosted network was successfully changed." and "The user key of the hosted network was successfully changed." Remember that the Command prompt will show warnings if it does not have those permissions.
Starting the Hosted Network: Now that the hosted network is configured, it's time to start it. In the Command Prompt, type or copy and paste the following command and press Enter:
netsh wlan start hostednetworkThe result is the confirmation of the start of the hosted network to provide internet access. A simple confirmation message will appear: "The hosted network started."
Sharing Your Internet Connection: Once the hosted network is running, you need to enable internet connection sharing. This is the final piece of the puzzle. Follow these steps:
- Open Network Connections: Press the "Windows key + R," type
ncpa.cpland press Enter. This will open the "Network Connections" window. - Identify Your Internet Connection: Locate the network adapter that's currently providing your laptop's internet connection. This is typically labeled "Ethernet" (if you're using a wired connection) or "Wi-Fi" (if you're using a wireless connection).
- Access Sharing Settings: Right-click on your internet connection adapter and select "Properties."
- Go to the "Sharing" Tab: Click on the "Sharing" tab in the properties window.
- Enable Internet Connection Sharing: Check the box that says "Allow other network users to connect through this computer's Internet connection."
- Select Your Hosted Network: In the "Home network connection" dropdown menu, select the name of the hosted network you created earlier (e.g., "YourHotspotName").
- Apply Changes: Click "OK" to save the changes.
If these steps are successful, your hosted network will now be sharing your internet connection. Your devices will be able to connect to your hotspot and access the internet.
- Open Network Connections: Press the "Windows key + R," type
Troubleshooting Common Issues
Despite its simplicity, sometimes things don't go as planned. Here are a few common issues and their solutions:
- "The hosted network couldn't be started." This error can occur for a number of reasons. It may be that your laptop’s wireless adapter does not support the hosted network feature, or there might be a conflict with another network adapter. Ensure your wireless adapter driver is up to date. Try restarting your laptop. If the issue persists, it may be a compatibility problem with your specific hardware.
- Devices Can Connect but No Internet Access: This is usually a problem with internet connection sharing. Double-check that you've correctly enabled internet connection sharing and that the correct network adapter is selected in the "Home network connection" dropdown menu. Also, ensure that your laptop is actually connected to the internet (test by browsing on the laptop itself). It may also be worth temporarily disabling any firewalls on your laptop to see if that's blocking internet access for connected devices.
- Password Issues: If your devices are unable to connect, verify you have the correct password for your hotspot. Make sure you did not make a mistake. Retype it carefully.
- Disabling the Hosted Network: If you no longer need your hotspot, you can easily disable it by going to the command prompt and typing the command:
netsh wlan stop hostednetwork.
Advanced Customization: Tailoring Your Hotspot
The steps outlined above establish a basic hotspot. But you can further customize its behavior and settings with some additional tweaks.
- Changing Your Hotspot Name and Password: To change your hotspot’s name (SSID) or password, simply re-run the
netsh wlan set hostednetworkcommand with the new desired values. Remember to also restart the hosted network (netsh wlan start hostednetwork) for the changes to take effect. - Viewing your Adapter Details: To see specifics about your adapter and its capabilities, you can find a lot of information using the Device Manager. Search Device Manager in the search box. Right-click on your wireless network adapter. Select the "Properties" option. Under the "Driver" tab, you can check for driver updates.
- Using Different Encryption Protocols: Windows 8.1 typically uses WPA2-Personal encryption by default, which is a secure standard. However, advanced configuration options are available if you have specific security requirements. These options might involve changing the encryption type, or even implementing more advanced security features, but these are often beyond the needs of the basic hotspot setup.
- Power Management Consideration: Be mindful of your laptop's power settings. If your laptop is set to turn off the wireless adapter to save power, this will also disable your hotspot. You'll need to adjust your power plan settings to prevent this. Go to "Control Panel" > "Hardware and Sound" > "Power Options" and adjust the settings.
Maximizing the Effectiveness of Your Hotspot
To ensure optimal performance and reliability, keep the following in mind:
- Signal Strength: The range of your hotspot is limited by the capabilities of your laptop’s wireless adapter. The closer your
