how to turn on wifi in windows 10 dell laptop

Title: Fix Dell Laptop Wi-Fi is Not Working Problem in Windows 1087 2025
Channel: FIXsage
Fix Dell Laptop Wi-Fi is Not Working Problem in Windows 1087 2025 by FIXsage
how to turn on wifi in windows 10 dell laptop, how to enable wifi on windows 10 dell laptop, how to turn on wireless capability in windows 10 in dell laptop, how to turn on wifi on dell laptop
Unlock Your Dell's Wi-Fi: The Windows 10 Secret!
Unleash Your Dell's Wireless Wonder: A Windows 10 Expedition!
Welcome, fellow Dell enthusiasts! We're embarking on a journey today. We are diving into the captivating world of your Dell's Wi-Fi capabilities. Are you ready to unlock the hidden potential? You're in the right place. Windows 10 holds the key. Let's explore the secrets within.
Decoding Dell's Wireless Puzzle: Initial Steps
Firstly, let's address the basics. Does your Dell connect? If not, don't fret. The first step involves checking the physical switch. Locate it on your laptop's frame. Ensure it's in the "on" position. Next, examine your keyboard shortcuts. Often, a function key (Fn) combined with another activates Wi-Fi. This can vary, though. Look for the Wi-Fi symbol on your keyboard.
Troubleshooting Wi-Fi Woes: A Detective's Guide
Still no joy? It's time for some detective work. Start by verifying your network connection. Is your router functioning correctly? Check other devices for connectivity. If all else fails, proceed to further diagnostics. Open the "Settings" app. Then, select "Network & Internet.” Inspect your Wi-Fi status. Is Wi-Fi enabled? Perhaps there's a simple software glitch.
Beyond that, consider restarting your Dell entirely. This is often a magic fix. It clears any temporary issues. If the problem persists, consult your Device Manager. Search for "Device Manager" in the Windows search bar. Expand the "Network adapters" section. Look for your wireless network adapter. Is it listed with an error? This is important to remember.
Unearthing the Hidden Drivers: The Key to Connectivity
Now, let's discuss the often-overlooked drivers. Drivers are the unsung heroes. They are essential for hardware functionality. Outdated or missing drivers can cause Wi-Fi troubles. How to find them? Visit Dell's support website. Input your service tag or model number. Then, download the latest wireless adapter drivers. Don't skip this step. It's crucial for optimal performance.
Subsequently, install the downloaded drivers. Follow the on-screen instructions carefully. Reboot your Dell after the installation. This refreshes the system. It also allows the drivers to take effect. Hopefully, these steps resolve the issue. However, there's more to uncover.
The Power of Network Settings: Navigating the Labyrinth
Subsequently, we will explore network settings. Occasionally, incorrect configurations hinder Wi-Fi access. Access the "Network & Internet" settings again. Click on "Change adapter options.” Right-click on your Wi-Fi adapter. Select "Properties.” Ensure the "Internet Protocol Version 4 (TCP/IPv4)” is selected. Double-click it. Verify the IP address settings. These settings might be set up incorrectly.
Moreover, you should consider your router. Your router's settings deserve attention. Check your router's documentation. Ensure your Wi-Fi password is accurate. Sometimes, a simple password mistake is to blame. Also, consider your Wi-Fi channel. Try changing the channel on your router. This can reduce interference.
Unlocking Windows 10's Wi-Fi Secrets: Advanced Techniques
Besides the basic troubleshooting, we'll explore advanced methods. Windows 10 has some hidden gems. The built-in troubleshooter is a valuable tool. It automatically diagnoses and fixes Wi-Fi issues. Access it via "Settings" -> "Network & Internet" -> "Status." Then, click on "Network troubleshooter." Let it run its course.
Also, consider resetting your network settings. This is a more drastic measure. But, it can resolve many complex problems. Access the "Settings" app. Go to "Network & Internet" -> "Status." Then, click on "Network reset." Be warned, this will erase your previously saved network passwords.
Maintaining Optimal Wi-Fi Performance: Tips and Tricks
Finally, let's discuss ongoing maintenance. Consistent performance is the goal. Keep your drivers updated regularly. Also, occasionally restart your Dell. That keeps things fresh. Secure your Wi-Fi network with a strong password. Regularly check for interference. Position your Dell strategically for better signal. This can make all the difference.
Moreover, consider your environment. Avoid placing your Dell near other electronic devices. These devices can cause interference. They can disrupt your Wi-Fi signal. Also, check your router's firmware. Ensure it’s up-to-date for performance.
Conclusion: Embracing Dell's Wireless Future!
In conclusion, we have ventured into the world of Dell Wi-Fi. We’ve explored troubleshooting steps and advanced techniques. We have also discussed ongoing maintenance. Now, use this knowledge. Unlock your Dell's true wireless potential. Experience seamless connectivity. Enjoy the digital world. Happy surfing, everyone!
Dell WiFi Nightmare? FIX It NOW! (Easy Steps!)Unlock Your Dell's Wi-Fi: The Windows 10 Secret!
Hey there, fellow tech enthusiasts! Ever stared at your Dell laptop, feeling like it's developed a sudden aversion to Wi-Fi? Frustrating, isn’t it? We've all been there, that moment of panic when the little Wi-Fi icon in the corner decides to stage a protest. Fear not! Today, we're diving deep into the nitty-gritty and uncovering the Windows 10 secrets to getting your Dell back online. It's easier than you think, and trust me, you're not alone in experiencing these digital hiccups. Think of this as your personal Wi-Fi recovery guide, crafted with a generous helping of empathy and a dash of tech wizardry. Let's get started!
1. The Mystery of the Missing Connection: Why Your Dell Might Be Silent
First things first: let's diagnose the problem. Before you start tearing your hair out (or, you know, throwing your laptop across the room), let's understand why your Dell might be stubbornly refusing to connect. Is it a ghost in the machine? Probably not. More likely, it's one of a few common culprits. Think of it like this: your Dell needs the Wi-Fi "signal" to act as a "bridge" for communicating, just like how a person needs a phone to speak.
- Faulty Drivers: Drivers are the unsung heroes of your computer, the little programs that allow your hardware to talk to Windows. An outdated, corrupted, or missing driver is often the root of the problem.
- Hardware Switch Troubles: Some Dell laptops have a physical Wi-Fi switch (sometimes on the side or front). Is it accidentally turned off? It’s a simple check, but a crucial one! It's like trying to start a car without the key in the ignition.
- Network Adapter Issues: Your Dell's network adapter, the internal component that handles Wi-Fi, can sometimes malfunction. Think of it as the antenna that captures the wireless signals, and if it stops working, you’re offline.
- Software Glitches: Windows 10, being a complex piece of software, can sometimes have its own little glitches that interfere with Wi-Fi connectivity. Like unexpected traffic jams blocking a road.
2. Checking the Obvious: The Elementary Detective Work
Before we dive into the more complicated stuff, let's do some elementary detective work. We have to rule out the obvious. This is like checking if your car has gas before calling a mechanic.
- The Wi-Fi Switch: As mentioned, this is the first thing to look for. Is the physical switch on? The power equivalent of a plug.
- Airplane Mode: Make sure Airplane Mode (usually accessible in the Action Center, the notification icon in the bottom-right corner) is off. Airplane Mode effectively shuts down all wireless connections.
- Router Reset: Sometimes, the problem isn't your Dell, but your router. Try restarting your router; it’s often the digital equivalent of a good night's sleep for your network.
- Other Devices: Do other devices in your home connect to Wi-Fi? If not, the issue is likely with your internet service, not your Dell.
3. Diving Deeper: Troubleshooting with Windows 10 Tools
Okay, the basics are covered. Now, let's wield some Windows 10 tools to troubleshoot further. Windows 10 has built-in utilities designed to help diagnose and fix Wi-Fi problems.
- Network Troubleshooter: This is your first line of defense. Go to Settings > Network & Internet > Status and click "Network troubleshooter". It's like having a tech-savvy friend who is always ready to offer helpful suggestions
- Airplane Mode Toggle: A simple on-off-on cycle can sometimes reset the network adapter. Use the Action Center or the Settings app (Network & Internet) to toggle Airplane Mode
- Network Reset: This resets all network settings to their defaults. Go to Settings > Network & Internet > Status > Network reset. This can be helpful for resolving deep-seated problems that can be done through the interface.
4. Driver Dilemmas: Updating and Reinstalling
Drivers are the most frequent cause of Wi-Fi woes. Let’s make sure they're in tip-top shape.
- Update Your Drivers: Right-click the Start Button, then choose "Device Manager". Expand "Network adapters", right-click your Wi-Fi adapter (it will likely have "Wireless" in the name), and select "Update driver". Choose "Search automatically for drivers". Windows will find the newest version.
- Uninstall and Reinstall: If updating doesn't work, try uninstalling the driver. In Device Manager, right-click the Wi-Fi adapter and select "Uninstall device". Then, restart your Dell. Windows will usually reinstall the driver automatically. If not, you can download the latest driver from the Dell support website.
- Roll Back Driver: If a recent update has caused the problem, you can "roll back" to a previous driver version in the Device Manager (select "Properties" from the right-click menu, then go to the "Driver" tab and look for "Roll Back Driver").
5. The Router's Role: Checking Your Home Base
Sometimes the problem isn't your Dell, but your router.
- Check the Router's Configuration. Make sure your router is broadcasting a Wi-Fi signal, and that it is set to the proper settings.
- Restart Your Router. Turn off your router for a few minutes and then turn it back on. Its a tried-and-true method.
- Change Your Router's Channel. If you live in a crowded area, the channel your router is using might be overcrowded with other Wi-Fi signals. You can change your router's channel in its settings.
6. Advanced Techniques: Power Cycling and Command Prompt
For those who aren't afraid of a little tech sleuthing, here are some more advanced techniques.
- Power Cycle: Turn off your Dell, unplug the power adapter, and remove the battery (if removable) for about a minute. This can sometimes reset hardware issues. Then, plug everything back in and restart.
- Command Prompt Magic: Open Command Prompt as an administrator (search for "cmd" in the Start menu, right-click, and choose "Run as administrator"). Try these commands, pressing Enter after each one:
netsh winsock resetnetsh int ip resetipconfig /releaseipconfig /renewipconfig /flushdns- Restart your Dell.
7. Firewall and Antivirus: The Security Check
Sometimes, your firewall or antivirus software can block your Wi-Fi connection.
- Temporarily Disable: Temporarily disable your firewall and antivirus software to see if that resolves the issue. Just remember to re-enable them afterward to protect your computer.
- Check Settings: Check your firewall and antivirus settings to make sure it doesn't have rules blocking your Wi-Fi adapter.
8. Windows Updates: Keeping it Current
Keeping Windows 10 updated is essential for security and compatibility.
- Check for Updates: Go to Settings > Update & Security > Windows Update, and click "Check for updates".
9. Hardware Inspection: Physical Checks
Rarely, the Wi-Fi card itself might be faulty.
- Internal Inspection (Expert Level): If you're comfortable opening your Dell, you could inspect the Wi-Fi card (often a small card located under the bottom panel). Make sure it's properly seated.
- Professional Help: If you’re not comfortable disassembling your laptop, it’s best to take your Dell to a professional repair technician.
10. The Wi-Fi Analyzer: Finding the Best Signal
A Wi-Fi analyzer is a handy tool.
- Download and Install: Download a Wi-Fi analyzer app (there are many free options).
- Analyze Your Network: The app will show you the Wi-Fi channels and the strength of the signals. This can help you determine if there's interference.
11. Troubleshooting with the Dell Support Assistant
Dell laptops often comes with a built-in support tool.
- Launch the Assistant: Open the Dell Support Assistant and run diagnostic tests. This can help identify hardware issues.
12. Resetting Network Settings: A Digital Do-Over
If all else fails, resetting your network settings may be the key.
- Settings > Network & Internet > Status > Network reset. This restores all your network settings to their defaults.
13. The Internet Connection Troubleshooter: A Last Resort
If the previous suggestions did not work, then we may explore alternatives.
- Settings > Update & Security > Troubleshoot > Internet Connections. This built-in troubleshooter attempts to detect and resolve common connectivity problems.
14. Consider Resetting Your Dell (Use with Caution!)
As a last resort when other methods have failed, consider a factory reset. Be warned: this will erase all your data, so be sure to back up your important files beforehand.
- Settings > Update & Security > Recovery > Reset this PC. This lets you reinstall Windows 10.
How to Turn on Wifi on Window 10 in Laptop Wifi Not Turning on Problem Solved Wifi Turned Off

By Zeeshan Awan How to Turn on Wifi on Window 10 in Laptop Wifi Not Turning on Problem Solved Wifi Turned Off by Zeeshan Awan
Fix WiFi Not Showing in Settings On Windows 10 Fix Missing WiFi 2025

By Sandeep Singh Fix WiFi Not Showing in Settings On Windows 10 Fix Missing WiFi 2025 by Sandeep Singh
NEW FIX WiFi Not Showing in Settings on Windows 10 in HINDI Fix WiFi Problem
By Techno Uplift NEW FIX WiFi Not Showing in Settings on Windows 10 in HINDI Fix WiFi Problem by Techno Uplift

Title: laptop wifi turn back off manually laptop wifi not working
Channel: As Technical
laptop wifi turn back off manually laptop wifi not working by As Technical
Laptop Wifi Hotspot
Unlock Your Dell's Wi-Fi: The Windows 10 Secret!
We understand the frustration. You're eager to get online, to connect to the vast digital world, and your Dell laptop, a dependable companion, refuses to cooperate. The Wi-Fi icon stubbornly displays a lack of connection, and the promise of instant access to information and entertainment fades. But fear not! Within the intricate architecture of Windows 10 lies a carefully guarded secret, a key that can unlock the full Wi-Fi potential of your Dell. We’re here to guide you, step-by-step, transforming your connectivity woes into seamless browsing and uninterrupted productivity.
Diagnosing the Digital Divide: Initial Checks
Before diving deep into Windows 10's settings, a preliminary inspection is crucial. Think of it as a physician taking your vitals before prescribing a treatment. This initial assessment can often reveal a surprisingly simple solution, saving you time and unwarranted technical stress.
First, visually assess your Dell laptop. Is the Wi-Fi indicator light illuminated? If not, it suggests the Wi-Fi adapter might be disabled. A simple solution: check for a physical wireless switch on your Dell. Often found on the side or front of the laptop, this toggle can inadvertently turn off your Wi-Fi. Ensure it's in the "on" position.
Next, examine the Windows 10 system tray, located at the bottom right of your screen. Look for the Wi-Fi icon, typically represented by a series of curved lines. If a red "X" appears on the icon, it signifies a problem. Clicking it often provides initial troubleshooting suggestions, such as identifying available networks or running the network troubleshooter.
Finally, observe the networks listed. Are any available? Select your usual Wi-Fi network (the one you know is password protected), and enter your password. Avoid mistyping the password, as repeated incorrect entries can lead to temporary network lockouts. Always double-check the entered password before proceeding.
If, after these initial checks, the Wi-Fi problem persists, we’ll progress to the more advanced Windows 10 settings.
Deciphering the Wireless Adapter: Device Manager Deep Dive
The heart of your Dell's wireless capabilities lies within the network adapter. Accessing and examining this crucial component is paramount to resolving connectivity issues. Windows 10's Device Manager provides a centralized hub for all hardware; its functions make it an indispensable tool in this troubleshooting journey.
To open Device Manager, you can employ several methods. The most direct method involves pressing your Windows key and "X", then choosing "Device Manager" from the menu. Alternatively, you can type "Device Manager" into the Windows search bar and select the matching result.
Once Device Manager is open, locate "Network adapters," a category encompassing all network-related hardware. Click the arrow to expand this section. Within this expanded list, you should see your Dell's wireless network adapter, often identified by names like "Intel Wireless" or "Dell Wireless."
Examine the network adapter's icon. A downward-pointing arrow indicates the adapter is disabled. Right-click the adapter and select "Enable device" to activate it. A yellow exclamation mark next to the adapter signifies a driver problem. In this case, right-click the adapter and select "Update driver." Choose "Search automatically for drivers." Windows 10 will search for and install the latest drivers. If Windows can’t find the drivers, you might need to download them from the Dell support website, using another device with internet access.
After updating the driver, restart your Dell laptop. The Wi-Fi adapter should now be functioning correctly.
The Network Troubleshooter: Your Digital Mechanic
Windows 10 incorporates a built-in network troubleshooter, a digital mechanic designed to diagnose and repair common network problems, acting as an automated triage specialist for connectivity-related issues. It’s a powerful tool to attempt before more involved methods.
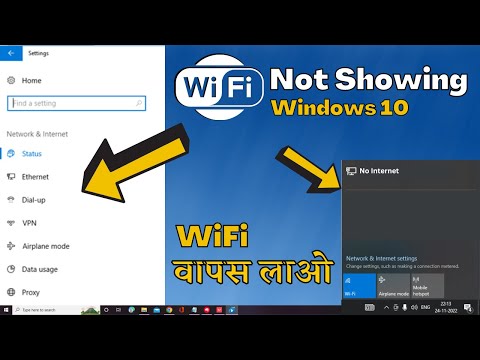
To access the troubleshooter, navigate to "Settings" by clicking the Start button and selecting the gear icon. In Settings, choose "Network & Internet". Then, select "Status" on the left side of the screen.
Within the Status section, you'll often see a "Troubleshoot problems" link. Click this link, and Windows 10 will initiate an automated diagnostic process. The troubleshooter will identify potential issues, such as incorrect network configurations, problems with the network adapter, or service interruptions. It will then automatically attempt to resolve the identified problems.
Follow any on-screen prompts or instructions. The troubleshooter might suggest resetting your network adapter, restarting related network services, or reconfiguring your network settings. Let it complete its procedures, which may take a few minutes.
Once the troubleshooter has finished, it will present a report of its findings and the actions taken. If the troubleshooter identifies and resolves a problem, your Dell's Wi-Fi should start to function correctly. If the problem persists, proceed to the more detailed methods discussed later.
Renewing Your IP Address: A Fresh Start for Your Connection
Sometimes, your computer’s IP address, its unique identifier on the network, can become corrupted or outdated, causing Wi-Fi connectivity issues. Renewing your IP address is like giving your device a fresh start on the network, allowing it to re-establish a clean connection.
To renew your IP address, open the Command Prompt. You can open the Command Prompt by typing "cmd" in the Windows search bar, right-clicking the matching result, and selecting "Run as administrator." This will give the Command Prompt the privilege it needs to make network changes.
In the Command Prompt window, type "ipconfig /release" and press Enter. This command releases your current IP address. A brief moment later, type "ipconfig /renew" and press Enter. This command requests a new IP address from your network's router.
After a short delay, the Command Prompt will display the new IP address details. Close Command Prompt and restart your Dell laptop. Verify if your Wi-Fi connection has been re-established. This simple process often resolves connection problems caused by IP address conflicts or related network glitches.
Deleting and Reconnecting to the Network: A Clean Slate
Sometimes, the saved network profile on your Dell laptop may be corrupted, leading to connection problems. Deleting the network profile and then reconnecting to the network can often resolve these issues without a complicated process. It is like giving your Wi-Fi connection a clean slate.
To do this, click the Wi-Fi icon in the system tray and click on Network and Internet Settings. In the settings, select “Manage Wi-Fi Settings”. Look for the network you are trying to connect to. Click on it, then click “Forget.” This will erase the saved network profile.
After you have forgotten the network, click the Wi-Fi icon in the system tray again. Select your Wi-Fi network from the available networks list, and re-enter your network password. This process of reconnecting establishes a new, potentially uncorrupted network profile.
Test the internet connection to verify that the Wi-Fi is now working.
Router Reboot: The Gateway to Connectivity
Have you exhausted all the earlier steps, and still, your Dell laptop is failing to connect to Wi-Fi? The problem may not be with your Dell, but rather with the router itself. The router, acting as the gateway to your internet connection, can in some instances, experience temporary glitches or become overloaded. A simple reboot can often resolve those issues.
Unplug the router from its power source. Wait about 30 seconds. Then, plug the router back in. Allow the router to power up fully, which may take a few minutes. Usually, it comes back online when the lights stabilize.
After the router reboots, check your Dell laptop's Wi-Fi connection. If the router was the source of the problem, your Dell should now connect without issues.
Advanced Troubleshooting: Network Reset
As a last resort before any major steps, consider a network reset. This operation essentially resets all network settings to their default values. Note that performing a network reset means you’ll need to re-enter your Wi-Fi password for any saved networks and any VPN settings.
To perform a network reset, go to "Settings" and select "Network & Internet." Click "Status" on the left. Scroll down to the bottom of the page and click on "Network reset." Windows will prompt you to confirm this action, as it will clear all of your network settings. Select "Reset now" to initiate the process. Your Dell will restart automatically.
After the restart, you will notice that your Wi-Fi networks will no longer be saved, and you will have to re-enter your Wi-Fi password to reconnect your Dell laptop.
When to Seek Professional Support
Although these methods are often effective, some situations warrant professional assistance. If your Wi-Fi problems persist after trying all the steps, it may mean a hardware problem, or a more complex network configuration issue.
Signs you should seek help:
- The Wi-Fi adapter is not detected by Windows.
- You suspect a hardware failure.
- Problems persist, even after a full reset.
In these circumstances, it's wise to consult with a qualified technician. They can perform more advanced diagnostics. Taking this step ensures the quickest and most effective resolution to your Dell’s Wi-Fi woes.
