how to find wifi password on mac laptop
Title: How to find a Wi-Fi password on Mac
Channel: ProgrammingKnowledge2
How to find a Wi-Fi password on Mac by ProgrammingKnowledge2
how to find wifi password on mac laptop, how to see wifi password on mac laptop, how to find wifi password on apple laptop, how to find wifi password on mac air, how to find wifi password on mac pro, how to see wifi password on apple laptop, how to see wifi password on mac pro, how to find internet password on macbook air, how to retrieve wifi password on macbook air, how to know wifi password on macbook air
Unlock Your Mac's WiFi Password: The Secret Method!
Unveiling the Hidden: Your Mac's WiFi Password Demystified!
Ever found yourself in a digital bind, craving access to a forgotten Wi-Fi password? We've all been there. You're likely staring at a screen, frustrated. Perhaps you're aiding a friend with their connection. Or maybe you’re dealing with a new device. Whatever the reason, it's a common predicament. Don't fret! There's a clever trick to uncover this seemingly elusive information. I’m going to show you.
Journey into the Keychain: Your Password's Secret Hideaway
Your Mac is a vault of secrets. One of its best-kept secrets is your Wi-Fi passwords. It cleverly stores them in a place called Keychain Access. This is where the magic happens. Think of it as your digital memory for logins. First, you'll need to locate this application. You should find it in your Utilities folder. Then, the adventure starts.
Navigating Keychain Access: The Initial Steps
Navigate to your Applications folder. Inside, seek the Utilities folder. Find Keychain Access within that folder. Double-click the icon to launch it. Alternatively, you can use Spotlight search (Command + Spacebar). Type in "Keychain Access," and instantly call it up. With Keychain Access open, you’re ready to begin. That’s your starting point.
Finding Your Wi-Fi Network: A Few Precise Clicks
Within the Keychain Access window, look for the "System" keychain. On the left-hand side, under "Category," choose "Passwords." Now, you'll see a list of saved items. You'll see a lot of things here. Consequently, carefully scan through this list. You will want to locate the name of your Wi-Fi network. Ensure you're using the correct network name.
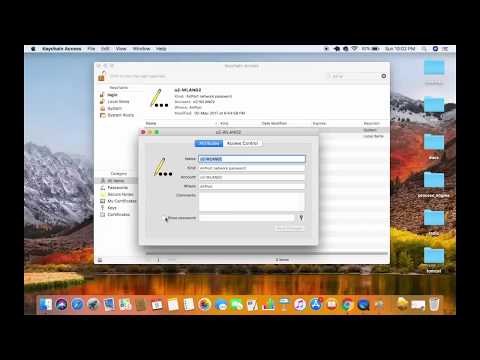
Revealing the Password: The Moment of Truth
Once you've found your network's name, double-click it. A new window will open, displaying information about the Wi-Fi network. Tick the "Show Password" box. You'll be prompted to enter your administrator password. This is necessary for security. Then, and only then, will your Wi-Fi password appear. Now the secret is out! Therefore, you’re now free to use it.
Troubleshooting: What If Things Go Sideways?
Sometimes, things don't go smoothly. Several things could go wrong. Perhaps the "Show Password" box is grayed out. This means you lack the necessary permissions. Ensure you're logged in as an administrator. Or, the password you enter might be rejected. Double-check that you are entering the correct administrator password. If you continue facing issues, restart your computer. This simple step often resolves minor glitches. If issues persist, there could be a deeper problem. Seek help from Apple support.
Beyond the Basics: Additional Keychain Insights
Keychain Access is not just for Wi-Fi passwords. Consider it a comprehensive password manager. It stores passwords for websites, applications, and more. Explore the other features. Furthermore, you can create new keychains. Store passwords for various accounts safely and securely. You can also customize your security settings. Remember, understanding Keychain Access is an excellent practice.
Security First: Protecting Your Digital Fortress
Of course, security is always paramount. Therefore, never share your administrator password with anyone. Keep your passwords strong and unique. Consider using a password manager. Regular security updates are also important. They help protect against vulnerabilities. Be vigilant about phishing attempts or suspicious emails. Remember, a proactive approach to digital security is essential.
Conclusion: Your Wi-Fi Password, Finally Revealed!
Congratulations! You've successfully unlocked your Mac's Wi-Fi password. You now possess a valuable piece of knowledge. This straightforward method can assist in various situations. You can recover lost passwords confidently now. You can connect new devices without a hitch. You can now troubleshoot network issues with increased ease. Embrace this skill. It's a handy tool in the world of technology. With practice, it will become second nature. As a result, you'll never be locked out again.
Download ASUS X541UA WiFi Driver NOW! (Fix Your Wi-Fi!)Unlock Your Mac's WiFi Password: The Secret Method!
Ever feel like a digital detective, desperately trying to crack a code? We've all been there. Lost passwords, forgotten credentials, the agonizing feeling of being locked out of your own digital life. And when it comes to Wi-Fi, that feeling is even more acute. You're tethered to the internet, but you need that password, whether it's to reconnect after a network change, share it with a guest, or simply to jog your memory. So, let's ditch the drama and dive headfirst into the thrilling world of finding your forgotten or hidden Wi-Fi passwords on your trusty Mac. We're not just talking about typing it in repeatedly until you accidentally guess it; we’re talking about a secret method that’s surprisingly simple.
1. The Mystery of the Missing Password: Why You Need It
Let's be honest, how many times have you typed in your Wi-Fi password over the years? Probably countless. Chances are, your Mac remembers it for you, like a loyal digital butler. But what happens when you need the password itself? Maybe you're travelling and want to join a new network. Perhaps you're helping a less tech-savvy friend connect. Or, maybe, you're just plain curious about what that long, cryptic string of characters actually is. The reasons are endless, but the problem remains: you need the password, and you don't have it. This is where our secret method comes into play.
2. Forget Brute Force: Introducing the Keychain Access
Okay, so we're not cracking actual safes here, but this is about unlocking a secret. The key, as it were, lies hidden within your Mac's "Keychain Access" application. Think of it as your Mac's personal safe, where it diligently stores all your passwords, including those elusive Wi-Fi credentials. This built-in utility is often overlooked, but it's the gateway to all your stored passwords. It's like discovering a hidden room in your own house – filled with treasures you’d forgotten about.
3. Accessing the Secret Chamber: Launching Keychain Access
Finding Keychain Access is easier than finding the remote! There are a couple of ways to unveil this digital vault. First, you can use Spotlight search (the magnifying glass icon in the top right corner of your screen). Simply type "Keychain Access" and hit Enter. Boom! The application appears. Alternatively, you can navigate through your Applications folder. It’s generally nestled in the "Utilities" folder, providing another route to your password paradise. Once located, double-click to launch the application.
4. Navigating the Digital Labyrinth: Finding Your WiFi Network
Once in Keychain Access, you'll find a long list of entries, each representing a different account, password, or certificate. Don't panic! We're looking for something specific: your Wi-Fi network. In the search bar in the upper right corner of the Keychain Access window, type in the exact name of your Wi-Fi network (the one you're connected to or want to see the password for). This will filter the list, making it much easier to find the correct entry.
5. Unveiling the Treasure: The Password Reveal
Once you’ve found your Wi-Fi network’s entry, double-click it. A new window will appear, displaying information about the network. Tick the box next to "Show Password". You may be prompted to enter your administrator password (the one you use to log into your Mac) to authorize the action. Think of this as the final safety check, ensuring you're the rightful owner of the information. Once you enter your password, the previously hidden password will appear in the "Password" field. Congratulations! You've cracked the code!
6. Digging Deeper: Understanding Keychain Entries
Each entry in Keychain Access holds valuable information. Let's break down what you're seeing:
- Name: The name of the Wi-Fi network (SSID).
- Kind: Usually "Wi-Fi password."
- Account: Often "System" or your user account.
- Show Password: The critical checkbox for revealing the password.
- Creation/Modified Dates: Provides historical context.
Understanding this allows you to manage your passwords effectively in the future.
7. The Other Secrets: Exploring Additional Keychain Features
Keychain Access is more than just a password retrieval tool. It's packed with features to help you manage your digital life:
- Password Generation: You can generate strong, unique passwords for new accounts.
- Secure Notes: Store sensitive information in encrypted notes.
- Certificate Management: Manage digital certificates for secure online communication.
It's a powerful app; use it wisely!
8. What if You Can't See the Password? Troubleshooting Tips
Sometimes, things don't go as planned. If "Show Password" is greyed out or the password isn't visible, here are a few things to check:
- User Permissions: Verify that you have administrator privileges on your Mac. If you’re using a guest account, you won’t likely have access.
- Keychain Access Permissions: Ensure Keychain Access itself is functioning correctly. Restarting your Mac can often resolve minor glitches.
- Security Settings: Check your Mac's security settings to ensure Keychain isn't restricted.
If the problem persists, you might need to consult Apple's support documentation or seek professional help.
9. Sharing is Caring: How to Share Your Password Safely
Once you've retrieved your Wi-Fi password, you might want to share it with others. Do NOT simply read it aloud or leave it visible on your screen! Instead:
- Type it in: If you're helping someone set up their device, type the password directly into the Wi-Fi settings.
- Use a secure messaging app: If you need to share it remotely, use an encrypted messaging app to send it securely.
- Advise caution: Remind anyone who receives the password to treat it securely.
Always prioritize security.
10. The Risks of Revealing: Protecting Your Network
Sharing your Wi-Fi password comes with inherent risks. Anyone with the password can access your network and potentially:
- Consume your bandwidth: Slow down your internet speed.
- Access your shared files: If you haven't secured your file sharing settings.
- Engage in illegal activities: If someone uses your network for illicit purposes, the responsibility may fall on you.
Exercise caution and choose who you share your password with.
11. Boosting Your Wi-Fi Security: Proactive Measures
Taking proactive steps to secure your Wi-Fi network is essential:
- Strong Password: Use a complex password with a mix of uppercase and lowercase letters, numbers, and symbols.
- Network Encryption: Ensure your network uses WPA2 or WPA3 encryption for robust security.
- Guest Network: Create a guest network for visitors, isolating them from your main network and devices.
- Regular Password Changes: Change your password periodically, just to be safe.
A fortified network equals peace of mind.
12. The Mobile Method: Finding WiFi Passwords on your iPhone or iPad (Bonus)
If you're trying to find the Wi-Fi password for a network you're already connected to on your iPhone or iPad, it takes a few extra steps and you’ll need to be on the same iCloud account as the Mac that knows that Wi-Fi password. Here’s a quick rundown:
- Ensure iCloud Keychain is Enabled: Go to Settings > [Your Name] > iCloud and make sure Keychain is turned ON.
- Check Wi-Fi Settings: On your iPhone or iPad, go to Settings > Wi-Fi. Tap the "i" icon next to the network you're connected to.
- Password Reveal (Indirectly): Unfortunately, iOS doesn't directly show the password like a Mac. But, if you're signed in with your Apple ID on a Mac where the password is saved in Keychain, you can access it using the Mac method described above.
- Share Carefully: After you get the password from your Mac, enter it on your other devices.
This method, while less direct, allows you to sync your passwords across devices for ultimate convenience.
13. The Analogy: Mac's WiFi Password as a Treasure Hunt
Imagine your Mac as a treasure chest, and your Wi-Fi password is a valuable artifact. Keychain Access is the map that leads you to the treasure. We've just completed the treasure hunt together, uncovering your network's secret.
14. The Future of Password Management: Trends and Technologies
The world of password management is constantly evolving. We’re seeing:
- Biometric Authentication: Fingerprint and facial recognition for enhanced security.
- Password Managers: Third-party apps with advanced features like automatic password generation and cross-platform syncing.
- Multi-Factor Authentication (MFA): Adding an extra layer of security with codes sent to your phone
- Passwordless Login: Using other methods, like security keys.
The future is exciting, and ensuring you are using the best practices for password security has never been of greater importance.
15. Final Thoughts: Your WiFi Password is Your Privacy
Download ASUS X541UA WiFi Driver NOW! (Fix Your Wi-Fi!)How to Show WiFi Password on MacBook

By Tech Tips How to Show WiFi Password on MacBook by Tech Tips
How to see wifi password on macbook

By IT Magics How to see wifi password on macbook by IT Magics
How To Find WiFi Password On Mac

By Martin Kolka How To Find WiFi Password On Mac by Martin Kolka

Title: How to Get WiFi Password in MacOS GUI and Mac Terminal
Channel: Apple Ninja
How to Get WiFi Password in MacOS GUI and Mac Terminal by Apple Ninja
My Laptop Work
Here is the title: The Ultimate Guide to Choosing the Perfect Hiking Boots: A Step-by-Step Approach
The Ultimate Guide to Choosing the Perfect Hiking Boots: A Step-by-Step Approach
Embarking on a hiking adventure is an experience that rejuvenates the soul, connects us with the natural world, and offers a profound sense of accomplishment. However, this transformative experience can quickly turn into a grueling ordeal if your feet are encased in the wrong footwear. The choice of hiking boots is paramount. They are the foundation upon which every hike is built, the crucial link between you, the trail, and the wilderness. This comprehensive guide provides a detailed, step-by-step approach to selecting the ideal hiking boots, ensuring your adventures are pleasurable, safe, and memorable.
Understanding Your Hiking Needs: Defining Your Terrain and Trip Length
Before even considering specific boot models, a critical self-assessment is required. This initial analysis dictates the type of boot you'll need, influencing everything from material composition to ankle support. The first consideration is the terrain. Are you primarily planning day hikes on well-maintained paths, multi-day backpacking trips across rugged mountain passes, or scrambling over technical rock faces? Day hikes on established trails might necessitate lighter, more flexible boots, while extended backpacking trips demand sturdier, high-cut boots capable of carrying heavy loads.
Next, determine the typical duration of your hikes. For short day hikes, comfort and breathability are often prioritized. Long-distance backpacking, however, introduces the need for superior ankle support, enhanced durability, and the capacity to withstand the demands of extended use in varying conditions. Consider the weight you’ll be carrying. A weekend backpacking trip with a moderate pack weight calls for a different boot construction than a week-long expedition with a fully-loaded backpack containing all your essentials. Accurately assessing your typical hike profile is the first, fundamental step towards selecting the right hiking boots.
Decoding Boot Types: A Detailed Breakdown
The hiking boot market offers a diverse range of options, each engineered for specific purposes. Understanding these categories is essential for making an informed choice:
- Hiking Shoes: These low-cut options are ideal for day hikes on well-maintained trails, offering excellent flexibility and breathability. They resemble trail-running shoes in their design and are generally lighter than boots, providing enhanced comfort for moderate distances. However, they offer limited ankle support and are not suitable for carrying heavy loads or traversing challenging terrain.
- Day Hiking Boots: These are mid-cut boots, providing greater ankle support and protection than hiking shoes. They strike a balance between comfort and support, making them suitable for a wider range of trails and conditions. Day hiking boots are excellent for day hikes or light backpacking trips with lighter pack weights.
- Backpacking Boots: These high-cut boots are designed for multi-day backpacking trips and carrying heavy loads. They offer superior ankle support, durability, and weather protection. They often feature stiffer midsoles, providing stability on uneven terrain. These are the workhorses of the hiking world, constructed to endure rigorous use and protect your feet in challenging environments.
- Mountaineering Boots: These are the most robust and specialized type of hiking boots, designed for use in alpine environments, including climbing and ice travel. They are typically very stiff, offer excellent ankle support, and are compatible with crampons. Mountaineering boots are designed for experienced hikers and climbers tackling extreme conditions.
The Anatomy of a Hiking Boot: Examining Crucial Components
Understanding the different components of a hiking boot allows you to make informed decisions based on your specific needs and preferences:
Upper: The upper is the external part of the boot, encompassing the materials that surround the foot. Uppers are usually constructed from leather (full-grain, split-grain, or nubuck), synthetic materials (nylon, polyester), or a combination of the two. Leather offers superior durability and water resistance, providing excellent protection in harsh environments. Synthetic materials are generally lighter, more breathable, and dry quicker.
Midsole: The midsole is the cushioning layer between the upper and the outsole. It provides shock absorption, stability, and often influences the boot's stiffness. Common midsole materials include EVA (Ethylene Vinyl Acetate), polyurethane, or a combination of the two. EVA offers good cushioning, while polyurethane is more durable. The stiffness of the midsole is a critical factor, impacting both support and comfort, especially when carrying heavy loads.
Outsole: The outsole is the bottom layer of the boot, the portion that comes into direct contact with the ground. It is responsible for providing traction and grip. Outsoles are typically made from rubber compounds, with different rubber formulations offering varying levels of grip, durability, and abrasion resistance. The lug pattern on the outsole is crucial; deeper, more aggressive lugs are better suited for muddy or uneven terrain, while shallower lugs are adequate for drier conditions.
Insole: The insole is the removable layer inside the boot that provides cushioning and support to the foot. Insoles can be replaced to enhance comfort, arch support, or to accommodate orthotics. Aftermarket insoles can significantly improve the fit and feel of a hiking boot.
Ankle Support: The height of the boot and the construction of the ankle cuff are critical factors determining ankle support. Higher-cut boots offer greater support, reducing the risk of ankle sprains on uneven terrain, especially when carrying a heavy pack.
Perfecting the Fit: The Crucial Step in Boot Selection
The most important aspect of choosing hiking boots is achieving the perfect fit. Ill-fitting boots can lead to blisters, pain, and ultimately, a miserable hiking experience. The following steps are crucial for ensuring a proper fit:
Measure Your Feet: Have your feet measured professionally at a reputable outdoor gear store. Measure both feet, as most people have slightly different-sized feet. Measure your feet at the end of the day, when they are most swollen.
Wear the Right Socks: Always try on boots with the socks you plan to wear while hiking. This typically includes a pair of hiking socks, often made of wool or synthetic materials. These materials wick away moisture and provide cushioning, essential for preventing blisters.
Toe Space: Ensure you have adequate toe space. There should be about a thumb's width of space between your longest toe and the end of the boot. This space is critical for preventing your toes from hitting the front of the boot on downhill sections of the trail.
Heel Hold: Your heel should fit snugly in the heel cup with minimal movement. Lift your heel, walking carefully, and observe how the heel seat fits. Your heel should not lift excessively while walking.
Ankle Support and Comfort: The boot should provide adequate ankle support without restricting movement. The boot should feel comfortable from the moment you put it on, and should have no noticeable pressure points or areas of discomfort.
Walk Around: Spend a significant amount of time walking and testing the boots in the store. Walk on different surfaces and inclines to assess the fit and feel under different conditions. If possible, use a ramp that is positioned to replicate a mountain trail.
Try Different Sizes and Models: Don't settle for the first pair of boots you try on. Try on boots from various brands and in different sizes to find the perfect fit. The best boot is the one that fits your foot perfectly, period.
Material Matters: Choosing the Right Blend for Your Needs
The materials used in hiking boots significantly impact their performance, durability, and comfort:
Leather: Leather offers excellent durability and water resistance, making it a great choice for backpacking boots and hiking in wet environments. Full-grain leather is the most durable but requires significant break-in time. Split-grain leather is lighter and more breathable but less water-resistant. Nubuck leather is a very fine type of leather, but offers a more luxurious feel.
Synthetic Materials: Synthetic materials, such as nylon and polyester, are lighter, more breathable, and dry faster than leather. They are a good choice for day hiking boots and hiking in warm, dry conditions. They require less break-in time than leather boots.
Waterproof Membranes: Waterproof membranes, such as Gore-Tex, keep your feet dry by preventing water from penetrating the boot. These membranes add to the boot's cost and can slightly reduce breathability. However, they are essential for hiking in wet conditions.
Outsole Rubber Compounds: Different rubber compounds offer varying levels of grip and durability. Vibram is a well-respected brand known for its high-quality outsoles. Softer rubber compounds provide excellent grip on rock but wear down more quickly. Harder compounds are more durable but may offer less grip.
Breaking In Your Boots: Preparing for the Trail
Breaking in your hiking boots is essential to ensure they conform to your feet and prevent blisters. This process can vary depending on the boot material and construction.
Start Slowly: Begin by wearing your new boots around the house for short periods. Gradually increase the duration of wear.
Wear Appropriate Socks: Always wear the hiking socks you intend to use on the trail. This ensures you're breaking in the boots with the appropriate fit.
Hike Short Distances: Once your boots feel comfortable around the house, start with short hikes on easy trails. Gradually increase the distance and difficulty of your hikes.
Address Hot Spots: Pay attention to any areas where the boots rub or press against your feet. Use tape or moleskin to protect these areas and prevent blisters.
Leather Conditioning: Leather boots require regular conditioning to maintain their
