how to create wifi using laptop windows 8

Title: Make a Wi fi Hotspot Using your Windows 8 Laptop
Channel: Syed Shah Zahurullah Hussaini
Make a Wi fi Hotspot Using your Windows 8 Laptop by Syed Shah Zahurullah Hussaini
Unlock Your Laptop's Hidden Hotspot: Free WiFi in 60 Seconds (Windows 8)
Turn Your Laptop into a Wi-Fi Powerhouse: Free Internet in a Flash (Windows 8)
So, you're craving Wi-Fi freedom? You're in the right place. Imagine transforming your Windows 8 laptop into a personal hotspot. It's like having your own portable internet router! Get ready to share your connection with friends, family, or any Wi-Fi enabled device nearby. This guide will show you how to make it happen, quickly. Let's dive right into it.
Unveiling the Secret: Your Laptop's Hidden Potential
Did you know your laptop is already equipped? It possesses the power to create its own Wi-Fi network. It's a little-known feature, perfect for sharing your internet. Instead of a complicated setup, it's actually quite easy. You can turn your laptop into a hotspot in under a minute. Really! That's quicker than brewing a cup of coffee. Get ready to become the Wi-Fi hero amongst your peers.
Setting the Stage: Preparing for Wi-Fi Domination
Before we begin, let’s ensure everything is ready. First, guarantee an active internet connection. Your laptop needs an internet source to share it, naturally. Either connect via Ethernet cable or a pre-existing Wi-Fi network. Next, make sure you have administrator privileges on your laptop. This is crucial for making changes to network settings. Finally, keep your laptop's power cord connected. This avoids interruptions during the process.
Step-by-Step: Your Quick Wi-Fi Creation Guide
Now, let's get started. Here's how to configure your laptop's hotspot:
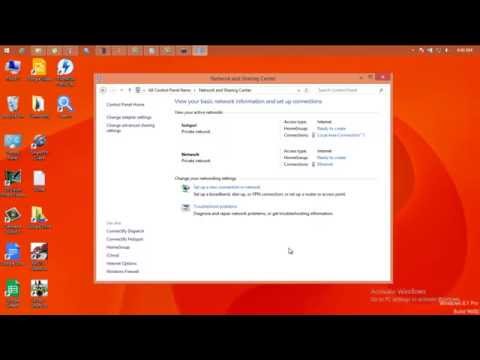
Accessing the Network and Sharing Center: Right-click the network icon. It's usually in the system tray, near your clock. Next, select "Open Network and Sharing Center." You will see a new window pop up.
Crafting Your Hotspot: In the Network and Sharing Center, locate “Set up a new connection or network.” Click on it. Then, choose “Set up a wireless ad hoc network.” Don't worry, we're not using an ad hoc network truly.
Configuring the Essentials: The wizard will guide you. It allows the setup of your new hotspot. Enter a name for your network (SSID). Choose a security type, such as WPA2-Personal; this is recommended. Create a strong password. This prevents unwanted access. Be sure to remember them!
Sharing Your Internet Connection: After establishing the network, allow other devices to connect. Click "Change adapter settings" on the left side of the Network and Sharing Center. Right-click on the connection you intend to share (Wi-Fi or Ethernet). Select "Properties." Go to the "Sharing" tab. Check the box labeled "Allow other network users to connect through this computer's internet connection." In the "Home networking connection” dropdown, select your new network. Click "OK."
Final Touches, and Unleashing the Power: Now enable your hotspot. Go back to the Network and Sharing Center. Your newly created network should appear. Select the connection you wish to share. Then, right-click and choose "Enable." Your laptop is now broadcasting its own Wi-Fi signal.
Troubleshooting Triumphs: Conquer Any Wi-Fi Challenges
Sometimes, even with the best instructions, issues arise. Don't panic! Here are some quick troubleshooting tips. Is your new Wi-Fi network not appearing? Check the network name and password. Is the connection slow? Check your internet speed. Ensure that all settings are correct on your device too. Restarting your computer is another classic solution. Recheck the sharing settings, as sometimes they reset.
Maximizing Your Hotspot's Potential: Tips and Tricks
You can now share your internet. But you can enhance the experience further. Here are some optimization pointers. Choose a strong password for optimal security. It helps prevent unauthorized use of your connection. Monitor connected devices. You can restrict access to specific devices if needed. Close unnecessary programs. These can reduce bandwidth usage, improving speed. Be mindful of data usage limits. This is particularly relevant if you're on a metered connection.
Embracing Wireless Freedom: The Benefits of a Personal Hotspot
Why bother setting up a hotspot? The benefits are numerous. Firstly, it’s incredibly convenient. You can create a Wi-Fi network wherever you are. This is perfect for travel or working remotely. It's also great for sharing your internet with multiple devices. Simultaneously connect your phone, tablet, and laptop. It is cost-effective. It avoids the necessity of paying for extra Wi-Fi services. It's a secure solution, especially when you control the password.
Wrapping Up: Your Journey to Wi-Fi Mastery
You've successfully created your laptop hotspot! You've navigated the setup process. You now have the ability to share your internet connection. You're no longer tethered to a wired connection. You have embraced wireless freedom. You know how to troubleshoot any issues. Your skills are now refined. Go forth and spread the Wi-Fi love! Remember to use your hotspot responsibly. Enjoy your newly found connectivity!
Laptop WiFi Dead? Fix It NOW (No Keyboard Needed!)Unlock Your Laptop's Hidden Hotspot: Free WiFi in 60 Seconds (Windows 8)
Hey tech adventurers! Ever been stranded with a dead phone battery and a desperate need for Wi-Fi? Faced with a data drought and yearning to connect, but the hotel's Wi-Fi is a joke, or the coffee shop's charging you an arm and a leg? We've all been there. But what if I told you that your trusty Windows 8 laptop holds the key to instant Wi-Fi liberation? And, get this, it's easier than brewing a cup of coffee. Prepare to transform your laptop into a personal Wi-Fi hotspot, offering free internet access in a mere 60 seconds. Let's dive in!
1. The Wireless Wonders: Why Your Laptop is a Wi-Fi Superhero
Think of your laptop as a Swiss Army knife for the digital age. It's got processing power, storage, and, most importantly for our mission, a built-in Wi-Fi adapter. This adapter is the portal to the internet, and with a little magic, we can transform this adapter into a broadcast tower, sharing your internet connection with other devices. It's like your laptop suddenly develops superpowers! We're talking about creating a personal, portable Wi-Fi network, ready whenever and wherever you need it.
2. Setting the Stage: Before We Conjure the Connection
Before we start, let's make sure we're prepared. Ensure your laptop is connected to the internet. This connection can be through an Ethernet cable plugged into your router, or a Wi-Fi connection itself. Think of this the internet as the fuel, and your laptop as the engine to share it. Also, make sure you have admin rights on your computer. Don't worry – it's usually a simple matter of clicking "yes" when prompted.
3. The Secret Recipe: Using the Command Prompt
This is where the real wizardry begins. Don’t let the "command prompt" scare you. It's simply a text-based interface where we'll type in some commands to work our magic. It's like casting a spell, but instead of waving a wand, we type!
Here's how to do it:
Step 1: Open the Command Prompt. Press the Windows key + X keys simultaneously. A menu will pop up on the bottom left. Click on "Command Prompt (Admin)." If you don't see it, try "Windows PowerShell (Admin)." They both work the same way for this purpose.
Step 2: The First Incantation (Sharing Your Internet). Type the following command and press Enter:
netsh wlan set hostednetwork mode=allow ssid="MyLaptopHotspot" key="YourPassword"Replace "MyLaptopHotspot" with the name you want your Wi-Fi network to have (this is what your friends will see when they search for Wi-Fi). Replace "YourPassword" with a strong password you want to use. It's like the secret code to your Wi-Fi castle!
Step 3: The Second Incantation (Starting the Hotspot). Type the following command and press Enter:
netsh wlan start hostednetworkThis is the magic button that activates your hotspot. It's like hitting the "on" switch!
4. Sharing the Love: Enabling Internet Connection Sharing
The command prompt has done its bit, and now we need to tell your laptop to share its internet connection.
Step 1: Open Network Connections. Search for "Network Connections" in the Windows search bar (the little magnifying glass in the bottom-left corner). You can also access it by right-clicking on the Wi-Fi/Ethernet icon in your system tray (usually near the clock) and selecting “Open Network and Sharing Center.”
Step 2: Identify Your Internet Connection. Look for the connection that's currently providing your internet access (it'll likely say "Wi-Fi" if you're using Wi-Fi, or "Ethernet" if you're using a cable).
Step 3: Open Properties. Right-click on your active internet connection and select "Properties."
Step 4: The Sharing Tab. Click on the "Sharing" tab.
Step 5: Check the Magic Box. Check the box that says "Allow other network users to connect through this computer's Internet connection."
Step 6: Choose Your Hotspot. In the "Home networking connection" dropdown, select the network that was created by the hosted network, which you might see as something like "Microsoft Hosted Network Virtual Adapter."
Step 7: Click "OK" and Done!
5. Success! Searching for Your New Wi-Fi Wizardry
Grab your phone, tablet, or another laptop.
- Go to your Wi-Fi settings.
- Look for the network name you entered in Step 2 of the Command Prompt process (e.g., "MyLaptopHotspot").
- Enter your password.
- Connect!
Welcome to your personal Wi-Fi network!
6. Troubleshooting Common Issues
Sometimes, things don't go perfectly, right? Don't worry, it's rarely a disaster.
- "Hosted network couldn't be started." Double-check the commands you typed in the Command Prompt. Make sure there are no typos. It’s like a recipe, and a missing ingredient ruins the cake. Also, ensure your Wi-Fi adapter is enabled.
- "Can't connect to the internet." Go back to Step 4 and ensure that the home networking connection is set up properly, and you have enabled sharing. Also restart your laptop. It's the classic solution.
- "Slow speeds." Your laptop is sharing its internet connection, so speeds might be slower than when you're using the primary connection alone. The more devices connected, the slower it gets.
7. The Power of Persistency: Restarting the Hotspot
If you want to start your Wi-Fi hotspot again, just open the Command Prompt (as an administrator) and type:
netsh wlan start hostednetwork
To STOP it. Type:
netsh wlan stop hostednetwork
It's as simple as that!
8. Beyond Windows 8: Adapting to Other Versions
While this guide focuses on Windows 8, the core principles apply to later versions of Windows (Windows 10 and 11). The interface might look slightly different, but the basic steps in the Command Prompt and Network Connections are similar. A quick Google search for "how to create a hotspot on Windows [your version]" will usually point you to the right adjustments.
9. Security First: Keeping Your Wi-Fi Fortress Safe
Never use a simple password like "password" for your Wi-Fi hotspot. Choose a strong one, using a mix of letters, numbers, and symbols. This is a digital lock: the stronger it is, the safer your data. Also, disconnect the hotspot when you don't need it.
10. The Unlimited Possibilities: Beyond the Basics
Once you understand this, the possibilities open up. You can share internet with anyone, create a Wi-Fi network while travelling or in area's that don't offer Wi-Fi.
11. The Mobile Advantage: Turn Your Laptop into a Portable Powerhouse
Imagine this: you're on the go, the conference Wi-Fi is terrible, and your colleague needs to send an urgent email. You, the Wi-Fi wizard, can save the day with your instant hotspot. It’s like having a superpower, a mobile Wi-Fi haven that ensures you're always connected.
12. The Economic Edge: Saving Money with your Laptop's hot spot
Why pay for expensive hotel Wi-Fi when your laptop can create a personal one? Your laptop becomes a money-saving champion!
13. The Hidden Potential: Unveiling Your Laptop's Hidden Capabilities
Every laptop is a treasure trove of capabilities; we have explored one of the hidden ones here. Unleashing your laptop's built-in hotspot functionality is, like discovering a secret compartment in a box, opening a new world of internet access.
14. The Future of Connectivity: Beyond the Current Solutions
As technology evolves, the future of connectivity may bring even more accessible and seamless hotspot solutions. However, the command prompt method is still a reliable and effective technique for today’s needs.
15. The Freedom is Yours: Empowering Yourself With Information
By learning how to turn your laptop into a Wi-Fi hotspot, you’re gaining knowledge and independence. It’s empowering yourself with the ability to stay connected, no matter where you are.
And there you have it! Unleashing your laptop's hidden hotspot in mere seconds.
We've come to the end of our Wi-Fi journey. This is one of those hidden tricks that, once you master it, will make you feel like a tech genius. It's a practical skill that can solve real-world problems. It's like having a backup plan in your pocket, a secret weapon against internet isolation. Remember, technology is not about complicated things; it’s about the power it gives you to solve problems and connect to the world.
FAQs
OMG! Hack ANY Laptop With Just Their WiFi? (Shocking Truth!)How to Connect to WiFi on Windows 8

By HOWTECH How to Connect to WiFi on Windows 8 by HOWTECH
Connecting Manually to a Wireless Network in Windows 8 HP Computers HP Support

By HP Support Connecting Manually to a Wireless Network in Windows 8 HP Computers HP Support by HP Support
Create WiFi Hotspot in windows 8.1, 8, 7 LaptopPC
By ANDREW CRUZ Create WiFi Hotspot in windows 8.1, 8, 7 LaptopPC by ANDREW CRUZ

Title: How to create wifi hotspot in windows 88.1 Easy method 100 works
Channel: Engineerhoon
How to create wifi hotspot in windows 88.1 Easy method 100 works by Engineerhoon
Wifi On Laptop
Here is the title: The Ultimate Guide to Planning Your Dream European River Cruise
The Ultimate Guide to Planning Your Dream European River Cruise
The gentle current of a European river, the charming towns gliding by, the promise of unparalleled experiences – a European river cruise is more than a vacation; it’s an immersion. It’s a journey that blends the elegance of a classic cruise with the intimacy of a boutique hotel, all set against the backdrop of Europe's most enchanting waterways. Planning such a voyage, however, requires careful consideration. This guide serves as your compass, navigating you through the essential stages of crafting the perfect European river cruise, ensuring a journey brimming with unforgettable moments.
Choosing Your River: Unveiling Europe's Watery Highways
The initial, and perhaps most exciting, decision is selecting your river. Each waterway offers a unique tapestry of destinations, experiences, and atmospheres. The choice will fundamentally shape your journey.
The Danube: The Imperial Highway. The Danube, celebrated by Strauss's waltz, winds its way through ten countries, offering a diverse blend of history, culture, and stunning scenery. Highlights include regal Vienna, with its imperial palaces; Budapest, the "Pearl of the Danube," showcasing stunning architecture; and the Iron Gate Gorge, where the river carves a dramatic path through the Carpathian Mountains and the Balkan ranges. Danube cruises often appeal to history buffs and those seeking a grand European adventure.
The Rhine: Romantic and Resplendent. The Rhine River, a legendary waterway dotted with fairytale castles and vineyards, epitomizes the romantic heart of Europe. Cruising the Rhine unveils the beauty of the Black Forest, the charming towns of the Rhineland, and the vibrant cities of Cologne and Amsterdam. Consider this your journey to storybook landscapes and charming villages. The Rhine is an excellent option for first-time river cruisers.
The Rhone and Saône: A Taste of France. For the culinary enthusiast and lover of French charm, the Rhone and Saône rivers offer an exquisite experience. These rivers meander through the heart of France, providing access to Lyon (the culinary capital), Avignon (with its impressive Palais des Papes), and the picturesque villages of Provence. Expect fine dining, world-class wines, and a deep dive into the French way of life.
The Douro: Portugal's Golden River. The Douro River, in the heart of Portugal, showcases breathtaking landscapes filled with terraced vineyards, ancient villages, and stunning port wine cellars. Taking this journey ensures access to Porto, the charming capital of northern Portugal, and the Douro Valley, a UNESCO World Heritage site. This choice offers a different perspective, a slower pace, and the warmth of the Portuguese culture.
Selecting Your Cruise Line: Matching Your Style and Budget
Once you’ve selected your river, the next pivotal step is choosing the cruise line. The market offers a diverse range of options, each with its unique personality, pricing structure, and onboard offerings.
Luxury Cruise Lines: Companies like Viking River Cruises, Avalon Waterways, and Uniworld Boutique River Cruise Collection are all well establish in the market. These lines offer premium service, all-inclusive packages (including excursions, beverages and gratuities), and meticulously designed itineraries. They typically feature larger cabins, gourmet dining, and a high level of personalized attention. Ideal for those prioritizing comfort, exclusivity, and a seamless travel experience.
Premium Cruise Lines: These companies offer an excellent balance between quality and value. They often include many of the amenities of luxury lines while maintaining a more moderate price point. Expect well-appointed ships, engaging itineraries, and a strong focus on cultural immersion. Examples include Tauck, which provides expertly curated experiences.
Budget-Friendly Options: Lines like CroisiEurope provide all-inclusive packages at a more accessible price point. They may offer smaller cabins and fewer included amenities, but they still deliver a quality river cruise experience. This choice is useful for those conscious of their budget.
Deciphering Itineraries: Crafting Your Perfect Journey
The itinerary you choose dictates the specific destinations you will encounter. Each cruise line provides a range of itineraries, spanning varying durations and featuring unique combinations of cities, towns, and activities.
Duration: River cruises typically range from 7 to 21 days, with a standard length of 8 days. Consider your available time and desired pace. Longer cruises allow for a more comprehensive exploration of a region, while shorter cruises offer a concentrated experience.
Theme: Some cruises cater to specific interests, such as food and wine, history, or Christmas markets. These themed cruises offer unique excursions, onboard lectures, and special events that enhance the overall experience, such as wine tasting in the Rhine valley or a cooking class in France.
Port Selection: Analyze the ports of call and the activities offered in each location. Do your research to see what interests you more, castles, art, history, or cultural institutions? Assess how much time is allocated to each port and how the excursions align with your interests.
Seasonal Considerations: The time of year significantly impacts the river cruise experience. Spring and fall offer pleasant weather, fewer crowds, and opportunities to witness the changing landscape. Summer is warmer but more crowded. Winter brings Christmas markets and a festive atmosphere along the Rhine and Danube.
Booking Your Cruise: Securing Your Voyage
Once you've narrowed down your preferences, it's time to book your cruise.
Early Booking: Booking in advance, ideally 9-12 months before your desired travel date, offers several advantages: access to the best cabins, early bird discounts, and a wider selection of itineraries.
Cabin Selection: Consider the size, location, and amenities of the cabins. The higher deck cabins (balcony cabins) usually cost more. Consider your comfort and the amount of time you plan to spend in your cabin.
Travel Insurance: Protect your investment by purchasing comprehensive travel insurance. This is especially important for international travel.
Flights and Transfers: Consider the logistics related to your travel itinerary. Many cruise lines offer options for flights, airport transfers, and pre- or post-cruise hotel stays.
Review and Confirm: Before finalizing your booking, carefully review all the details, including the itinerary, inclusions, and cancelation policies. Ensure that you have all the necessary documentation.
Packing Essentials: Preparing for Your River Cruise
Efficient packing is essential for any successful river cruise.
Clothing: Pack versatile clothing that can be layered. Bring comfortable walking shoes, as excursions often involve walking on cobblestone streets. Pack some formal wear for dinner.
Accessories: Don't forget a hat, sunglasses, sunscreen, and insect repellent.
Documents: Keep essential documents organized: passport, visas (if required), cruise documents, flight confirmations, and any necessary medical information.
Electronics: Pack any necessary chargers, adapters, and a portable battery charger for your phone.
Other Items: Remember any personal medications, a small first-aid kit, and any items that will enhance your comfort, such as a journal, books, or binoculars.
Making the Most of Your Cruise Experience: Tips for an Unforgettable Journey
With your trip booked and your bags packed, it's time to prepare for the cruise.
Pre-Cruise Research: Learn about the destinations on your itinerary. Read about the history, culture, and local customs. Understand the currency exchange rates and the use of local languages.
Embrace the Excursions: Participate and engage in the excursions offered by the cruise line.
Engage with the Local Culture: Venture beyond the organized excursions and explore independently. Visit local markets, try regional cuisine, and immerse yourself in the local culture.
Embrace the Slower Pace: River cruises are designed to be relaxing. Take advantage of the opportunities to unwind, enjoy the scenery, and disconnect from the day-to-day routines.
Engage with Fellow Passengers: River cruises foster a sense of community. Take the opportunity to mingle with your fellow passengers.
Be Open to New Experiences: Allow yourself to try new foods, visit new places, and embrace the unexpected. Be flexible and adaptable, as the itinerary can change during the trip itself.
Post-Cruise Considerations: Extending Your Adventure
The journey doesn't necessarily end when you disembark. Consider these options to extend your European exploration:
Extended Stays: Add pre- or post-cruise hotel stays in major cities.
Land Tours: Combine your river cruise with additional land tours.
Travel Insurance: Ensure you have adequate travel insurance to cover you throughout the trip, including any post-cruise activities.
Documentation: Keep all documentation for the trip, including itineraries and receipts. Organize photos and videos of the memories.
A European river cruise is a truly transformative experience, a journey that promises a blend of beauty, culture, and relaxation. By following this comprehensive guide, you'll be well on your way to planning and enjoying the dream trip.
