how to turn on wifi on gateway laptop xp

Title: How FIX WIFI Gateway Connection Problems Notebook Desktop Ultra Slim Creator NV NE M Series NE LT
Channel: Helping Hermit
How FIX WIFI Gateway Connection Problems Notebook Desktop Ultra Slim Creator NV NE M Series NE LT by Helping Hermit
Unlock Your XP Laptop's WiFi: The Secret Gateway Trick!
Unleash Your Legacy Machine: Conquering WiFi on Your XP Laptop
Alright, buckle up, tech adventurers! We're diving headfirst into a mission: breathing new life into those trusty, albeit aging, Windows XP laptops. Before proceeding, let's be honest; these machines are classics. They hold a special place in our tech history. Today, we're unlocking the secrets to reliable WiFi connectivity. This is crucial for exploration and daily tasks.
The XP WiFi Conundrum: A Nostalgic Challenge
Let's face it. Connecting an XP laptop to WiFi can sometimes feel like navigating a minefield. You're bombarded with outdated protocols. Compatibility issues abound. Drivers can be a nightmare. Consequently, frustration is a common side effect. These machines, however, still have a lot of life left. Firstly, we'll bypass the usual headaches. We'll unlock a secret that will get you online. This means exploring a "gateway trick." What exactly is this? It is essentially a clever workaround.
The Gateway Trick Revealed: Your WiFi Salvation
The "gateway trick" hinges on a simple concept: using your smartphone as a WiFi bridge. Think of your phone as the hero. It provides Internet access. Your XP laptop is the grateful recipient. The process is surprisingly straightforward. Firstly, make sure your smartphone has an active internet connection. You'll also need to have the mobile data enabled to proceed. Secondly, enable the "Personal Hotspot" feature. Find this in your smartphone’s settings menu. Ensure your laptop's WiFi adapter is turned on. Now, scan for available WiFi networks. Locate your phone's hotspot name. Connect using the password you created.
Troubleshooting the Connection: Smooth Sailing Ahead
Occasionally, you might encounter a few bumps. No worries! Troubleshooting is part of the fun. First, double-check the password. It's a common culprit. Secondly, confirm your laptop's WiFi adapter is enabled. The physical switch is easy to miss. Also, try restarting both devices. This often works wonders. Finally, make sure your drivers are up-to-date. Head to your laptop manufacturer's website. Download the latest drivers for your wireless adapter. Consider the following suggestions. If you're still having issues, consider a different WiFi adapter.
Beyond the Basics: Optimizing Your XP WiFi Experience
Now that you're connected, let's optimize your experience. Firstly, secure your connection. Use a strong password for your hotspot. Secondly, consider upgrading your browser. Old browsers can be slow and insecure. Firefox and even Chrome can still run on XP. In addition, think about a lightweight antivirus solution. It will protect your system. Furthermore, limit background applications. They drain your resources. Finally, for better speed, get closer to the hotspot.
Why This Trick Works: Understanding the Mechanism
How does this "gateway trick" actually work? Basically, your smartphone acts as a router. It creates a local network. Consequently, your laptop connects to this network. The phone then shares its data connection. This process is called tethering. It's a seamless way to get online. The built-in network bridging is generally compatible. It allows the XP machine to use modern protocols through the phone.
The Perks of a Connected XP Machine: Embracing Nostalgia
So, what can you do once you are connected? The possibilities are endless. You can browse the web, access emails, or stream music. You can also play retro games. It’s a unique way to relive the past. Consider it a journey back in time. Connecting your XP laptop to WiFi fosters a newfound appreciation. You are embracing nostalgia with a modern twist.
Final Thoughts: Keeping the Legacy Alive
This "gateway trick" is a lifeline. It allows your XP laptop to stay relevant. It's a testament to the enduring appeal of older technology. Therefore, don't let those classic machines gather dust. Embrace the challenge. Enjoy the journey. Happy surfing, tech explorers. This solution is easy to implement. It's practical. You will feel satisfied.
WiFi Nightmare! Dell Windows Laptop Refuses Home Network? FIXED!Unlock Your XP Laptop's WiFi: The Secret Gateway Trick!
Hey tech adventurers! Remember the good ol' days of Windows XP? That familiar blue screen, the clunky interface, the… shudders… dial-up internet (for some of us!). Well, if you've still got an XP laptop kicking around – maybe you're nostalgic, maybe you're running specialized software, or maybe you just like the challenge – you've probably run into the age-old problem: trying to connect to modern WiFi networks. We've all been there, staring at that frustrating “limited or no connectivity” message. But fear not, because we're about to dive deep, and I mean deep into the rabbit hole, and unearth the secret gateway trick to getting that vintage beauty online. It's not magic, but it's close!
Decoding the WiFi Woes of Windows XP
Let's face it, XP was born in a different era. The security protocols, the encryption methods – they're ancient history compared to today's cutting-edge WiFi standards. Modern routers speak a different language, and your XP laptop, bless its heart, just doesn't understand. It's like trying to have a conversation with someone who only speaks Latin in a room full of Mandarin speakers!
The Core Culprit: WPA2/3 and Your XP Laptop
The main culprit behind your WiFi woes is often the security protocol used by your router. Modern routers predominantly use WPA2 or WPA3 encryption. These are robust and secure… and sadly, incompatible with the native WiFi capabilities of many XP machines. It's like trying to fit a square peg in a round hole – it just won't work!
The Secret Gateway: Understanding the Bridge
So, what's the solution? The secret gateway trick, we'll call it! It's all about creating a bridge between your XP laptop and the modern internet. Think of it like this: your modern router is a fortress, and your XP laptop can't scale the walls. The trick creates a tunnel – a bridge – that lets your XP machine safely cross over. This often involves using another device as a go-between, and setting it up correctly.
Step-by-Step: The Bridge Construction
We're going to focus on a common and effective method: using a second computer or your smartphone as a wireless hotspot and then bridging the connection. I use my phone all the time. Trust me, this works.
The First Pillar: Preparing Your Go-Between Device (Smartphone/Laptop)
- Mobile Hotspot Enabled (Smartphone): This is the easiest. Turn on your smartphone's mobile hotspot feature. Most smartphones support WPA2 security natively. Make sure to set a strong password! Think of it as securing the entrance to your bridge.
- Wireless Network Connection (Laptop): If using a second laptop, configure it to connect to your home Wi-Fi.
The Second Pillar: Connecting Your XP Laptop to the Gateway
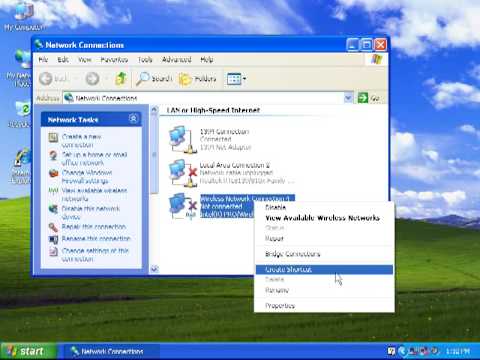
- Locating Available Networks: On your XP laptop, click on the wireless network icon in the system tray (usually in the bottom right corner).
- Selecting Your Hotspot: Find your smartphone or other Wi-Fi devices hotspot name from the available networks list.
- Entering the Password: Enter the password you set for your hotspot. This is the key to unlocking the gateway!
The Final Span: Checking Your Connection
Once your XP laptop connects to the hotspot, you should – fingers crossed! – see a successful connection. Try opening a web browser and navigating to a website. If it works, you've successfully built your bridge!
Troubleshooting the Troublesome: When Things Go Wrong
Sometimes, things don't go smoothly. Here are some common troubleshooting tips:
- Check Password Accuracy: Double-check that you typed the password correctly. The smallest typo can wreck everything!
- Restart Everything: Sometimes, a simple reboot of both devices – the XP laptop and the hotspot device – can work wonders. It's the digital equivalent of hitting reset!
- Firewall Issues: Make sure your firewall isn't blocking the connection. Your firewall might be a little overprotective.
- Update Wireless Drivers: If you can somehow get online in the first place. Then, update the wireless drivers on your XP laptop. This can sometimes fix compatibility issues.
The Security Considerations: A Word of Caution
It's important to note that using an XP laptop online comes with security risks. XP is no longer supported by Microsoft, meaning there are no security updates. Think of it as driving a vintage car without airbags. Ensure that you have a robust antivirus installed and that you’re careful about the websites you visit. Exercise caution: it's always better safe than sorry.
Exploring Alternative Gateways: Other Options
While using a mobile hotspot is a common and often the easiest solution, there are other ways to build a bridge:
- Using a Wireless Ethernet Adapter: This device connects to your router wirelessly, then connects to your XP laptop via Ethernet cable.
- Setting Up a Network Bridge (Advanced): This involves configuring a Windows machine to act as a bridge between the WiFi and the Ethernet connection of the XP Laptop.
The Beauty of Retro: Embracing the Challenge
Why do we bother with all this? Sure, it might seem like a lot of effort to get an ancient computer online. But there's something undeniably satisfying about bringing a piece of computing history back to life. It's like restoring a vintage car. It's a passion project, a nod to the past, and a chance to learn a few things. Plus, the smug satisfaction of getting it to work is unparalleled!
Future-Proofing: Maintaining Your XP Machine
To prolong the life of your XP laptop, I strongly advise using it for specific offline tasks. Think of it as a typewriter - no internet access, just pure productivity! Use it to write, edit photos, or run software that can't run on newer machines. This approach reduces the risk of malware.
The Final Verdict: Is It Worth It?
Absolutely! The effort of unlocking your XP laptop’s WiFi and getting it online is totally worth it. It’s a journey into tech history, a puzzle to solve, and a way to keep a piece of the past alive. It also can be quite fun—something akin to the joy of a jigsaw puzzle.
Closing Thoughts
We've covered the secret gateway trick, the bridge construction, troubleshooting tips, security considerations, and even alternative methods. Hopefully, you're now armed with the knowledge to get your XP laptop back online. Go forth, connect, and enjoy the adventure.
FAQs
1. Why can't my XP laptop just connect directly to my modern WiFi?
Because modern routers primarily use WPA2/WPA3 security protocols, which aren't typically supported by XP's built-in wireless capabilities. It's like trying to speak a language your computer doesn't understand.
2. Is it safe to use an XP laptop online?
It's less safe than using a modern, supported operating system. XP no longer receives security updates, making it more vulnerable to attacks. Use it with caution, a strong antivirus, and stick to secure websites.
3. What's the easiest way to get my XP laptop online?
Most likely using your smartphone's mobile hotspot feature. This is usually quick and simple to set up, and the phone handles the modern security protocols.
4. My connection is slow. What can I do?
Speed depends on your hotspot's connection and the capabilities of your XP laptop's wireless card. Try moving closer to the hotspot or upgrading your wireless card (if possible).
5. Will this work with all XP laptops?
Yes, the methods discussed here are generally applicable. However, your XP laptop needs to have a working wireless card (or a way to connect wirelessly), and your hotspot device needs to be capable of providing a signal.
1) Principal Keywords: XP WiFi Gateway Trick. 2) SEO Headline: XP WiFi Fix: Secret Gateway Trick Revealed! 3) Pathway: XP WiFi Trick 4) Meta Summary: Unlock your Windows XP laptop's WiFi! Discover the secret gateway trick & connect to modern networks. Simple steps & troubleshooting tips inside! 5) Image Alt Text: Vintage laptop with a blue XP screen with a modern smartphone in the background representing the bridge to the internet.
Download Dell Inspiron N5010 WiFi Drivers NOW! (Fix Your WiFi Today!)How To Fix Wifi Not Working In Windows XP Tutorial

By MDTechVideos How To Fix Wifi Not Working In Windows XP Tutorial by MDTechVideos
How to connect Windows XP to your wireless network
By NetComm How to connect Windows XP to your wireless network by NetComm
How to Fix Wifi for Windows 8 Gateway Laptop

By Jacqui Rubsam How to Fix Wifi for Windows 8 Gateway Laptop by Jacqui Rubsam

Title: Turn on Wifi Laptop Solved
Channel: Kevin King
Turn on Wifi Laptop Solved by Kevin King
Laptop Working
Here's the title for your article: The Definitive Guide to Planting and Caring for Hydrangeas: A Gardener's Secret Weapon
The Definitive Guide to Planting and Caring for Hydrangeas: A Gardener's Secret Weapon
The allure of hydrangeas is undeniable. Their opulent blooms, cascading from lush foliage, transform ordinary gardens into breathtaking displays. But the promise of these magnificent shrubs demands more than mere admiration; it requires informed cultivation. Throughout these pages, we embark on an in-depth exploration of hydrangea care, unveiling the secrets to ensuring vibrant blooms and flourishing plants, year after year. Consider this your comprehensive guide – a secret weapon for every gardener striving for hydrangea perfection.
Unveiling the Hydrangea Spectrum: A Variety for Every Garden
Before even considering the trowel, it's essential to understand the vast diversity within the hydrangea family. Each species boasts unique characteristics, and recognizing these distinctions is paramount to successful cultivation. Let's delve into the key players:
- Bigleaf Hydrangeas (Hydrangea macrophylla): These are the archetypal hydrangeas, beloved for their large, mophead or lacecap flower clusters, which are iconic in gardens. They are famous for their ability to change colour based on soil pH, offering a captivating display of pinks, blues, and purples. Within this group, cultivars like 'Endless Summer' and 'Nikko Blue' are particularly popular for their reblooming capabilities, ensuring a prolonged flowering season.
- Panicle Hydrangeas (Hydrangea paniculata): These sturdy shrubs feature cone-shaped flower heads that often begin white and then transform to shades of pink and red as the season progresses. The 'Limelight' and 'Pinky Winky' varieties are highly valued for their exceptional hardiness and impressive size, making them excellent choices for larger landscapes.
- Smooth Hydrangeas (Hydrangea arborescens): Known for their reliable blooms and strong stems, even under less-than-ideal conditions, these hydrangeas are perfect for those seeking low-maintenance beauty. The 'Annabelle' cultivar, with its large, snowball-like flowers, is a perennial favourite.
- Oakleaf Hydrangeas (Hydrangea quercifolia): These native North American hydrangeas distinguish themselves with their distinctive oak-leaf-shaped foliage and striking, cone-shaped flower clusters. Their bark exfoliates, adding year-round interest, and their foliage provides stunning autumn hues. 'Snowflake' and 'Alice' are excellent choices for their beautiful forms and attractive foliage.
- Climbing Hydrangeas (Hydrangea petiolaris): Providing a vertical dimension, these unique hydrangeas climb by aerial roots, offering a unique aesthetic. They require a supportive structure, such as a wall or trellis, to thrive.
Understanding these species and their respective needs sets the foundation for successful hydrangea cultivation.
Planting Hydrangeas: A Strategic Approach
The initial planting process sets the stage for the life of your hydrangea. Careful consideration of location, soil preparation, and planting techniques ensures a strong start.
- Selecting the Perfect Location: Hydrangeas thrive in locations that provide morning sun and afternoon shade, with the exception of some panicle hydrangeas, which can tolerate more sunlight. Avoid planting them in areas exposed to harsh winds, which can damage the delicate foliage. Consider the size of the mature plant when selecting a location, providing ample space for growth.
- Preparing the Soil: Hydrangeas prefer rich, well-draining soil that retains moisture. Amend the soil with compost, well-rotted manure, or other organic matter to improve drainage and fertility. Before planting, conduct a soil test to determine the pH levels. For bigleaf hydrangeas, soil acidity is the key to blooms. Generally, a pH of 6.0 to 6.5 is ideal for pink blooms, while a pH of 5.5 to 6.0 will result in blue blooms.
- Planting Techniques: Dig a hole that is twice as wide as the root ball and just as deep. Gently remove the hydrangea from its container and loosen any circling roots. Place the hydrangea in the hole, ensuring the top of the root ball is level with the ground. Backfill with the prepared soil, gently tamping it down. Water thoroughly after planting and apply a layer of mulch to retain moisture and suppress weeds.
Nurturing Hydrangeas: Essential Care Practices
Once planted, ongoing care is crucial for maximizing the health and beauty of your hydrangeas.
Watering: Hydrangeas require consistent moisture, especially during the growing season. Water deeply and regularly, particularly during dry spells. Avoid overhead watering, which can lead to fungal diseases; instead, water at the base of the plant. Monitor the soil moisture levels and adjust your watering schedule accordingly.
Fertilizing: Fertilize hydrangeas in early spring with a balanced fertilizer. Fertilizers formulated specifically for hydrangeas are also available and often contain trace elements that support bloom development
Pruning: Proper pruning is vital for maintaining the shape, promoting flowering, and removing dead or diseased wood. Different hydrangea species have different pruning requirements:
- Bigleaf Hydrangeas: Prune dead or diseased wood in late winter or early spring. Since these bloom on old wood, avoid pruning in late summer or fall, as this can remove the flower buds. It's important to only prune these when necessary.
- Panicle Hydrangeas: Prune these in late winter or early spring to shape the shrub and encourage new growth.
- Smooth Hydrangeas: These hydrangeas can be pruned heavily in late winter or early spring to promote vigorous growth and abundant blooms.
- Oakleaf Hydrangeas: Prune lightly after flowering to remove spent flower heads and shape the plant.
- Climbing Hydrangeas: Prune after flowering to remove dead or overcrowded stems.
Mulching: Apply a layer of mulch around the base of the hydrangea to retain moisture, regulate soil temperature, and suppress weed growth. Use organic mulches, such as shredded bark or compost. Replenish the mulch annually.
Pest and Disease Management: Hydrangeas are relatively pest-resistant, but they can be susceptible to certain issues. Common pests include aphids, spider mites, and Japanese beetles. Disease can include powdery mildew and leaf spot. Monitor plants regularly and take appropriate action if you notice any problems.
Changing Flower Color: The color of bigleaf hydrangeas can be adjusted by manipulating the soil pH. To achieve blue blooms, lower the soil pH by adding aluminum sulfate. To achieve pink blooms, raise the soil pH by adding lime. Avoid using fertilizers that contain phosphorus, as it can interfere with colour changes.
Troubleshooting Common Hydrangea Problems
Even with the best care, hydrangeas can sometimes encounter challenges. Knowing how to identify and address common problems is key to maintaining healthy plants.
Lack of Blooms: This is one of the most common complaints. The reasons can vary, including:
- Improper Pruning: Pruning bigleaf hydrangeas at the wrong time can remove flower buds.
- Insufficient Sunlight: Hydrangeas need adequate sunlight to bloom.
- Too Much Fertilizer: Excessive nitrogen can result in lush foliage but fewer flowers.
- Cold Damage: Late frosts can damage flower buds, preventing blooming
Wilting Foliage: This is often a sign of inadequate watering, particularly during hot or dry conditions. Additionally, wilting can be indicative of root rot.
Yellowing Leaves: Often this is a sign of a nutrient deficiency or may mean that you are overwatering, which can lead to root rot.
Pests and Diseases: Identify and address any pest or disease problems promptly.
Winter Protection: Safeguarding Your Hydrangeas
In colder climates, protecting hydrangeas during the winter months is essential to ensure their survival and vibrant blooms in the spring.
- Mulching: Add a thick layer of mulch around the base of the plant in late fall to insulate the roots.
- Wrapping: For bigleaf hydrangeas, consider wrapping the plant with burlap or other protective material to shield it from harsh winter winds and cold temperatures.
- Containerized Hydrangeas: If you have hydrangeas in containers, move them to a sheltered location, such as a garage or shed, during the winter.
Extending the Hydrangea Season: Beyond the Blooms
The beauty of hydrangeas extends beyond their flowering season.
- Dried Flower Arrangements: Harvest the blooms in late summer or early fall to create stunning dried flower arrangements. Cut the stems and hang the flowers upside down in a cool, dark, and well-ventilated area for several weeks until they are completely dry.
- Foliage Interest: Oakleaf hydrangeas offer particularly dramatic fall foliage, providing a seasonal display of warm hues.
- Adding Texture to the Garden: The large leaves of hydrangeas add texture and depth to any garden.
Embracing the Hydrangea Journey: A Gardener's Reward
Growing hydrangeas is a rewarding endeavor. With patience, knowledge, and the proper care, you can cultivate these magnificent shrubs and enjoy their breathtaking beauty for years to come. By embracing the secrets of hydrangea cultivation, you'll transform your garden into a showcase of vibrant blooms and lush foliage, delighting both yourself and all who behold them. The journey of a thousand blooms begins with the first step. Plant your hydrangeas
