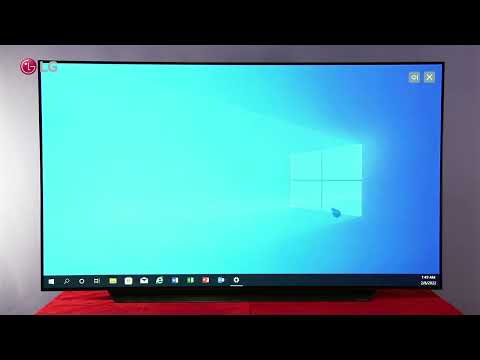
connect laptop to lg smart tv using wifi

Title: How to Cast Windows Laptop Screen on LG Smart TV Wirelessly Connect & Mirror
Channel: Fix369
How to Cast Windows Laptop Screen on LG Smart TV Wirelessly Connect & Mirror by Fix369
how to connect lg smart tv to laptop using wifi direct, how to connect laptop to lg smart tv wirelessly
Laptop to LG Smart TV Wireless: The SHOCKINGLY Easy Trick!
Unlock Your LG Smart TV: The Wireless Laptop Connection You NEED to Know!
Have you ever wished you could beam your laptop screen directly to your LG Smart TV? Are you tired of wrestling with HDMI cables or squinting at a tiny screen? Well, prepare to be amazed. Because I’m about to reveal a secret, a shockingly easy trick to wirelessly connect your laptop to your LG Smart TV. This isn’t just about convenience; it's about transforming your viewing experience.
The Frustration of Tangled Wires and Tiny Screens (A Problem No More!)
Let’s be honest. Dealing with wires is a pain. Constantly plugging and unplugging cables is tedious. You might also face the restrictions of your display, especially for presentations or movie nights. The solution? Ditch the cords and embrace the freedom of wireless streaming. It’s remarkably simple, as you will soon discover.
Decoding the Wireless Magic: The Key Players
The key to this wireless connection lies in a few essential pieces of technology. Firstly, you need a laptop. Secondly, and obviously, an LG Smart TV, preferably one manufactured in the last few years. The more recent your TV model, the smoother the process usually is. Finally, a stable home Wi-Fi network is crucial. Make sure your laptop and TV are connected to the same network.
Step-by-Step Guide: Connecting Your Laptop Effortlessly
Now, let's get into the actual connection process. It's so straightforward, you’ll be streaming in minutes. Therefore, gather your devices and follow these simple instructions:
Power Up and Network Check: Turn on your LG Smart TV. Then, ensure your laptop is also running. Make sure they are both connected to your home Wi-Fi network.
Access the TV's Input Menu: Locate the "Input" or “Source” button on your LG TV remote. Then, push the button. You should see a list of available input options on your screen.
Find and Select Screen Mirroring: The options may differ depending on your LG TV model, nevertheless, look for an option like "Screen Mirroring," "Screen Share," or "Miracast." Select this option using your remote.
On Your Laptop: The Search Begins: Next, on your laptop, go to your Windows settings. Otherwise, open your Control Panel. In Windows 10 and 11, you'll commonly find this via the notification center icons.
Connect to Your TV: In your display or connected devices settings, look for an option to "Connect to a wireless display". Your LG Smart TV should appear in the list of available devices. Click on your TV's model.
The Magical Connection: Your laptop will now start connecting to your TV. The screen will display what is visible on your laptop.
Start Streaming: Once connected, you can start viewing your laptop content on your LG Smart TV.
Troubleshooting Common Roadblocks: Quick Fixes
Encountering an issue? Don't worry! Troubles sometimes happen. But finding a solution is usually simple. First, make sure both your laptop and TV are on the same Wi-Fi network. If the connection is unstable, try restarting both devices. Check the LG TV's settings to ensure screen mirroring is enabled. Furthermore, update your laptop's graphics drivers.
Benefits Beyond Belief: Why You'll Love This
The benefits of this wireless setup are numerous. First, you gain instant access to your laptop's content on a larger screen. This is ideal for presentations, streaming movies and TV shows. It's great for working with spreadsheets, and even showing photos and videos. It frees you from the limitations of a small laptop screen. By the way, it allows for a more immersive and social viewing experience.
Optimizing Your Experience: Tips and Tricks
To maximize your viewing pleasure, consider these extra tips. To begin, optimize your laptop's resolution settings to match your TV's resolution for the best image quality. For optimal performance, reduce the distance between your laptop and the TV. In addition, close any unnecessary applications running on your laptop to free up processing power. You can also adjust the audio settings on your laptop to control the output.
Beyond the Basics: Exploring Advanced Features
Want to take it a step further? Some LG Smart TVs offer advanced features, like dual-screen mirroring. This allows you to display different content on your laptop and your TV simultaneously. Experiment with these settings to customize your experience. As well as that, check your TV's user manual for more specific instructions and advanced settings.
Final Thoughts: Embrace the Wireless Revolution!
Wireless connectivity is the future. You now know how to connect your laptop to your LG Smart TV. The process is simple and rewarding. So, go ahead and enjoy the freedom and convenience of wireless streaming. You will wonder why you ever bothered with cables in the first place. Embrace the wireless revolution, and elevate your entertainment experience today!
Unlock Any WiFi: The Laptop Trick They Don't Want You To KnowLaptop to LG Smart TV Wireless: The SHOCKINGLY Easy Trick!
Hey everyone! Ever been sprawled on the couch, completely engrossed in a movie on your laptop, only to wish you could experience it bigger and better? I know I have! Nothing’s worse than squinting at a small screen when you could be enjoying the full cinematic experience on your gloriously large LG Smart TV. We’ve all been there, right? Well, prepare to be amazed, because connecting your laptop to your LG Smart TV wirelessly is not the headache you might think it is. In fact, it's surprisingly simple. Forget wrestling with tangled HDMI cables; we're diving into the shockingly easy trick that lets you stream your laptop content directly onto your TV screen, hassle-free!
1. The Wireless World Awaits: Why Go Wireless Anyway?
Let's be honest, wires – they're the bane of our existence sometimes. They tangle, they trip you up, and they just look messy. Wireless connectivity, on the other hand, is graceful and liberating. Imagine the freedom: you can be anywhere in the room, laptop in hand, controlling the playback on your TV. No more tethering yourself to a single spot! It's like upgrading from a horse-drawn carriage to a sleek, futuristic sports car. Wireless allows you to:
- Maximize Comfort: Lounge on your sofa, sprawled out as you please.
- Maintain Aesthetics: No unsightly cables cluttering your living room.
- Flexibility: Watch movies, present presentations, or browse the web from anywhere in your Wi-Fi's reach.
- Convenience: Easy to set up and use.
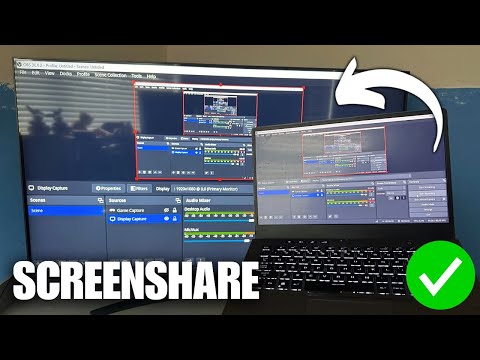
2. Unveiling the Magic: Meet Your LG Smart TV and Laptop’s Secret Weapon – Screen Mirroring!
The core of this magic trick lies in a feature called screen mirroring. Think of it as a digital mirror reflecting your laptop's screen onto your TV. Most modern LG Smart TVs come equipped with this capability, and it's generally found under a few different names like "Screen Share," "Miracast," or simply "Screen Mirroring." The same goes for your laptop, most likely running Windows or macOS. The beauty of this method is its simplicity; it avoids complicated configurations and lets you seamlessly transfer your laptop's content to the larger screen.
3. Windows Wonders: A Step-by-Step Screen Mirroring Guide (For Windows Users)
Alright Windows users, let’s get down to brass tacks! Here’s how to connect your laptop to your LG Smart TV wirelessly:
- Ensure Compatibility: Make sure both your laptop and your LG Smart TV support screen mirroring. This is generally the case with newer models.
- Connect to Wi-Fi: Both devices need to be connected to the same Wi-Fi network. This is crucial for the connection to work. Think of the Wi-Fi network as the invisible bridge that connects them.
- Open the Action Center: Click the notification icon (usually a speech bubble) in your Windows system tray (bottom right corner of your screen). Or, you can press the Windows key + A.
- Click "Connect": You should see a "Connect" button. Click it.
- Select Your TV: Your LG Smart TV should appear in the list of available devices. Click on your TV’s name.
- Confirm on Your TV: Your TV will likely prompt you to accept the connection. Do so.
- Enjoy! Your laptop screen should now be mirrored on your TV!
It’s like magic, right? But even I am left speechless.
4. macOS Mastery: Connecting Your MacBook Wirelessly to Your LG Smart TV
If you’re a Mac user, the process is just as easy, maybe even a bit smoother. Here's how to mirror your MacBook's screen:
- Check for AirPlay Compatibility: Ensure your LG Smart TV supports AirPlay 2 (this is more common in newer models).
- Connect to Wi-Fi: Like Windows, both your MacBook and your LG Smart TV must be on the same Wi-Fi network.
- Click the Control Center Icon: Click the Control Center button (two toggles) in the top right corner of your screen (next to the clock).
- Select "Screen Mirroring": This will open a list of available devices.
- Choose Your TV: Select your LG Smart TV from the list.
- Enter the Code: If prompted, enter the AirPlay passcode displayed on your TV.
- Voilà! Your MacBook screen is now mirrored on your TV.
5. Troubleshooting Time: What To Do If Things Get a Little… Sticky?
Let's face it, sometimes things just don't go according to plan. If you encounter any issues, here are some common troubleshooting tips:
- Check Your Wi-Fi Connection: Ensure both devices are connected to the same network and that the connection is stable. A weak Wi-Fi signal is the most common culprit.
- Update Your Drivers: Outdated graphics card drivers on your laptop can sometimes cause problems. Update them via your laptop’s manufacturer's website.
- Restart Your Devices: Turn off both your laptop and your TV, then restart them. This often clears up minor glitches.
- Check for Software Updates: Make sure your LG Smart TV and your laptop’s operating system are up to date. Updates often include bug fixes that can resolve connectivity issues.
- Factory Reset (Last Resort): If all else fails, you may need to reset your TV to its factory settings. Be aware that this will erase your personalized settings. You can do this via the settings menu on your LG TV.
6. Beyond Screen Mirroring: Unlocking the Full Potential - Other Methods Worth Exploring
While screen mirroring is the easiest method, there are other ways to connect your laptop to your LG Smart TV, depending on your needs and the capabilities of your devices.
- Using a Streaming Device: Devices like Chromecast, Roku, or Amazon Fire Stick can act as intermediaries, allowing you to cast content from your laptop to your TV even if screen mirroring isn’t fully compatible.
- DLNA: Digital Living Network Alliance (DLNA) is a standard that allows devices to share media files over a network. If both your laptop and your TV support DLNA, you can stream videos, photos, and music directly without mirroring the entire screen.
- HDMI Cable (For The Traditionalists): Even though we're focusing on wireless, sometimes a good old-fashioned HDMI cable is the best solution, especially for gaming to ensure the best visual quality.
7. Optimizing Your Experience: Tips and Tricks for Seamless Streaming
Once you've got your laptop connected to your LG Smart TV, here are some tips to enhance your viewing experience:
- Adjust Display Settings: Fine-tune the display settings on your TV for optimal picture quality. Experiment with brightness, contrast, and color settings.
- Optimize Audio: Ensure your TV’s audio settings are optimized. Use an external soundbar for a more immersive audio experience.
- Close Unnecessary Apps: Close any background applications on your laptop that might be using bandwidth.
- Positioning: Make sure that both the TV and the laptop are in range of your router to get the best Wi-Fi performance!
8. The Power of Presentations: Using Your Laptop for Work or School
The wireless connection isn't just for movies; it's perfect for presentations, too. Imagine delivering a vibrant slideshow or video from your laptop to your TV for a captive audience. This is the go-to-strategy for most of my presentations.
9. Gaming On The Big Screen: Unleash Your Inner Gamer
Level up your gaming experience by playing your favorite games on your large LG Smart TV. It's ideal for family game nights! It's ideal for family game nights, or even just relaxing alone and enjoy your big screen experience.
10. Photo and Video Sharing: Sharing Memories with Friends and Family
Share your cherished memories with loved ones by displaying photos and videos from your laptop on your LG Smart TV. Create a beautiful photo slideshow of a recent vacation!
11. Streamlining Your Entertainment: Building Your Ultimate Home Theater
The wireless connection is a cornerstone of your entertainment, allowing you to build an ultimate home theater setup. Get the popcorn ready and let's watch a film!
12. Choosing the Right Content: Making the Most of Your Streaming Experience
What will it be tonight? A movie marathon, streaming TV shows, or a video game session? Whatever your mood, your laptop and LG Smart TV are ready for the occasion.
13. The Impact on Productivity: Work and Play, Blended with Ease
Your laptop and LG Smart TV partnership is not just for fun; it can also enhance your productivity. Expand your workspace, and make your life more effective!
14. Considering the Future: Keeping Up with Technology Trends
The world of technology is always evolving, so keep an eye on advancements in wireless connectivity and features that enhance the user experience.
15. Final Thoughts: Embracing the Effortless Wireless Lifestyle
Connecting your laptop to your LG Smart TV wirelessly is no longer a daunting task. With a little bit of know-how, you can transform your viewing experience and enjoy the freedom of wireless connectivity.
Turn Your Windows 8.1 Laptop into a WiFi Hotspot: The SHOCKINGLY Easy Trick!LG WebOS TVs How To Connect A Laptop To You LG TV - WebOS 6.0
By LG USA Support LG WebOS TVs How To Connect A Laptop To You LG TV - WebOS 6.0 by LG USA Support
How to Connect Windows Laptop to LG Smart TV - Wireless

By Home Helper How to Connect Windows Laptop to LG Smart TV - Wireless by Home Helper
How To Share Laptop Screen To LG Smart TV Wirelessly
By Your Fix Guide How To Share Laptop Screen To LG Smart TV Wirelessly by Your Fix Guide

Title: How to Connect & Mirror Laptop Screen on Any Smart TV Wirelessly No App
Channel: MJ Tube
How to Connect & Mirror Laptop Screen on Any Smart TV Wirelessly No App by MJ Tube
Laptop Working
Here is the title: The Ultimate Guide to Planting and Caring for Rose Bushes
The Ultimate Guide to Planting and Caring for Rose Bushes
The allure of the rose, a timeless symbol of beauty, love, and celebration, is undeniable. Its velvety petals, intoxicating fragrance, and vibrant hues have captivated humanity for centuries. While the rose’s elegance may seem daunting to cultivate, with the correct knowledge and diligent care, anyone can experience the joy of growing these exquisite flowers. This comprehensive guide will equip you with the necessary tools and insights to successfully plant, nurture, and enjoy the beauty of your very own rose bushes.
Choosing the Right Rose Bush for Your Garden
The first and perhaps most crucial step in rose cultivation is selecting the appropriate variety. The sheer diversity of rose types can be overwhelming, so understanding the key distinctions is essential. Consider your local climate, available sunlight, and desired aesthetic when making your selection.
Hybrid Teas: Renowned for their classic, high-centered blooms and long stems, Hybrid Teas are ideal for cutting and creating stunning bouquets. They often produce one magnificent flower per stem. Examples include 'Peace,' 'Mr. Lincoln,' and 'Double Delight.' They thrive in full sun and require regular pruning.
Floribundas: These roses offer a profusion of blooms displayed in clusters, making them a dazzling display of color in the garden. They are generally hardier and more disease-resistant than hybrid teas, making them a good choice for beginners. Popular varieties include 'Iceberg' and 'Julia Child.'
Grandifloras: A cross between Hybrid Teas and Floribundas, Grandifloras share characteristics of both. They produce large, shapely blooms on long stems, but also offer a generous display of flowers. 'Queen Elizabeth' is perhaps the most famous example.
Miniature Roses: Perfect for smaller gardens, containers, or edging beds, miniature roses offer all the beauty of full-sized roses in a compact form. They are easy to care for and come in a wide array of colors.
Climbing Roses: These vigorous roses can be trained to climb walls, fences, arbors, and other structures. They provide a romantic and vertical dimension to the garden. 'Zephirine Drouhin' and 'New Dawn' are popular choices.
Shrub Roses: Known for their disease resistance and hardiness, shrub roses offer a wide range of bloom types, from single to fully double. They are relatively low-maintenance and often bloom repeatedly throughout the season. David Austin roses, a popular sub-category, are known for their old-fashioned charm and exquisite fragrance.
Preparing the Soil: The Foundation of Healthy Roses
Roses are heavy feeders and require well-draining soil rich in organic matter to thrive. Proper soil preparation is paramount for their long-term health and performance.
Soil Testing: Before planting, conduct a soil test to determine its pH level and nutrient content. Roses prefer a slightly acidic to neutral pH range (6.0 to 7.0). Adjust the soil pH if necessary by adding lime to raise the pH or sulfur to lower it. A soil test will also reveal any nutrient deficiencies that need to be addressed.
Soil Amendment: Amend the soil with generous amounts of organic matter, such as compost, well-rotted manure, or peat moss. Organic matter improves drainage, aeration, and water retention, while also providing essential nutrients. Dig a hole that is at least twice the width of the rose bush's root ball and just as deep. Break up the soil in the bottom of the hole to encourage root growth.
Planting Location: Roses require at least six hours of direct sunlight per day. Choose a location that receives ample sunlight and has good air circulation to help prevent fungal diseases. Avoid planting roses in areas where water pools or where they will be crowded.
Planting Your Rose Bush: A Step-by-Step Guide
Planting a rose bush correctly is a critical step in its successful establishment.
Bare-Root Roses: Soak the bare roots in water for several hours, or even overnight, before planting. This rehydrates the roots and encourages growth.
Container-Grown Roses: Gently remove the rose bush from its container. Loosen any circling roots with your fingers or a knife.
Planting: Position the rose bush in the prepared hole, ensuring the bud union (the swollen area at the base of the stems) is level with or slightly below the soil surface in colder climates, and slightly above in warmer climates. Backfill the hole with the amended soil, gently tamping it around the roots to eliminate air pockets.
Watering: Water the newly planted rose bush thoroughly, ensuring the soil is well-saturated. This helps to settle the soil around the roots.
Mulching: Apply a layer of mulch, such as shredded bark, wood chips, or compost, around the base of the rose bush. Mulch helps to retain moisture, suppress weeds, and regulate soil temperature. Keep the mulch a few inches away from the stems to prevent rot.
Watering and Fertilizing: Nourishing Your Roses
Proper watering and fertilizing are essential for supporting vigorous growth and abundant blooms.
Watering: Water roses deeply and regularly, especially during dry spells. Water at the base of the plant, avoiding wetting the foliage, which can promote fungal diseases. The frequency of watering will depend on the climate, soil type, and weather conditions. Aim to keep the soil consistently moist, but not waterlogged.
Fertilizing: Feed roses regularly with a balanced fertilizer specifically formulated for roses. Apply fertilizer according to the manufacturer's instructions. Start fertilizing in early spring, just as new growth emerges, and continue throughout the growing season, stopping at least six weeks before the first expected frost.
Fertilizer Types: Granular fertilizers are easy to apply but release nutrients slowly. Liquid fertilizers provide a quick boost but require more frequent application. Choose a fertilizer type that suits your preferences and gardening style.
Pruning: Shaping and Maintaining Your Rose Bushes
Pruning is an essential practice for maintaining the health, shape, and blooming potential of rose bushes.
Timing: The best time to prune roses is in late winter or early spring, before new growth begins. However, you can also prune lightly throughout the growing season to remove spent blooms and dead or diseased branches.
Types of Pruning:
- Deadheading: Removing spent blooms to encourage new flower production. Cut the stem down to the first five-leaflet leaf.
- Thinning: Removing overcrowded or crossing branches to improve air circulation and reduce the risk of disease.
- Shaping: Pruning to maintain the desired shape of the bush.
- Rejuvenation: Severely pruning old and neglected roses to encourage new growth.
Pruning Techniques:
- Use sharp pruning shears or loppers to make clean cuts.
- Make cuts at a 45-degree angle, just above an outward-facing bud.
- Remove dead, diseased, or damaged canes.
- Remove any suckers that sprout from below the bud union.
- Thin out the center of the bush to allow for good air circulation.
Protecting Your Roses from Pests and Diseases
Roses are susceptible to various pests and diseases. Early detection and proper management are crucial for preventing serious problems.
Common Pests: Aphids, spider mites, Japanese beetles, and rose chafers are common rose pests. Inspect your roses regularly for signs of infestation. Insecticidal soap, horticultural oil, and neem oil are effective control methods. Hand-picking pests and removing infested leaves can also be effective.
Common Diseases: Black spot, powdery mildew, and rust are common rose diseases. Choose disease-resistant varieties whenever possible. Provide good air circulation to minimize the risk of fungal diseases. Apply fungicides as needed, following label instructions carefully. Remove and dispose of infected leaves promptly.
Winterizing Your Roses: Preparing for the Dormant Season
Preparing your roses for winter is essential to ensure their survival and ensure healthy growth the following spring.
Stopping Fertilizing: Cease fertilizing roses at least six weeks before the first expected frost.
Watering: Continue watering roses deeply until the ground freezes.
Pruning: Prune roses lightly in late autumn to remove any dead or diseased canes. Avoid heavy pruning, as it can stimulate new growth that is vulnerable to frost damage.
Protecting: In colder climates, protect your roses from harsh winter conditions. Mound soil or mulch around the base of the bush to protect the bud union. You can also wrap the canes with burlap or rose cones to provide additional insulation.
Enjoying the Beauty of Your Roses
The rewards of growing roses are immeasurable. From the exquisite blooms to the intoxicating fragrance, roses offer a unique and enduring beauty. Here are some tips for enjoying your roses:
- Cut Flowers: Cut roses in the early morning, when the blooms are most hydrated. Cut the stems at an angle and place them immediately in fresh water with floral preservative.
- Arrangements: Create stunning bouquets and arrangements using your freshly cut roses. Experiment with different colors, shapes, and textures.
- Gifting: Share the beauty of your roses with friends and loved ones. A bouquet of homegrown roses is a thoughtful and heartfelt gift.
- Appreciating: Take time each day to appreciate the beauty of your roses. Observe their growth, admire their blooms
