laptop sony no enciende la wifi

Title: Sony Vaio Series Laptop Wi-Fi Ethernet Internet Not Working Problemmacniteshkeyboardtricks2024
Channel: Mac Nitesh
Sony Vaio Series Laptop Wi-Fi Ethernet Internet Not Working Problemmacniteshkeyboardtricks2024 by Mac Nitesh
Sony Laptop WiFi DEAD? Fix This NOW!
Sony Laptop WiFi Woes? Breathe Easy, We've Got This!
Alright, fellow tech travelers, let's tackle a common digital dilemma head-on. Your Sony laptop’s WiFi refuses to cooperate. The dreaded "no internet connection" message stares back at you. Don't panic! Before you hurl your beloved machine across the room, let's troubleshoot this together. We're going to get that WiFi back online, painlessly.
Decoding the Wireless Wilderness: Pinpointing the Problem
First things first: let’s play detective. Is your WiFi truly dead, or just temporarily incapacitated? Before you dive into complex solutions, perform some basic checks. Is the physical WiFi switch – if your laptop has one – enabled? It might be a simple flick of a switch. Also, check the WiFi icon in your system tray. Does it show a red X, a yellow warning triangle, or something altogether different? Next, verify your other devices. Do they connect to the internet without difficulty? If your phone and tablet are surfing the web flawlessly, the problem likely lies with your Sony laptop.
Unveiling the Network Adapter: A Digital Detective Story
Now, let’s dig a little deeper into the heart of your laptop's connectivity. The network adapter is the unsung hero of your wireless world. It’s the bridge between your laptop and your router. So, how do we inspect this vital component?
- The Device Manager Deception: Right-click on the Start button (or press the Windows key + X). Select "Device Manager." This opens a window into the hardware underworld.
- Network Adapter's Nest: Expand the "Network adapters" section. You should see entries related to your WiFi – perhaps named something like "Wireless Network Adapter" or "Wi-Fi adapter."
- Status Check: Are there any exclamation marks or cross marks next to your WiFi adapter? These are tell-tale signs of trouble. It could indicate driver issues or hardware conflicts.
- Driver Drive: If you see any warning symbols, right-click on the adapter. Choose "Update driver." Select the option to search automatically for updated driver software. Windows might find a new driver to breathe life back into your WiFi.
The Router Renegade: Is It the Culprit?
Sometimes, the problem isn't your laptop at all. It’s the router. This is the home base for your internet connection. Let's not overlook this crucial piece.
- Restart Ritual: Unplug your router and modem (if separate) for about 30 seconds. This simple reset can often resolve temporary glitches. Then, plug them back in. Give them a few minutes to boot up completely.
- Signal Strength Scrutiny: Are you located too far from the router? Walls and other obstructions weaken WiFi signals. Bring your laptop closer to the router. See if that solves the issue.
- Channel Chaos: Your router broadcasts on a channel. Other devices can interfere with the router's signal. You can change the channel in the router's settings. Find a less congested channel.
Software Shenanigans: Resolving Windows' Wireless Workaround
Your operating system, Windows, plays a critical role in managing your WiFi connection. Sometimes, software glitches are the root of the problem.
- Network Troubleshooter Tactics: Windows has a built-in troubleshooter meant to tackle network issues. Search for "Network troubleshooter" in the Windows search bar. Run it. Let the system identify and resolve potential problems.
- Forget and Reconnect: Have you ever tried to reconnect to your WiFi network? Sometimes, deleting the saved network profile and reconnecting can work wonders. Go to your WiFi settings. Find your network. Then, select "Forget." Re-enter your password to reconnect.
- Firewall Fumbles: Occasionally, your firewall might be blocking your WiFi connection. Review your firewall settings. Temporarily disable your firewall to test if it's the cause. But, remember to re-enable it afterward. This is a security precaution.
Hardware Hurdles: When Things Get Physical
If software fixes fail, the issue might be related to the hardware. Don't despair, though.
- Internal Inspection: If you’re comfortable with it, try opening your laptop. Check for any loose connections within the WiFi adapter. But, only do this at your own risk. Always turn off your laptop before beginning. Take detailed photos before and after for easier reassembly.
- External Adapter Alternative: Consider buying a USB WiFi adapter as another option. This can bypass any internal adapter problems. It's a quick and easy fix. This provides an alternative means of connecting.
Final Thoughts: Reclaiming Your Wireless Freedom
Dealing with WiFi troubles isn't fun. Yet, with a bit of detective work and these troubleshooting steps, you will be back online quickly. In most cases, one of the suggested solutions will do the trick. Remember to be patient and methodical. If you've tried everything and it still doesn't work, consider seeking professional help. A qualified technician can provide more specialized assistance. Now go forth and conquer, and let the digital waves roll freely once more!
Laptop Refuses to See My SJCAM SJ4000 WiFi? (Solved!)Sony Laptop WiFi DEAD? Fix This NOW!
Hey there, fellow Sony laptop users! Ever stared at that little WiFi icon in the corner of your screen, that usually glows with vibrant life, and found it… lifeless? Yep, a dead WiFi connection on your Sony laptop can be a real mood killer. Suddenly, your social media feed becomes a distant dream, your streaming services taunt with buffering circles, and your deadlines feel like they're running you over at the speed of dial-up. Been there, done that, bought the t-shirt, and trust me, we've all been there. But don't panic! We're going to walk through some troubleshooting steps that will breathe life back into your connection and, hopefully, get you back online faster than you can say "free Wi-Fi."
1. First Things First: Is It Really Your Laptop?
Before we dive headfirst into tech solutions, let's do a quick sanity check. Imagine your internet is a grumpy old cat. Before you start swatting at it, are the other cats in the neighborhood (i.e., your other devices) having issues too? Try these quick diagnostic steps:
- Check Your Other Devices: Does your phone, tablet, or another laptop connect to the WiFi? If they can, the problem likely isn't your internet service provider (ISP) or your router. If they can't, you know the issue is broader and the fix is most likely for your network provider.
- Restart Your Router: This is the digital equivalent of a good night's sleep for your internet. Unplug it, wait a full 30 seconds (yes, count them!), plug it back in, and give it a few minutes to reboot. Think of it as giving your router a fresh start. Sometimes, that's all it takes to get things humming again.
2. The Simple Solutions: Basic WiFi Troubleshooting
Okay, so your other devices are working, and you've rebooted the router. Still no WiFi on your Sony laptop? Let's move on to some straightforward fixes – the low-hanging fruit, if you will:
- The Airplane Mode Fiasco: Are you accidentally in Airplane Mode? Check the WiFi icon again. Is there a little airplane symbol? Disable Airplane Mode (usually found in the Action Center at the bottom right of your screen, or by pressing the Airplane Mode key, typically on the top row of your keyboard, alongside the function keys).
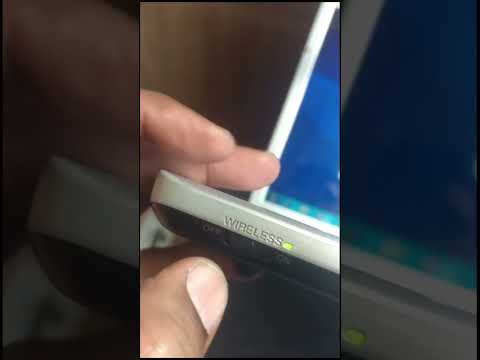
- The Hidden Switch: Some Sony laptops have a physical WiFi switch, often on the side or front. Make sure it's flipped to the "On" position. It's easy to overlook this little guy!
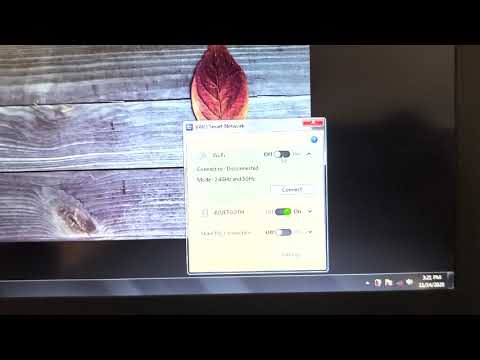
- The Software Switch Glitch: Windows has its own WiFi switch. Go to the Action Center (the little speech bubble icon) and make sure the WiFi tile is enabled. It should be highlighted and a color, rather than a grayed-out, inactive state.
3. Diving Deeper: Your Network Adapter Needs Love
If the simple fixes didn't work, we're going to get our hands a little dirtier. It’s time to check on your network adapter. Think of it as the messenger carrying your WiFi signal. If the messenger is ill, so is your connection.
- Checking the Adapter Status: Right-click the Start button, select "Device Manager." Expand "Network adapters." You should see your WiFi adapter listed (e.g., "Intel Wireless-AC 9560"). Is there a yellow exclamation mark or a red "X" on the adapter icon? That’s a bad sign.
- Updating the Driver: Right-click your WiFi adapter in Device Manager and select "Update driver." Choose “Search automatically for drivers.” Windows will attempt to find and install the latest driver. This is like giving the messenger a new, better horse.
- Uninstall and Reinstall the Driver: If updating doesn't work, right-click the adapter, select "Uninstall device," and confirm. Restart your laptop, and Windows should automatically reinstall a fresh driver upon startup. This is like sending in a new messenger altogether.
4. The Troubleshooter to the Rescue: Let Windows Do the Work
Microsoft has built-in troubleshooters, and they can be surprisingly effective. Let's make use of it, since its there.
- Run the Network Troubleshooter: Type "troubleshoot settings" in the Windows search bar and open it. Under "Network and Internet," select "Network Adapter" and run the troubleshooter. It will automatically detect and try to fix problems.
5. Beyond the Basics: Advanced Troubleshooting
If we're still at a standstill, we need to get a little technical. Prepare to embrace the command prompt and a few deep breaths.
- Flush the DNS Cache: Open Command Prompt as an administrator (search for "cmd," right-click, and select "Run as administrator"). Type
ipconfig /flushdnsand press Enter. This clears your DNS cache, which stores website address information. It's like clearing out the cobwebs from your system. Then runipconfig /releasefollowed byipconfig /renewfor good measure. - Check for Interference: Are you near other electronic devices, microwaves, or thick walls? These things can interfere with your WiFi signal. Try moving closer to your router or changing its location to see if that helps.
6. Factory Reset & Potential Loss Concerns, A Relatable Concern For All
If you have exhausted all the above options, a factory reset would be a last resort. But remember, this is like taking a sledgehammer to a problem. Data loss might occur. But, keep in mind, this will put your laptop back in the state it was when you first bought it.
- Back Up Your Data: Before you even think about a factory reset, back up all your important files to an external drive or cloud storage.
- Perform the Reset: Go to Settings > Update & Security > Recovery. Under "Reset this PC," click "Get started." You'll have options to keep your files or remove everything. Choose wisely.
- Reinstall Your Apps and Drivers: After the reset, you'll need to reinstall your apps and any unique drivers you have.
7. The Hardware Hurdles: Is It Really Dead?
There is a remote possibility that your WiFi adapter itself has failed. This is like the messenger dying on their way to deliver the message. If you've tried everything else, and you still can't connect, this is on the list.
- Consider Professional Help: If you're not comfortable opening your laptop, take it to a qualified technician. They can diagnose hardware problems.
- External WiFi Adapter: Alternatively, use a USB WiFi adapter if the internal one is faulty. This will act as a new messenger.
8. Router Configuration Clues: Check Your Router Settings
The issue could be with your router, rather than your laptop.
- Check the Router's Broadcast: Make sure your router is broadcasting its SSID (network name). Some routers have a setting to hide the SSID.
- Channel Interference: Your router might be on a channel with too much interference. Access your router's settings (usually by typing 192.168.1.1 or 192.168.0.1 into your browser) and try different channels.
9. Power Saving Puzzles: Preventing the Sleep of WiFi
Sometimes, Windows can put your WiFi adapter into a power-saving mode which can cause issues.
- Check Power Management: In Device Manager, right-click your WiFi adapter, select "Properties," and go to the "Power Management" tab. Uncheck "Allow the computer to turn off this device to save power."
10. Avoiding Future WiFi Woes: Preventative Measures
Prevention is better than a cure!
- Keep Your Drivers Updated Regularly: This is like keeping your messenger's horse well-fed and healthy.
- Install a Good Antivirus: Malware can sometimes interfere with your network settings.
- Keep Your Router Firmware Updated: Router manufacturers regularly release firmware updates that can improve performance and security. This update is like giving your messenger better equipment.
11. The Specifics: Sony Laptop Quirks
While these steps apply generally, Sony laptops sometimes have unique features or quirks.
- Sony Vaio Specifics: Vaio laptops, for example, sometimes had proprietary software that could affect network settings. Check your Sony software for any network-related settings.
12. Diagnosing the Problem: Pinpointing the Culprit
Before you start blindly trying fixes, try to understand where the problem lies.
- What Error Messages? Any error messages you see are a huge clue.
- When Did This Start? Did the problem arise after a Windows update, or after installing new software?
13. The Wireless Network Diagnostic Tool
Windows has a built-in wireless network diagnostic tool.
- Run the Diagnostic Tool: Search for "Network troubleshooter" and select "Identify and repair network problems." This can often pinpoint the issue.
14. Security Settings Spotlight: Firewalls and Antivirus
Your firewall or antivirus software could be blocking your connection.
- Temporarily Disable and Test: Temporarily disable your firewall and antivirus software and see if your WiFi connects.
15. The Final Word: Getting Back
Laptop WiFi: Blast Your Signal with This High-Power USB Antenna!Sony vaio Wi-Fi issues No key from r Wi-Fi
By Fixing News Sony vaio Wi-Fi issues No key from r Wi-Fi by Fixing News
SONY VAIO WiFi Tidak Berfungsi Tidak Terhubung Tidak Ada Koneksi Tersedia Perbaiki Perbaikan Jaringan VAIO Smart.
By It's Binh Been Repaired & Everything Reviewed SONY VAIO WiFi Tidak Berfungsi Tidak Terhubung Tidak Ada Koneksi Tersedia Perbaiki Perbaikan Jaringan VAIO Smart. by It's Binh Been Repaired & Everything Reviewed
MENGATASI LAPTOP TIDAK BISA TERHUBUNG KE WIFI LAPTOP SONY

By EYD COMPUTER MENGATASI LAPTOP TIDAK BISA TERHUBUNG KE WIFI LAPTOP SONY by EYD COMPUTER

Title: como hacer que tu lap sony vaio reconozca la red wifi
Channel: heydy Ramirez
como hacer que tu lap sony vaio reconozca la red wifi by heydy Ramirez
Working With Laptop
Here's the article:
The Ultimate Guide to Mastering the Art of Sourdough Baking at Home
We've all been captivated by the allure of the perfect sourdough loaf – that crusty exterior giving way to a soft, airy interior, with a tangy flavor that dances on the palate. But the reality of sourdough baking, we find, can seem daunting. Fear no more! This is your comprehensive guide to transforming your kitchen into a sourdough sanctuary, equipping you with the knowledge and techniques to consistently bake bread that will rival the finest bakeries. We'll demystify the process, break down complex steps, and ensure your sourdough journey is filled with delicious success.
Cultivating Your Own Sourdough Starter: The Heart of the Matter
The soul of any superb sourdough is, without question, its starter. This living culture of wild yeast and beneficial bacteria is what gives sourdough its unique characteristics, from the characteristic sourness to the complex flavor profile. Creating your own starter is a rewarding experience, and thankfully, it’s simpler than many believe.
The process begins with equal parts, by weight, of unbleached, all-purpose flour, and filtered, non-chlorinated water. The chlorine in tap water can inhibit the growth of the beneficial microbes. Combine these ingredients in a clean glass jar, mixing thoroughly until a smooth, shaggy consistency is achieved. Cover the jar loosely (a paper towel secured with a rubber band works well) and let it rest at room temperature, around 70-75°F (21-24°C), for 24 hours.
Over the subsequent days, observe for signs of life. Some bubbles are a good starting sign, but really it's the little things. After the first day, discard half of the mixture and add 100 grams of both flour and water. Mix, and repeat for days two and three. You may not see much activity initially, but patience is key. It can take anywhere from 5-14 days (or longer) for a starter to become consistently active.
As the days progress, the starter might begin to exhibit a variety of changes. You might observe bubbles, which is carbon dioxide released by the yeast, as well as a change in the aroma. The smell might range from sweet and fruity to slightly sour. These are wonderful signs that your starter is developing.
After a few days, you may discard half of the starter each day, replacing it with an equal amount of fresh flour and water. Watch closely how it reacts to being fed. As it matures, you should typically start to see significant rises and falls. Usually, a well-fed starter will double (or even triple!) in size within a few hours after feeding. The timeframe of peaking and dropping can vary, and that's normal. Remember to use a clean jar and utensils each time to avoid contamination. If a layer of dark liquid, known as “hooch,” forms on top of the starter, it simply indicates that the starter is hungry. Stir the liquid back in, or pour it off – your choice.
Once it reliably doubles in size within 4-8 hours after feeding, your starter can be considered “mature” and ready for baking. This can also vary depending on factors like environmental temperature.
Maintaining Your Sourdough Starter: A Commitment to Longevity
Maintaining a healthy starter necessitates a regular feeding schedule, which is essential for its vitality. A well-fed starter is the foundation of remarkable sourdough. Once the starter is mature, the feeding schedule depends on how frequently you bake.
If you bake frequently (every few days), you can keep your starter at room temperature and feed it daily, following the 1:1:1 ratio (1 part starter, 1 part flour, 1 part water), by weight of course.
If you are an occasional baker, the starter can be stored in the refrigerator. In the refrigerator, the yeast and bacteria become dormant, drastically slowing their activity. In this case, feed your starter weekly, using a 1:1:1 ratio. Before using a refrigerated starter to bake, take it out and feed it at room temperature for a few days, until it's active and bubbly.
Whenever you feed, always use fresh, high-quality flour and filtered water, regardless of whether the starter needs to be used for baking.
The Baking Process: Transforming Starter into Bread
With your starter thriving, it's time to create the bread. This involves multiple steps, each contributing to the final result.
- Levain Building (Optional): Some recipes call for building a levain, which is a small amount of starter fed a day before baking. This can help to increase the activity and flavor of the final loaf. Building a levain provides an extra measure of control.
- Autolyse: This step involves mixing the flour and water together and letting it rest for 30-60 minutes. This allows the flour to fully hydrate, which improves the gluten development.
- Mixing & Bulk Fermentation: Now, add the mature starter and salt to the autolysed dough. Mix well until the ingredients are evenly distributed. Then, the bulk fermentation process begins. This is where the dough rises and develops its flavor. Folding the dough gently every 30-60 minutes for the first few hours helps to develop its strength. The duration of bulk fermentation depends on factors like the type of flour used and the ambient temperature. With practice, you'll recognize when the dough is ready, usually when it has increased in volume by 20-50% and has developed bubbles on the surface.
- Shaping: After bulk fermentation, gently shape the dough into a round or oblong loaf. This process traps the gases and prepares the dough for the final rise.
- Proofing: The shaped loaf is then proofed, often in a banneton basket (a specialized basket for holding the dough). Proofing in the refrigerator, for a longer period (12-24 hours), is often used to develop the flavor.
- Baking: Preheat your oven and baking vessel (Dutch oven or baking stone) to a high temperature, typically between 450-500°F (232-260°C). Carefully score the top of the loaf with a sharp knife or lame. The score controls how the bread expands during baking. Bake covered for the first 20-30 minutes and then uncovered until the crust is deeply golden and the internal temperature reaches around 200-210°F (93-99°C).
Choosing the Right Ingredients: Elevating Your Sourdough
The quality of your ingredients has a significant impact on the final outcome.
- Flour: Unbleached, bread flour is generally the best for sourdough. It has a higher protein content, producing more gluten, which gives the bread structure and allows for a good rise. Experiment with different flours, such as whole wheat (which adds a nutty flavor) or rye (adding a tang and complexity).
- Water: Always use filtered, non-chlorinated water.
- Salt: Use fine sea salt or kosher salt. Salt is essential for flavor, and it controls the yeast activity and gluten development.
Troubleshooting Common Sourdough Challenges
Even experienced bakers encounter challenges. Here are solutions to a few potential problems:
- Flat Loaf: This can be caused by under-proofing, a weak starter, or over-proofing.
- Dense Crumb: Under-mixing can lead to a dense crumb, or not enough gluten formation.
- Sour Taste: This means that the starter or the bulk fermentation was too long.
- Tough Crust: The oven’s temperature was too high, or perhaps the baking time was too long.
Advanced Techniques: Refining Your Sourdough Skills
Once you’ve mastered the basics, you can explore some advanced techniques:
- Developing Gluten: Using multiple folds during bulk fermentation is essential.
- Scoring: Experiment with different scoring patterns to create beautiful and unique loaves.
- Flavor Combinations: Incorporate ingredients like seeds, nuts, or dried fruits for added flavor and texture.
The Joys of Sourdough: A Culinary Journey
Baking sourdough is more than just a recipe; it is an art that fosters patience, experimentation, and a deep connection with the process of creation. With each loaf, you’ll develop a deeper understanding of the nuances and subtleties of the craft. You'll find satisfaction and accomplishment in the delicious bread, and the satisfaction of creating something truly remarkable is an unparalleled sensation.
