mi laptop hp no se conecta a wifi windows 10

Title: Solucion Wi-Fi HP No Funciona 2025
Channel: TechFixIT
Solucion Wi-Fi HP No Funciona 2025 by TechFixIT
mi laptop hp no se conecta a wifi windows 10, hp laptop wifi not working windows 10, why is my hp laptop wifi not working, hp laptop wifi suddenly stopped working
HP Laptop WiFi Nightmare? Fix Your Windows 10 Connection NOW!
HP Laptop WiFi Woes? Conquer Your Windows 10 Connection Crisis Today!
Have you ever fumbled with that sleek HP laptop, only to be greeted by the agonizing silence of a disconnected Wi-Fi? Oh, the frustration! You're poised to stream your favorite show, finish an important project, or simply stay connected. Suddenly, you're staring at a frustrating lack of signal. Trust me, you are not alone. Many HP laptop users have encountered this unwelcome disconnect. However, before you chuck your laptop across the room, take a deep breath. Help is here. Let's troubleshoot. Together, we can vanquish those Wi-Fi gremlins and restore your digital peace.
Is Your WiFi Really the Problem? A Quick Diagnostic Check
First things first: let's determine where the blame truly lies. Before you point fingers at your HP laptop, consider these initial checks. Are other devices in your household experiencing similar connectivity problems? If your phone, another laptop, or a tablet also fail to connect, the issue might be your internet service. Moreover, it could be with your router. Try restarting your router. Unplug it for thirty seconds before plugging it back in. Subsequently, test your connection again. Still no luck? Alright, it’s time to concentrate on your HP laptop.
Checking Your Windows 10 WiFi Settings—The Foundation
Now, let’s delve into the core settings within your Windows 10 operating system. These settings are often the gateway to a functional Wi-Fi connection. Click on the Wi-Fi icon, usually found in the system tray at the bottom right of your screen, near the clock. Does it state ‘Not Connected’? If so, move on to the next step. If it says 'Connected', then you can try to disconnect and re-connect. This simple action can occasionally resolve minor glitches. Alternatively, ensure Wi-Fi is enabled. Sometimes, it gets accidentally switched off.
Driver Drama! Addressing WiFi Adapter Conflicts
A common culprit behind these connectivity conundrums is the Wi-Fi adapter driver. Think of the driver as the translator between your laptop and your Wi-Fi hardware. Outdated, corrupted, or incompatible drivers can easily disrupt the flow of data. To check these, right-click on the Windows Start button. Select "Device Manager" from the menu. In the Device Manager window, expand the "Network adapters" section. You’ll find your Wi-Fi adapter listed there. Is there a yellow exclamation mark next to it? This indicates a problem.
If you spot a problem, right-click on your adapter. Then, select "Update driver." Windows will attempt to find the newest compatible driver online. If this fails, you might want to manually download the driver from the HP support website. You can search for your specific HP laptop model. This download generally fixes driver issues. It ensures the best harmony between your hardware and software. Remember to restart your laptop after installing (or updating) the driver.
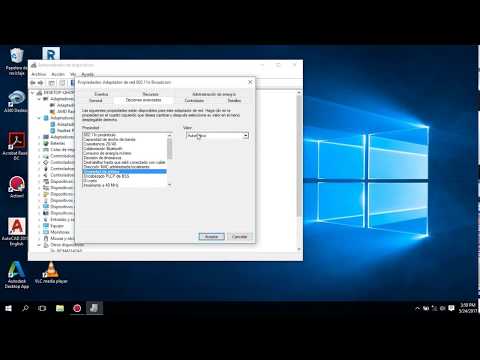
Power Management Pitfalls: Keeping Your Adapter Awake
Another sneaky issue that messes with connectivity? It’s power management settings! These settings can, by default, allow your laptop to turn off your Wi-Fi adapter to save power. While seemingly helpful, it can cause connection drops and other issues. Fortunately, the fix is easy. In Device Manager, go back to your Wi-Fi adapter. Right-click it, and select "Properties." Navigate to the "Power Management" tab. Ensure that the box next to "Allow the computer to turn off this device to save power" is unchecked. Click "OK" to save your changes. Afterward, restart your laptop.
Troubleshooting Tips & Tricks: Beyond the Basics
Sometimes, the solution requires a bit of a deeper dive. So, here are a few advanced options you can try. Execute them in sequence. First, consider running the Windows Network Troubleshooter. It's a built-in tool. You can usually find it by searching for "troubleshooting" in the Windows search bar. This troubleshooter can automatically detect and repair many connection issues.
Next, try resetting your network settings altogether. This will remove all your saved Wi-Fi passwords. But, it can often resolve underlying conflicts you might not even realize exist. Go to Settings > Network & Internet > Status > Network reset. Click "Reset now." Your computer will restart afterward.
Finally, if problems persist, consider the physical environment. Is your HP laptop placed near any devices that could interfere with Wi-Fi signals? (Microwaves are notorious culprits). Ensure your router is in a central location. Obstacles like walls can weaken the signal.
When to Seek Professional Assistance
If you've tried everything, and your HP laptop still refuses to connect, it might be time to seek professional help. There might be a hardware failure, or a more complex software problem. Contacting HP support is a good first step. They can often provide remote assistance or direct you to a repair center. Independent computer repair shops are another option. These professionals have the knowledge and tools to diagnose and repair more serious issues.
Conclusion: Reclaiming Your Connected Life
Losing your Wi-Fi connection can feel like a major setback. However, by following these troubleshooting steps, you now have the power. You can reclaim your connectivity and banish those Wi-Fi woes for good. Remember to be patient and persistent. Usually, the solution is within reach. Hopefully, these tips have helped you get back online. Enjoy the digital world!
Airtel WiFi Router to Laptop: The SHOCKINGLY Easy 1-Minute Setup!HP Laptop WiFi Nightmare? Fix Your Windows 10 Connection NOW!
We’ve all been there. You're finally ready to dive into that crucial project, stream your favorite show, or video chat with family, and… poof. Your HP laptop’s Wi-Fi decides to take an unexpected vacation. Suddenly, the internet – that lifeline of modern life – seems a million miles away. Sound familiar? If you're nodding your head, then welcome to the club! But fear not, fellow travelers in the digital desert, because we're about to embark on a journey to conquer that pesky Wi-Fi gremlin and get your HP laptop back online.
1. The Silent Killer: Recognizing the Wi-Fi Connection Breakdown
Before we can fix the problem, we need to diagnose it. Sometimes, the issue is glaringly obvious: a red "X" over the Wi-Fi icon in the system tray, cryptic error messages, or simply a complete lack of internet access. Other times, it's more subtle: slow speeds, intermittent dropouts, or an endless spinning wheel of buffering. It's like a slow leak in a tire – you only notice it when you're trying to get somewhere. Pay attention to the warning signs, and let's get to fixing it.
2. The Usual Suspects: Common Culprits Behind Wi-Fi Woes
Let's be honest, sometimes the solution is as simple as a good old-fashioned restart. Before we start tearing things apart, let's try some of the most common fixes.
- Restart Your Laptop: This is the classic, the go-to, the IT Crowd's "Have you tried turning it off and on again?" Sometimes, a simple reboot can clear up temporary glitches and get things running smoothly.
- Restart Your Router: Just like your laptop, your router can get bogged down. Unplug it, wait 30 seconds, and plug it back in. Patience is a virtue here – let it fully boot up before reconnecting.
- Check Your Physical Connections: Is your router plugged in? Is the Ethernet cable (if you're using one) securely connected? Sounds silly, but we've all been there, haven't we?
3. Digging Deeper: Troubleshooting Windows 10 Wi-Fi Settings
If the easy fixes didn't work, we need to get our hands a little dirtier. Let's delve into the Windows 10 settings to see what's happening under the hood.
- Check the Wi-Fi Adapter: Go to the Device Manager (search for it in the Windows search bar). Expand "Network adapters" and look for your Wi-Fi adapter (it'll usually have "Wireless" or "Wi-Fi" in the name). Is there a yellow exclamation mark or red "X" next to it? If so, it indicates a problem.
- Update Your Driver: Right-click on your Wi-Fi adapter and select "Update driver." Choose "Search automatically for drivers." Windows will try to find the latest drivers online.
- Troubleshoot the Network: Windows has a built-in troubleshooter. Right-click on the Wi-Fi icon in the system tray and select "Troubleshoot problems." Let Windows do its thing and see if it can identify and fix any issues.
4. The Bandwidth Bandit: Understanding Your Internet Speed
Before we keep fixing the Wi-Fi, let's check the basics. Have you checked your internet speed? We might be chasing ghosts if the internet is slow at the source. There are plenty of online speed test tools you can use to test your internet speed. You may have to contact your internet service provider for assistance.
5. Location, Location, Location: The Importance of Router Placement
Sometimes, the problem isn't your laptop, but your router's location. Is your router tucked away in a closet, surrounded by metal objects, or on the far side of the house? Just like a bad reception with a phone, the location matters.
- Place the Router in a Central Location: This will help it to broadcast the signal as evenly as possible throughout your home.
- Elevate Your Router: Place it on a shelf or table, away from the floor.
- Avoid Obstructions: Keep your router away from walls, metal objects, and other electronic devices that could interfere with the signal.
6. The Antenna Angle: Optimizing Your Router's Antennas
Many routers have external antennas. Did you know you could optimize the angle?
- Experiment with the Antenna Angle: Try adjusting the angle of your router's antennas. Generally, pointing them in different directions can help improve signal strength.
- Observe the Signal Strength: Use a Wi-Fi analyzer app on your phone or another device to help you visualize the signal strength in different areas of your home.
7. Security Check: Ensuring Your Network is Secure
We want the internet to be there for you, not anyone else. Security is important.
- Check Your Network Password: Ensure it is up to date and only accessible to you.
- Check Network Encryption Type: If you have a more modern router, make sure the network is using the correct encryption type, such as WPA2 or WPA3.
8. The Power of Restart: Resetting the Network Adapter
Sometimes, the network is stuck. Let's reset the network adapter. Similar to restarting the computer, sometimes, resetting the network adapter may relieve the burden.
- Reset the Network Adapter Restart your computer and log back in.
9. The IP Address Issue: Renewing Your IP Configuration
Sometimes, the IP address is the problem. Let's try to renew it.
- Release and Renew IP Address: Open the command prompt and use the code
ipconfig /releaseand press enter. Once complete, typeipconfig /renewand press enter.
10. The DNS Dilemma: Changing Your DNS Servers
Sometimes, the DNS servers may be the problem. This can be fixed with the following process:
- Switch to Public DNS Servers: Go to your network adapter settings and manually configure your DNS servers to use public DNS servers like Google's (8.8.8.8 and 8.8.4.4) or Cloudflare's (1.1.1.1 and 1.0.0.1). This can sometimes improve connection speed and stability.
11. Antivirus Interference: Checking for Conflicts
Your antivirus software can sometimes interfere with your Wi-Fi connection. Let's ensure there is no reason for conflict.
- Temporarily Disable Antivirus: If possible, check to see if your antivirus software is interfering with the network.
12. The Driver's Seat: Reinstalling Your Wireless Network Driver
Sometimes, reinstalling drivers helps fix the conflict. Let's try to reinstall the drivers for the network adapter.
- Uninstall and Reinstall Driver: Go to the Device Manager(as mentioned earlier). Uninstall the wireless network adapter and reinstall the latest version.
13. Factory Reset: A Last Resort Strategy
If nothing else works, factory resetting the settings may be the only option.
- Factory Reset: This is a last resort. Factory resetting your router will reset everything. So be sure to follow the guide for factory resetting and back up all your data.
14. The Ultimate Test: Does the Problem Persist?
After each step, test your Wi-Fi connection. Can you browse the internet? Stream videos? Send emails? If the problem persists, move on to the next troubleshooting step. Remember, this is a process of elimination. Don't give up!
15. When to Call the Cavalry: Knowing When to Seek Professional Help
If you've tried everything and your Wi-Fi still isn't cooperating, it's time to call in the professionals. Contact your internet service provider or a local computer repair specialist. Sometimes, the problem is beyond our DIY capabilities.
Wrapping Up: Conquering the Wi-Fi Beast!
So, there you have it! We've armed ourselves with a comprehensive arsenal of troubleshooting steps to tackle that infuriating HP laptop Wi-Fi nightmare. Remember, fixing Wi-Fi issues is often a process of trial and error – a bit like detective work. But with patience and persistence, you can overcome the Wi-Fi gremlins and reclaim your internet connection. Now, go forth, troubleshoot confidently, and get back to enjoying the digital world! And if you still feel stuck? Don't hesitate to ask for help. We're all in this together!
FAQs:
- Why is my HP laptop's Wi-Fi so slow? Several factors can contribute to slow Wi-Fi speeds, including: distance from the router, interference from other devices, outdated drivers, network congestion, or slow internet service from your provider.
- How do I update my Wi-Fi driver on my HP laptop? Go to Device Manager, expand "Network adapters," right-click your Wi-Fi adapter, and select "Update driver." Choose "Search automatically for drivers." Or visit HP's support website and download the latest driver for your specific laptop model.
- Can a bad router cause Wi-Fi problems on my HP laptop? Yes, absolutely! A faulty or outdated router can be a significant source of Wi-Fi issues.
Cara mengatasi Laptop Tidak Bisa Tersambung ke Wifi di Windows 11 & Windows 10 tutorial internet

By Rifki Els Cara mengatasi Laptop Tidak Bisa Tersambung ke Wifi di Windows 11 & Windows 10 tutorial internet by Rifki Els
Porque me sale No se Puede Conectar a esta Red en mi laptop Windows 10

By Percy pea Porque me sale No se Puede Conectar a esta Red en mi laptop Windows 10 by Percy pea
Cara Mengatasi Laptop Tidak Bisa Connect Wifi Windows 10, 8 & 7

By Jari Mungil Rayyan Cara Mengatasi Laptop Tidak Bisa Connect Wifi Windows 10, 8 & 7 by Jari Mungil Rayyan
Title: Seal Wifi dbil Windows 10-Solucin Rpida
Channel: Libardomm
Seal Wifi dbil Windows 10-Solucin Rpida by Libardomm
Working With Laptop
Here's the title for your article: The Ultimate Guide to Mastering the Art of Sourdough Bread Baking
The Ultimate Guide to Mastering the Art of Sourdough Bread Baking
The gentle hiss as a freshly baked sourdough loaf leaves the oven, the intoxicating aroma that fills the kitchen, and the satisfying tang of a perfect slice – these are the rewards that await the dedicated sourdough baker. For centuries, the art of sourdough has been passed down, a testament to its enduring appeal. This comprehensive guide will equip you with the knowledge and techniques needed to embark on your own sourdough journey, transforming you from a novice into a confident baker capable of producing consistently exceptional loaves. Forget dry, dense bread. We are here to unlock the secrets to airy crumb, crisp crust, and a flavor profile that will leave you craving more.
Understanding the Foundation: The Sourdough Starter
The heart and soul of sourdough lies in the starter, a living culture of wild yeasts and beneficial bacteria. Cultivating and maintaining a healthy starter is the cornerstone of successful sourdough baking. This living culture, often referred to as a "mother," requires consistent care and attention. Its vitality directly impacts the bread's flavor, texture, and rise.
Creating Your Own Starter: Step-by-Step Instructions
Beginning your starter from scratch is a rewarding experience. It involves a simple process of combining flour and water and allowing the naturally occurring yeasts and bacteria in the environment to flourish.
- Initial Mix: In a clean jar (a glass mason jar works well), combine 50 grams of unbleached, all-purpose flour or bread flour with 50 grams of filtered, lukewarm water. Stir thoroughly until a smooth, slightly thick paste forms.
- First Fermentation: Cover the jar loosely with a lid or a piece of cheesecloth secured with a rubber band. Leave it at room temperature (ideally between 70-75°F/21-24°C).
- Daily Feedings (Week 1): Over the next 5-7 days, discard half of the starter each day. Then, add 50 grams of flour and 50 grams of lukewarm water to the remaining culture. Stir well. Observe for signs of activity, such as bubbles, a slight increase in volume, and a tangy aroma. The smell will evolve – it might initially smell like sour flour and then change to something more complex.
- Monitoring Activity: During this first week, don’t be discouraged if you see little activity. Different flours, room temperatures, and environmental factors will affect this initial period. Be patient.
- Feeding Changes (After Week 1): After a week, reduce the feeding frequency to once every 12-24 hours. It depends on your starter's strength. If it’s doubling in size and visibly bubbly within a few hours after feeding, you can feed it less often. If it's still sluggish, keep feeding more frequently.
- Testing for Readiness: Your starter is ready when it reliably doubles in size within 4-8 hours after feeding and has a pleasant, slightly sour aroma. It should also have a bubbly appearance and a texture similar to a thick pancake batter. This usually takes 1-2 weeks, though it can vary.
- Long-Term Storage: Once your starter is active, you can store it in the refrigerator. Feed it once a week to maintain its health. If you are not baking frequently, consider a method of long term storage by drying the starter and activating it later.
Maintaining a Healthy Starter: Feeding Schedules and Storage
Consistent care is crucial for keeping your starter vigorous.
- Feeding Frequency: Feed your starter regularly, even if you are not baking. The feeding schedule depends on the starter's activity and your baking frequency. In general, refrigerate your starter and feed it once a week if you are not baking. To bake, remove the starter from the fridge and feed it 12-24 hours before use, at room temperature.
- Feeding Ratios: Experiment with feeding ratios; the standard is 1:1:1 (starter:flour:water), but adjust based on your needs. For example, a 1:2:2 ratio (1 part starter, 2 parts flour, 2 parts water) can provide a more robust starter. Pay attention to the consistency of your starter. It should be neither too thick nor too thin.
- Flour Selection: Use unbleached, all-purpose flour or bread flour for the initial stages of starter development. Once established, you can experiment with different flours, such as whole wheat, rye, or spelt, to influence the flavor and activity of your starter. Experiment to see what works for you.
- Water Quality: Use filtered water, as chlorine and other chemicals in tap water can inhibit yeast activity.
- Storage: Store your starter in a clean, airtight container. Glass jars are ideal because you can easily see the activity.
The Sourdough Baking Process: From Levain to Loaf
Baking sourdough involves several key stages, each contributing to the final result.
1. Levain Building: Before you make your dough, you build a levain. This is like a "pre-ferment" that gives flavor and strength to the dough. A levain consists of a small portion of your starter mixed with more flour and water. The ratio of the levain and its age will determine the flavor of your final loaf.
2. Autolyse: Combine the flour and water from your recipe, making it a shaggy dough. Then, let it rest, covered, for 30-60 minutes. This step allows the flour to fully hydrate, which improves gluten development and flavor. Note, that this step does not apply for all recipes.
3. Mixing the Dough: Incorporate your levain and salt into the autolysed dough. Be patient and start kneading the dough until it starts to come together.
4. Bulk Fermentation: This is where the magic happens! Place the dough in a lightly oiled bowl and cover it. During bulk fermentation, the yeast and bacteria in your starter will work their magic. The length of time for bulk fermentation depends on your room temperature and the strength of your starter. Expect it to take anywhere from 3-8 hours.
- Folding: At intervals during bulk fermentation (typically every 30-60 minutes for the first few hours), perform "folds." Gently stretch and fold the dough over itself to develop strength. This builds a gluten structure without overworking the dough.
- Observing the Dough: Watch the dough for signs of fermentation. It should increase in volume, develop bubbles, and become more airy.
- The Poke Test: After bulk fermentation, test the dough's readiness. Gently poke the dough with a wet finger. If the indent slowly springs back, it’s ready. If it springs back quickly, it needs more time. If it collapses, it’s over-proofed.
5. Shaping the Loaf: Gently transfer the dough onto a lightly floured surface. There are various shaping techniques depending on the type of loaf you want to create.
- Round (Boule): Gently shape the dough into a ball.
- Oval (Batard): Shape the dough into an oval.
6. Proofing (Second Rise): Place the shaped loaf in a banneton basket lined with flour (or a bowl lined with a floured cloth). Cover and refrigerate for 12-24 hours (or longer) for a cold proof. This develops flavor and makes the dough easier to score.
7. Baking: Preheat your oven with a Dutch oven inside to 450-500°F (232-260°C). Carefully remove the hot Dutch oven. Gently place the loaf in the Dutch oven. Score the top of the loaf with a sharp knife or lame to control expansion. Cover and bake for 20-25 minutes. Remove the lid and continue baking for another 20-30 minutes, or until the crust is deeply golden brown and the internal temperature reaches 200-210°F (93-99°C).
8. Cooling: Allow the baked loaf to cool completely on a wire rack before slicing. This prevents a gummy texture and allows the flavors to develop fully. Patience is key here!
Troubleshooting Common Sourdough Challenges
Even with the best instructions, challenges can arise. Here are some common issues and solutions:
- Dense Loaf: This can result from under-proofing or over-proofing, a weak starter, or insufficient gluten development. Check your proofing times, ensure your starter is active and strong, and make sure you develop gluten properly during mixing and folding.
- Flat Loaf: Often related to an under-proofed, or over-proofed, dough. A weak starter can also lead to flat loaves. Adjust your proofing times and be mindful of how much you feed your starter.
- Sour Taste: The level of sourness depends on fermentation time, starter age, and proofing temperature. Adjust your fermentation times and try adding a bit of brown rice flour to your levain, which will contribute to a more mild flavor.
- Uneven Crumb: This can be caused by improper shaping techniques or uneven oven temperatures. Practice your shaping skills and ensure your oven is preheated to the proper temperature.
- Crust Too Dark: Lower the oven temperature or reduce the baking time.
**
