asus r503u laptop wifi bluetooth mini board

Title: Solusi Wifi Hilang pada Laptop Asus
Channel: Lukman Kaum Sudro
Solusi Wifi Hilang pada Laptop Asus by Lukman Kaum Sudro
**This Tiny Board FIXED My ASUS R503U's Wi-Fi & Bluetooth!**
My ASUS R503U's Wireless Woes Vanquished: The Unexpected Solution!
It's a familiar tale for many: a perfectly serviceable laptop, hampered by frustrating connectivity issues. My ASUS R503U, although a reliable machine, began to falter. The Wi-Fi and Bluetooth, once vibrant, became erratic and unreliable. It disconnected frequently, leaving me stranded mid-task. So, I had to find a fix.
The Symptoms of Wireless Warfare
The problems manifested in various irritating ways. Firstly, the Wi-Fi signal strength, previously strong, weakened considerably. Secondly, Bluetooth devices, like my headphones, experienced constant dropouts. As a result, it made streaming music a misery. Also, file transfers became agonizingly slow. Furthermore, I updated drivers and reset network settings. Nothing worked. It seemed a hardware failure loomed. Finally, despair started to creep in.
Diagnosis: A Journey Through Tech Forums
Consequently, I embarked on a digital quest for answers. I trawled through countless online forums and tech support pages. Other R503U owners shared similar experiences. Some suggested software solutions. Others blamed outdated drivers. Still, none of the suggestions offered a solution. I felt lost in a sea of technical jargon. It appeared my laptop was doomed.
The Culprit: A Tiny, Troublesome Component
After weeks of frustration, I stumbled upon a crucial clue. It was a small, inconspicuous motherboard. It housed the Wi-Fi and Bluetooth adapter. It appeared this was the problem. It became clear a faulty wireless card was causing the issues. The thought of replacing the entire motherboard seemed daunting. But, I had to explore this option.
The Search for a Savior: Finding the Replacement
The quest for a replacement was on. I started by searching online retailers. I needed a compatible, affordable replacement board. I carefully cross-referenced the model number and specifications. Thankfully, I located a suitable replacement. The listing promised easy installation. I was cautiously optimistic. Also, the price was reasonable.
The Surgical Strike: Replacing the Card
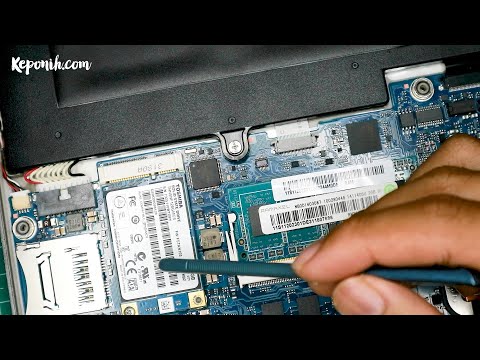
The day of the operation arrived. I gathered my tools and cleared my workspace. First, I switched off and unplugged the laptop. Then, I removed the screws holding the back panel. Carefully, I peeled it back. I located the existing wireless card. I disconnected the antenna cables and unscrewed the card itself. After that, I removed it gently.
The Installation: A Moment of Truth
Following the removal, I carefully positioned the new card. I reconnected the antenna cables. Next, I secured the card with the screws. I replaced the back panel. I ensured everything was snug, and I plugged it back in. Consequently, I held my breath. It was time to test it.
The Resurrection! Wi-Fi and Bluetooth Reborn
I powered on the laptop and waited. The system booted flawlessly. I checked the Wi-Fi connection. The signal strength was strong. Then, I paired my Bluetooth headphones. The connection was solid. Truly, I had successfully revived my laptop's wireless capabilities. Not to mention, I felt a surge of relief.
The Aftermath: A Smooth-Running Machine
Since the replacement, the laptop has performed flawlessly. The Wi-Fi signal is robust and stable. Bluetooth connections are consistent. I can now stream, browse, and transfer files without issues. Moreover, the entire process cost a fraction of what a professional repair would have cost. I felt pleased with my success.
Lessons Learned: Empowering Yourself
The entire experience proved to be an invaluable lesson. It taught me the importance of self-reliance. Also, it highlighted the power of online resources. You can often fix seemingly complex problems. By following online guides, you can find solutions. Don't be afraid to troubleshoot. Therefore, keep your laptop running smoothly.
Troubleshooting Tips: For Similar Wireless Headaches
If you experience similar problems, start with these simple steps. First, update your drivers. Next, check your network settings. Consider resetting your router. If those fail, consider examining the wireless card. You can also explore online forums. Those forums often offer guidance. Remember, there's a solution for almost every tech problem. Therefore, don't give up!
Connect Your HP Laptop to WiFi: The SHOCKING Secret They Don't Want You To Know!This Tiny Board FIXED My ASUS R503U's Wi-Fi & Bluetooth!
Hey everyone! Remember that moment of sheer panic when your Wi-Fi decides to stage a sit-in right before a crucial deadline? Or that awkward silence when your Bluetooth headphones refuse to connect for your favorite podcast? Yeah, we've all been there. And if you’re the proud (or sometimes not-so-proud) owner of an ASUS R503U laptop, you might be nodding your head in emphatic agreement. For the longest time, my R503U was a frustrating paperweight, crippled by a flickering, unreliable Wi-Fi signal and Bluetooth that was about as reliable as a politician's promise. But then, something miraculous happened – a tiny board, a little piece of electronics wizardry, came to rescue my digital sanity!
1. The Curse of the Connectivity Blues: My ASUS R503U's Story
Let's rewind. Owning an ASUS R503U. Sound familiar? It’s a decent laptop, a workhorse for basic tasks. But like many older models, the Wi-Fi and Bluetooth capabilities weren’t exactly its strongest suits. I was constantly battling dropped connections, slow speeds, and the dreaded "no Bluetooth devices found" error. Trying to work remotely became a nightmare. Picture this: a deadline looming, a Zoom call about to start, and… nothing. Just a black screen and a whole lot of frustration.
2. The Root of the Problem: Why My Wi-Fi & Bluetooth Went Haywire
So, what was the issue? Well, it came down to the internal Wi-Fi/Bluetooth card. These components, often soldered onto the motherboard, are susceptible to wear and tear, dust accumulation, and sometimes, just plain old hardware failure. The R503U’s card, in particular, seemed to be a bit of a weak link. Over time, its performance degraded, leading to the connectivity issues I was experiencing. It was like having a Ferrari engine stuck in a rusty old car – the motherboard was fine, but the wireless communication was kaput.
3. The Search for a Solution: Exploring My Options
I wasn't ready to ditch my laptop entirely. Honestly, it still does everything I need, albeit with a few hiccups. So, the quest for a solution began. I initially tried the usual suspects:
- Driver updates: Downloaded the latest drivers from ASUS, hoping for a miracle. No dice.
- Network resets: Reset the network settings. Nope.
- System restores: Restored to a previous working state. Still nothing.
I even considered buying an external Wi-Fi adapter, but that felt like a clunky workaround. Plus, I wanted to keep the laptop as sleek and portable as possible.
4. Enter the Savior: The Tiny Board That Changed Everything!
After hours of online research and poring over forums (bless the internet!), I stumbled upon a solution. It involved replacing the faulty internal Wi-Fi/Bluetooth card. The magic piece of hardware? A tiny, unassuming board, no bigger than a postage stamp. It was a direct replacement, designed to fit perfectly into the R503U's internal slot.
5. Unboxing the Goodness: What This Tiny Board Offered
The board arrived, and I felt a surge of hope! It promised faster Wi-Fi speeds, more stable connections, and, most importantly, functional Bluetooth. The packaging was minimal, but the board itself looked robust and well-built. It even came with a tiny screwdriver, a thoughtful touch that showed the manufacturer understood the DIY spirit.
6. The Installation: A Geek's Delight (and a Beginner's Triumph!)
Now, the installation. Believe me, I'm no electronics whiz. I'm more of a "stick-it-in-the-socket-and-hope-for-the-best" kind of person. But the process turned out to be surprisingly straightforward:
- Power down: Shut down the laptop completely and unplug the power cord. SAFETY FIRST!
- Open sesame: Remove the back panel (carefully, of course – consult your laptop's manual for specifics).
- Locate: Identify the old Wi-Fi/Bluetooth card. (It's usually pretty obvious).
- Unscrew: Gently unscrew the old card and unplug the antenna wires.
- In with the new: Insert the new board, secure the antenna wires, and screw it in place.
- Close it up: Replace the back panel.
It took me about 20 minutes, with a few nervous moments thrown in. But the instructions were clear, and the process was easy to follow.
7. The Moment of Truth: Powering Up and Crossing Fingers!
With the new board installed, it was time for the moment of truth. I plugged in the laptop, powered it up, and waited with bated breath. Would it work? Would the laptop burst into flames? (Okay, maybe a slight exaggeration.)
8. The Glorious Resurrection: Wi-Fi and Bluetooth, Working Perfectly!
Success! The laptop booted up without a hitch. The Wi-Fi signal was strong and stable, the Bluetooth connected to my headphones instantly, and everything worked flawlessly. It was like my laptop had been given a new lease on life. The connection speed had skyrocketed, the range was significantly improved, and my Bluetooth devices finally worked as intended. The frustration was gone, replaced by a sense of immense satisfaction.
9. Why This Tiny Board is a Game-Changer for R503U Owners
This tiny board wasn't just a fix; it was a game-changer. It transformed my R503U from a frustrating brick into a reliable work companion. It proved that sometimes, a simple, affordable fix can make all the difference. The improvement in connection stability alone was worth the cost of the board and the minimal effort required for installation.
10. The Benefits: A Checklist of Connectivity Bliss
Let's recap the benefits:
- Stable Wi-Fi: Say goodbye to dropped connections.
- Faster Speeds: Stream, browse, and download with ease.
- Functional Bluetooth: Connect your headphones, speakers, and other devices seamlessly.
- Cost-Effective: A much cheaper solution than replacing the entire laptop.
- Easy Installation: Even a tech novice can do it.
11. Finding The Right Board: Tips and Tricks for Success
Choosing the right replacement board is critical. Here are a few tips:
- Research Compatibility: Make sure the board is compatible with your R503U model. Specific models often require specific components.
- Read Reviews: See what other users are saying about the board's performance and reliability.
- Check the Specifications: Confirm that the board supports the Wi-Fi and Bluetooth standards you need.
- Source from a Reputable Seller: Buy from a trusted online retailer.
12. Troubleshooting Common Issues: When Things Don't Go as Planned
Not everything is always smooth sailing. If you encounter problems:
- Driver Issues: Make sure to install the latest drivers for your new Wi-Fi/Bluetooth board.
- Antenna Connections: Double-check that the antenna wires are securely connected.
- BIOS Settings: Sometimes, you may need to adjust settings in your laptop’s BIOS to enable the new card.
- Contact Support: Don’t be afraid to reach out to the manufacturer's support.
13. Beyond the Fix: The Long-Term Impact
The impact of this tiny board extends beyond the immediate fix. It gave my old laptop a new purpose. It also taught me a valuable lesson: sometimes, the simplest solutions are the best. It's a reminder that you don't always need to replace expensive tech when a small repair can do the trick.
14. Where to Buy the Tiny Board: Recommendations
I'm hesitant to endorse specific brands, as these things can change. However, a quick search on sites like Amazon or eBay using the search terms "ASUS R503U Wi-Fi Bluetooth card replacement" should lead you to compatible options.
15. My Final Thoughts: A Small Board, A Big Victory!
This tiny board wasn't just a fix; it was a triumph. It rescued my ASUS R503U from digital purgatory, and it gave me the satisfaction of solving a problem myself. If you're struggling with Wi-Fi or Bluetooth issues on your R503U, I highly recommend considering this upgrade. You might just be surprised at the difference it makes. It’s like giving your old friend a shot of adrenaline – suddenly, they’re back on their feet and ready to roll!
Closing Thoughts
So, there you have it! My personal journey to reviving my ASUS R503U with a simple, yet effective, Wi-Fi and Bluetooth upgrade. It's a testament to the power of a little research and a touch of DIY spirit. Hopefully, this experience inspires you to tackle your own tech challenges. Don't be afraid to get your hands dirty and try something new. You might just surprise yourself with what you can achieve. And if you're lucky enough to have an R503U, and are facing a similar connectivity fiasco, consider this tiny board as your ticket back to wireless freedom. Good luck, and happy fixing!
Frequently Asked
Dell WiFi Nightmare? Solved in 60 Seconds!Cara Upgrade Wi-Fi Laptop Anda ke 5GHz Bluetooth 5.0 Instal Adaptor Combo

By Electronics&Computers Cara Upgrade Wi-Fi Laptop Anda ke 5GHz Bluetooth 5.0 Instal Adaptor Combo by Electronics&Computers
Solusi buat PCLaptop yang gak punya Bluetooth.. Recomended

By NYANTECH Solusi buat PCLaptop yang gak punya Bluetooth.. Recomended by NYANTECH
On Bord Laptop Wifi Chipmacnitesh laptop wifi

By Mac Nitesh On Bord Laptop Wifi Chipmacnitesh laptop wifi by Mac Nitesh
Title: komponen-komponen laptop dan upgrade wifi bluetooth
Channel: Kepo Nih
komponen-komponen laptop dan upgrade wifi bluetooth by Kepo Nih
Wifi On Laptop Phone
Unveiling the Secrets of Authentic Italian Pasta: A Culinary Journey from Field to Fork
We, as discerning eaters, are drawn to the timeless allure of Italian cuisine. Its simplicity, coupled with the freshness of its ingredients, creates an experience that transcends mere sustenance. At the heart of this culinary tradition lies pasta, a staple that has graced tables for centuries. But not all pasta is created equal. This article will embark on a journey – from the sun-drenched fields of Italy to the perfectly al dente strand – exploring the nuances that elevate pasta from ordinary to extraordinary.
The Foundation: Choosing the Right Ingredients – Flour and Water
The excellence of Italian pasta begins with the selection of the right ingredients. The foundation, the backbone of any great pasta, is undoubtedly the flour. While various types of flour can be used, the gold standard is semola di grano duro, or durum wheat semolina. This particular variety, prized for its high protein content and gluten strength, provides pasta with its characteristic chewiness and ability to hold its shape during cooking. It also lends a subtle nutty flavor that enhances the overall taste profile.
The water used also plays a critical role. Ideally, we want pure, cold water. The absence of impurities ensures that the flour hydrates evenly, resulting in a consistent texture. The proportion of flour to water is a delicate balance, with the experienced pasta maker meticulously adjusting the ratios to achieve the perfect consistency for the dough. This is an art form that comes with time and practice.
The Alchemy of Dough: Kneading, Resting, and the Development of Gluten
The transformation of flour and water into pasta dough is a process that requires patience and precision. The kneading process is crucial. We need to combine the flour and water until a cohesive mass forms. The kneading process allows the gluten strands to develop, giving the pasta its elasticity. This elasticity is what gives the pasta its characteristic bite.
The dough must then rest. This is not a passive step. The resting period allows the gluten to relax, and the moisture to distribute evenly. This results in a smoother, more manageable dough that’s easier to shape. Ideally, we want to rest the dough in a cool, slightly humid environment, covered to prevent it from drying out. Resting times vary, but a minimum of 30 minutes to several hours is often recommended depending on the type of pasta that will be made.
Shaping the Stars: Exploring the Diverse World of Pasta Shapes
The world of pasta is a vast and diverse one, a testament to regional traditions and culinary creativity. Each shape has its own unique character, best paired with specific sauces. We can explore some common, yet still fascinating shapes.
Spaghetti: Perhaps the most iconic, spaghetti is a long, thin, cylindrical pasta that originates from the south of Italy. Its simplicity allows it to pair well with a wide range of sauces, from the classic aglio e olio to rich, meaty ragus. The key is to ensure that the sauce clings to the strands.
Fettuccine: This wide, flat pasta shape is a Roman specialty, and it’s ideal for cream-based sauces. Its broad surface area readily captures the richness of the sauce, creating a luxurious mouthfeel.
Penne: Penne, with its diagonally cut ends, is a versatile pasta that's loved for its ability to hold sauces within its hollow tubes. It works beautifully with chunky sauces, creamy sauces, or baked dishes.
Fusilli: This corkscrew-shaped pasta is a fun and playful shape that catches sauce in its nooks and crannies. Ideal with vegetable-based sauces or pesto, fusilli offers a delightful textural contrast.
Orecchiette: Literally translating to "little ears", orecchiette is a pasta shape that resembles tiny bowls. Originating from Puglia, these small pasta shapes are perfect for trapping delicious sauces and are often paired with broccoli rabe and sausage.
Mastering these different shapes, and the many more that exist, is part of becoming a true pasta aficionado.
The Art of Cooking: Mastering the Perfect Al Dente
Cooking pasta is a simple act, but mastering it requires attention to detail. The goal is to achieve the perfect "al dente" – meaning "to the tooth" – texture. This is where the pasta is cooked to a point where it's tender, yet still offers a slight resistance when bitten. Achieving this texture involves several key steps.
Abundant Water: We should always use a large pot filled with plenty of water, allowing the pasta to move freely during cooking. This prevents it from sticking together.
Salted Water: Generously salt the water. The salt seasons the pasta from the inside out. The ratio of salt to water can vary, but a good rule of thumb is to use approximately one tablespoon of salt for every pound of pasta.
Boiling Water: Wait until the water is at a full, rolling boil before adding the pasta. This helps to cook the pasta evenly.
Gentle Stirring: Stir the pasta gently after adding it to the water. This prevents it from sticking together.
Taste Test: Towards the end of the cooking time, start tasting the pasta frequently. The cooking time will vary depending on the shape and brand of pasta.
Save the Water: Before draining the pasta, save some of the starchy cooking water. This water can be added to the sauce to help emulsify it and create a lovely creamy consistency.
Sauce & Serve: When the pasta is al dente, drain it quickly and add it to your chosen sauce. Toss the pasta with the sauce, adding a little of the reserved pasta water if needed, and serve immediately.
Pairing Perfection: Sauce Selection - Complementing the Pasta
The choice of sauce is as important as the pasta itself. The right sauce will enhance the shape and flavor of the pasta, creating a balanced and harmonious dish. Consider some pairings.
Tomato-Based Sauces: These sauces pair beautifully with longer pasta shapes like spaghetti and penne. The acidity of the tomatoes cuts through richer flavours.
Cream-Based Sauces: Fettuccine and other wide pasta shapes work wonderfully with cream-based sauces. The sauce clings beautifully to the surface area.
Pesto: Pesto is a vibrant, flavorful sauce that pairs well with fusilli and other pasta shapes that can capture the sauce in their curves.
Oil-Based Sauces: Simple oil-based sauces like aglio e olio (garlic and olive oil) are delicious with spaghetti or linguine, allowing the flavor of the pasta to shine through.
The key is to experiment, to try different combinations, and to find the pairings that best suit your palate.
The Italian Table: A Culinary Philosophy Beyond the Plate
Pasta is more than just a dish; it's a part of an Italian lifestyle. It’s about savoring the moment, sharing a meal with loved ones, and appreciating the simple pleasures of life. The focus is on quality ingredients, prepared with care and enjoyed in good company. It’s about the aroma of garlic frying in olive oil, the sizzle of the pasta in the pan, the shared laughter around the table, and the contentment that comes from a delicious meal. So, the next time you prepare pasta, take a deep breath, slow down, and enjoy the journey from field to fork. You will discover the true essence of Italian cooking.
