how to connect wifi windows 7 laptop

Title: How To Enable WiFi Internet Connection In Windows 7
Channel: MDTechVideos International
How To Enable WiFi Internet Connection In Windows 7 by MDTechVideos International
how to connect wifi windows 7 laptop, how to connect internet in windows 7 laptop, how to connect wireless internet to windows 7 laptop, how to connect wifi in windows 7 hp laptop, how to connect wifi in windows 7 dell laptop, how to connect wifi in laptop windows 7 ultimate, how to connect wifi in laptop windows 7 in hindi, how to connect wifi in acer laptop windows 7, how to connect wifi in toshiba laptop windows 7, how to connect wifi in samsung laptop windows 7
Windows 7 WiFi Nightmare? This FIX Will Shock You!
Windows 7 WiFi Woes: Unveiling the Shocking Solution!
Remember those frustrating days? They were when your Windows 7 machine refused to play nice with your WiFi network. The internet, once a portal to endless information, turned into a buffering purgatory. But fear not, because there's a fix that will genuinely surprise you.
The Ghosts in the Machine: Common WiFi Demons
Before you throw that aging laptop out the window, let's identify your enemy. Countless users suffered. The symptoms? Intermittent connection drops. Sluggish browsing speeds. Or, the dreaded "no internet access" message. Consequently, these issues often stemmed from several culprits. Outdated drivers plagued many. Wireless network adapters acted up. Router incompatibility also caused problems. Moreover, security protocols sometimes created barriers. These demons haunted the digital world of Windows 7 users for years.
Decoding the Driver Dilemma: Your First Line of Defense
Updating network adapter drivers is crucial. It's more important than you think. Right-click the "Computer" icon. Then, from the menu, select "Manage." Navigate to "Device Manager." Locate your network adapter in the list. Right-click its name and choose "Update Driver Software." Follow the prompts. Let Windows search automatically. If that fails, you'll need to download them manually. Furthermore, visit your adapter manufacturer's website. Search for the latest drivers for your adapter and Windows 7.
Router Reset Ritual: A Digital Cleansing
Sometimes, a simple reset works wonders. Your router can often become the problem. Unplug the router's power cord. Wait for thirty seconds. Then, plug it back in. Allow it to fully boot up. After that, try connecting to the network again. You may be shocked at the improvement. It's a quick and easy fix.
Security Shenanigans: WEP, WPA, and the Wireless Maze
Security settings aren't always user-friendly. You probably want to avoid old security protocols like WEP. WEP offers minimal protection. They can expose your network to vulnerabilities. Consider using WPA2 or WPA3 instead. These offer much stronger encryption. Access your router's configuration page via your web browser. Typically, this is done by entering your router’s IP address into the address bar. Change your security settings here.
Power Management Pitfalls: Draining the Connection
Windows 7's power management settings can interfere. Sometimes, your computer conserves power by disabling the network adapter. This can cause intermittent disconnections. To adjust this, go back to Device Manager. Find your network adapter again. Right-click it and choose "Properties." Click the "Power Management" tab. Uncheck "Allow the computer to turn off this device to save power." Consequently, this ensures your connection stays active, always.
Channel Surfing: Finding the Sweet Spot
Wireless channels can get crowded. They can also cause interference. Switch to a less congested channel. Access your router's settings. Look for the "Wireless" or "WiFi" section. There, you'll find the channel selection options. Experiment with different channels. Test your connection on each. You will find the best one for your network.
Troubleshooting Tools: Calling in the Digital Cavalry
Windows 7 offers built-in troubleshooting tools. They can help diagnose and fix specific issues. Open the "Network and Sharing Center" from the Control Panel. Click "Troubleshoot problems." Windows will automatically scan your network. It will then attempt to identify and resolve issues. Let the tool do its work.
The Ultimate Revelation: A Surprisingly Simple Secret
After exhausting all other options, there's one more trick. It's simple, often overlooked, and works wonders. Sometimes, the issue lies in the services running on your Windows 7 machine. Specifically, the "WLAN AutoConfig" service requires inspection. Press the Windows key + R. Type "services.msc." Press Enter. Find "WLAN AutoConfig" in the list. Ensure it's set to "Automatic." Moreover, restart the service. These small adjustments can breathe new life into your WiFi.
Beyond the Basics: Further Considerations
If all else fails, other factors may be at play. Is your adapter physically damaged? Is the router's firmware outdated? Furthermore, consider upgrading your hardware. A new router or network adapter may offer improved performance. Don't give up. Troubleshooting can often be rewarding.
Conclusion: Victory Over WiFi Frustration
So, there you have it. The frustrating Windows 7 WiFi nightmare is beatable. By systematically addressing these issues, you can restore a stable connection. Thus, say goodbye to buffering. You can also say hello to reliable browsing. If you are still struggling, don’t hesitate to seek further online help. After all, internet freedom awaits!
Laptop to WiFi Hotspot: The SHOCKINGLY Easy Trick You NEED!Windows 7 WiFi Nightmare? This FIX Will Shock You!
Hey tech adventurers! Remember those days when Windows 7 ruled the roost? Good times, right? Well, maybe not always. If you're anything like me (and trust me, I’ve wrestled with more tech gremlins than I care to admit!), you probably remember the occasional, soul-crushing Windows 7 WiFi nightmare. You know, the frustrating situation where your internet decides to take an extended vacation, leaving you staring blankly at your screen. But guess what? We’re diving deep into one of the most common culprits, and I've got a fix that just might shock you.
1. The Ghost in the Machine: Understanding the Windows 7 WiFi Woes
Before we jump into the fix, let’s talk about the enemy. The WiFi problems in Windows 7 could manifest in a myriad of ways. Sometimes it’s a complete disconnect, like the internet just vanished into thin air. Other times, you’d see a “limited connectivity” message, leaving you feeling, well, limited. Maybe streaming videos turned into a buffering battleground, or online games became a lag-fest of epic proportions. Sound familiar? It's like having a grumpy gremlin living inside your computer refusing to play nice.
2. Blame the Driver! The Usual Suspect for Connection Chaos
One of the most frequent reasons behind these WiFi woes? Your network adapter driver. Think of it like this, the driver is the translator between your computer and your WiFi adapter. If that translator speaks gibberish, your computer can't understand the instructions. Outdated, corrupted, or incompatible drivers are notorious for causing connection issues. We're talking about a major headache!
3. Unveiling the Fix: Updating Your Wireless Network Adapter Driver
Alright, time to roll up our sleeves and tackle the problem head-on. The good news is, fixing driver problems is usually a straightforward process. Seriously, it’s like giving your computer a shot of digital adrenaline. Here's how we're going to get your WiFi back in tip-top shape:
- Method 1: Device Manager - The Digital Detective:
- Click the Start button (that little Windows logo).
- Type "Device Manager" into the search bar and hit Enter.
- In the Device Manager window, expand "Network adapters."
- Right-click on your wireless network adapter (it’ll have a name like "Intel(R) Wireless-AC…").
- Select "Update driver."
- Choose "Search automatically for updated driver software." Windows will scour the internet for the latest and greatest version. Cross your fingers!
- Method 2: Manufacturer's Website - The Source:
- If the Device Manager doesn't find anything, don’t despair! You may have to hit up the source.
- Identify the manufacturer of your wireless adapter. This information is also usually available in Device Manager (look under "Network adapters", then look at the name of the adapter).
- Visit the manufacturer's website (e.g., Intel, Broadcom, Realtek).
- Search for drivers specific to your adapter and Windows 7 (important!).
- Download and install the latest driver.
- Method 3: Rolling Back (If All Else Fails):
- Go to the device manager again as described above.
- Right click on the adapter and choose "properties".
- Click the "Driver" tab
- If the "Roll Back Driver" button is available, that means a previous version of your wireless adapter driver is saved on your computer. Click it.
- Restart your computer.
4. The Restart Remedy: Bringing the Driver Back to Life
After updating your driver, one of the most critical steps is restarting your computer. This allows the changes to take effect and the new driver to fully integrate. Think of it as hitting the "refresh" button on your WiFi system.
5. Beyond the Driver: Other Potential Culprits
While the driver is often the star of the show, let’s not rule out other potential suspects in this WiFi mystery:
- Your Router: The Silent Partner: Is your router acting up? Try restarting it. Sometimes the simplest fix is the best.
- Security Software: The Helpful (but Sometimes Overzealous) Friend: Your antivirus software or firewall might be blocking your connection. Temporarily disable them to see if that’s the problem. (But remember to turn them back on!)
- Distance and Obstacles: The Invisible Barriers: Are you too far from your router? Thick walls can weaken the signal. Move closer or try a WiFi extender.
- Network Settings: The Digital Blueprint: Occasionally, network settings get messed up. Check your network connections and ensure everything is set up correctly.
6. Troubleshooting Tips: A Step-by-Step Guide
Here's a quick checklist to help you troubleshoot your WiFi woes in a more structured format:
- Step 1: The Obvious: Restart your computer and your router. Seriously, it works more often than you think.
- Step 2: The Driver Check: Update or reinstall your wireless network adapter driver.
- Step 3: The Security Scan: Temporarily disable your antivirus or firewall to see if they are interfering.
- Step 4: The Location Test: Move closer to your router or remove any obstructions.
- Step 5: The Network Assessment: Double-check your network settings.
7. Diagnosing WiFi Problems: A Digital Detective's Checklist
Before you dive into fixes, it’s wise to understand what's actually going wrong. Here's how to diagnose your WiFi issues:
- Check the Icon: Look at the Wi-Fi icon in your system tray (bottom right corner). Is it showing a connection, a limited connection, or no connection at all?
- Test the Speed: Run a speed test (there are plenty of free online tools). This can show you if your connection is slow.
- Ping Test: Open Command Prompt (search for "cmd" in the Start menu) and type "ping google.com" and hit Enter. A successful ping shows you’re getting a response from the internet.
- Look for Error Messages: Keep an eye out for any error messages that the system might be giving you. These often provide clues.
8. The Power of Persistence: Don't Give Up!
Troubleshooting tech problems can be like solving a puzzle. Sometimes you find the answer immediately, and other times, it requires a bit of detective work. But don’t get discouraged! The key is persistence. Keep trying, keep researching, and don't be afraid to ask for help.
9. Why Windows 7 WiFi Issues Still Matter
You may be thinking, “Why bother? Windows 7 is old news!” Well, many people still use it. Some might be using vintage computers for a specific purpose or just prefer its design. And hey, even if you are using a modern OS, you might be helping a relative or friend with their older machine. It’s always good to have these fixes in your toolbox!
10. The "Shocking" Revelation: A Driver Update Done Right
So, what's truly shocking about this fix? Perhaps it’s how often people overlook the simplest solution: updating drivers. Or, maybe it’s that a single driver update can completely transform your WiFi experience. Either way, it's a testament to the power of a good, solid fix.
11. Common Windows 7 WiFi Errors and Their Solutions
Let’s break down some common errors and how to tackle them:
- "Limited Connectivity": This often means your computer can connect to your router, but not the internet. Check your router settings, and update your driver (as we discussed).
- "No Connections Available": Your computer isn’t even seeing any WiFi networks. Make sure your wireless adapter is enabled, and check that the physical switch on your laptop (if it has one) is turned on.
- Slow Speeds: Try moving closer to your router, or check for interference. If you're still experiencing issues, consider upgrading your router to a faster model.
12. Avoiding Future WiFi Nightmares: Prevention is Key
Once you’ve fixed the problem, how do you prevent it from happening again? Here are a few tips:
- Automatic Updates: If possible, enable automatic driver updates (in Windows). This will help keep your drivers up-to-date.
- Regular Maintenance: Periodically check for driver updates manually.
- Router Reboot: Restart your router regularly. It helps maintain a healthy connection.
13. Beyond the Basics: Advanced Troubleshooting
If the basic fixes aren't working, it's time to get a little more advanced:
- Network Reset: In Windows, you can try resetting your network settings to their defaults. This can fix some weird configuration issues.
- Command Prompt Magic: Use the Command Prompt to run specific network commands, such as “ipconfig /flushdns” (to clear your DNS cache).
- Consult an Expert: If you're really stuck, don't hesitate to seek professional help.
14
Laptop Wifi Nightmare? Solved!Not connected no connections are available windows 7 laptop

By IT Magics Not connected no connections are available windows 7 laptop by IT Magics
Windows was unable to connect wifi windows 7 Laptop and Desktop

By IT Magics Windows was unable to connect wifi windows 7 Laptop and Desktop by IT Magics
How to enable your network connection in Windows 7

By MHELP2U How to enable your network connection in Windows 7 by MHELP2U
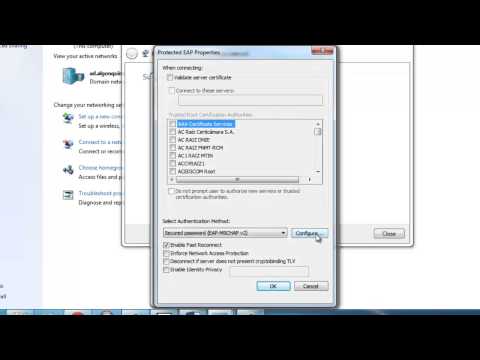
Title: Connecting your Windows 7 Computer to the Wi-fi Network.
Channel: Academic Algonquin
Connecting your Windows 7 Computer to the Wi-fi Network. by Academic Algonquin
Wifi On Laptop
Assume the article's title is: "The Ultimate Guide to Crafting the Perfect Sourdough Starter: A Step-by-Step Masterclass"
The Ultimate Guide to Crafting the Perfect Sourdough Starter: A Step-by-Step Masterclass
Embarking on the journey of sourdough bread making is akin to unlocking an ancient culinary secret. At its heart lies the sourdough starter, a vibrant colony of wild yeasts and beneficial bacteria, responsible for the characteristic tang and airy crumb that defines this beloved bread. This comprehensive guide serves as your compass, steering you through the meticulous yet rewarding process of cultivating your very own, thriving sourdough starter, capable of producing loaves that will undoubtedly impress.
Phase 1: The Genesis – Initiating the Fermentation
The creation of a sourdough starter commences with the simplest of ingredients: flour and water. The choice of flour significantly influences the outcome. While all-purpose flour can be used, whole wheat or rye flour offers a richer nutritional profile and, more importantly, a greater abundance of wild yeasts present on the grain's outer layers. These naturally occurring yeasts are the lifeblood of your starter.
Day 1: The Initial Blend
In a clean, non-reactive container – a glass jar is ideal – combine equal parts of filtered, chlorine-free water and flour. Use a digital kitchen scale for precise measurements; accuracy is paramount, especially in the early stages. Aim for approximately 50 grams of each, water and flour, to begin. Mix these ingredients thoroughly until a shaggy, homogenous mixture forms. The consistency should resemble a thick pancake batter. Cover the jar loosely with a lid or a breathable cloth secured with a rubber band – this allows for air circulation while preventing contamination. Place the jar in a location with a stable temperature, preferably between 70-75°F (21-24°C). This is the ideal environment for fermentation to begin.
Day 2-7: Observing and Feeding
The first few days involve close observation. At the end of each 24-hour period, you will observe the mixture. You might notice minuscule bubbles forming on the surface; this is a promising sign that yeast activity is underway. You may also detect a subtle change in aroma, perhaps a hint of sourness or a slightly fruity scent.
Daily Feeding Regimen:
This is where the true essence of starter creation lies. Discard approximately half of the starter – this removes spent flour and byproducts, allowing fresh flour and water to rejuvenate the colony. Add fresh flour and water in equal parts, maintaining the same weight ratio as mentioned earlier (e.g., 50 grams of flour and 50 grams of water). Stir rigorously to integrate completely. Return the jar to its warm resting place. This daily feeding nourishes the yeasts and bacteria, fostering their proliferation.
Critical Considerations During the Initial Phase:
- Temperature Control: Maintaining a consistent temperature is crucial. Fluctuations can hinder the process. If your kitchen environment is cooler, consider placing the jar in a slightly warmer spot or utilizing a proofing box if available.
- Flour Choice: Experiment with different flour types initially. A blend of whole wheat and all-purpose can often yield a more active starter.
- Water Quality: Chlorine in tap water can inhibit yeast activity. Using filtered or bottled water is highly recommended.
- Patience: Do not be discouraged if you do not see significant activity in the first few days. Starter development is a gradual process, and patience is key.
Phase 2: Maturation – Recognizing a Thriving Starter
After approximately 7-14 days, your starter should exhibit signs of maturity. These include:
- Significant Rise and Fall: The starter should double or even triple in size after feeding, followed by a noticeable drop. This “rise and fall” cycle indicates vigorous yeast activity.
- Bubbles: The presence of numerous, large bubbles throughout the starter is a hallmark of a healthy culture.
- Aromatic Profile: The starter will develop a distinct sour, tangy aroma, characteristic of lactic acid bacteria. The scent should be appealing, not overwhelmingly unpleasant.
- Consistency: The texture should be airy and somewhat elastic.
Day 7-14 (and Beyond): Refining Your Starter
Observe the starter's behavior meticulously. If it's rising and falling consistently and has a pleasant aroma, it’s ready for the next phase: baking! If you are not ready to bake, continue feeding it once daily.
Feeding Frequency Adjustment:
As the starter matures, you can adjust the feeding frequency based on its activity and your baking schedule. If you bake regularly, feeding it daily is recommended. Should you bake less frequently, you might opt to feed it every other day or even less often.
The "Float Test": Gauging Readiness
A reliable method to determine if your starter is ready for baking is the “float test.” Take a teaspoon of the starter and place it in a glass of water. If it floats, it is buoyant enough and contains sufficient gas production, meaning it is ready to be incorporated into a loaf. If it sinks, it needs further development. Feed it and try again in a few hours.
Phase 3: Maintenance – Prolonging the Life of Your Starter
A well-maintained sourdough starter can last indefinitely, becoming a cherished heirloom in your kitchen. The key to long-term success lies in consistent, proper maintenance.
Refrigeration for Prolonged Storage:
When you are not actively baking, refrigerate your starter. The cooler temperature slows down the fermentation process, reducing the need for daily feedings. Before refrigerating, feed the starter as described above, let it peak, and then place it in the refrigerator.
Reviving a Dormant Starter:
To revive a refrigerated starter, remove it from the refrigerator and feed it as usual, letting it sit at room temperature. This should be done a few times, ideally for a few days, before baking with it. Look for the signs of life: bubbling, rising, and a pleasant, sour aroma.
Adjusting Feeding Ratios for Consistency:
Experiment with different flour-to-water ratios to fine-tune consistency. Some bakers prefer a slightly thicker starter, while others opt for a more liquid consistency. The ideal ratio is often determined by your climate and baking preferences. Feel free to alter it to achieve the desired outcome.
Troubleshooting Common Issues:
- Starter Not Rising: This could be due to several factors, including inactive yeast (perhaps from using water that's too hot), low temperature, or insufficient food. Feed the starter regularly, checking the temperature of the area, and use fresh ingredients.
- Watery Starter: This often indicates an imbalance in the flour-to-water ratio or too much liquid. Use precise measurements and ensure your starter is stored in a dry environment.
- Mold or Off-Odors: Discard the starter if mold appears or if the odor becomes overwhelmingly unpleasant (e.g., ammonia-like). Start a fresh starter, always using clean equipment. Cleanliness is of utmost importance.
Phase 4: Baking with Your Sourdough Starter – Unleashing the Flavor
Once your starter is vigorous and properly maintained, you are ready to embark on the most rewarding phase. Baking with a sourdough starter unlocks a world of flavor, texture, and satisfaction that is unmatched by commercially yeasted bread.
Using Your Starter in Bread Recipes:
Most sourdough bread recipes call for a portion of your active starter, often referred to as "levain." Usually it's about 10-20% of the total flour weight. The levain is mixed and allowed to rest for a period. This enables the microorganisms to create flavor and gas to leaven the dough.
Understanding Levain Builds:
Many recipes provide guidelines for creating a “levain” or “leaven,” which is a small amount of your active starter. This levain is then fed with flour and water and allowed to rise, often doubling in size, before being incorporated into the bread dough. This process intensifies the flavor and ensures sufficient leavening power. The time your levain needs to rise can vary depending on the recipe and the environment.
Recipe Adaptability and Experimentation:
Once you become comfortable with the fundamentals, dare to adapt recipes. You can increase or decrease the amount of starter, adjust the bulk fermentation time, and explore various flour combinations to personalize your creations. Embrace the joy of experimentation.
The Journey Continues…
Crafting a sourdough starter is an ongoing journey of learning and discovery. With patience and practice, you will unlock the secrets of this ancient art. Remember that each starter is unique, shaped by its environment and the baker's touch. Embrace the process, celebrate the successes, and learn from every loaf. The rewards – the intoxicating aroma, the magnificent crumb, and the unparalleled flavor – are well worth the effort. So, prepare your flour, gather your water, and begin your own odyssey into the captivating world of sourdough.
