how to setup wifi on asus laptop
Title: How to Fix WIFI not Connecting Not Showing in Windows 10 Asus Laptops
Channel: FIXsage
How to Fix WIFI not Connecting Not Showing in Windows 10 Asus Laptops by FIXsage
how to setup wifi on asus laptop, how to install wifi driver on asus laptop, how to connect wifi in asus laptop windows 7, how to connect wifi in asus laptop windows 10, how to connect wifi in asus laptop windows 11, how to connect to wifi network on asus laptop, how to connect to wireless internet on asus laptop, how to turn on wifi on asus laptop windows 10, how to turn on wifi on asus laptop, how to connect asus laptop to wifi
Asus WiFi Setup: The Easiest Guide EVER! (Guaranteed!)
Unleash Your ASUS WiFi: A No-Sweat Setup Guide (Seriously!)
Let's face it. Setting up a WiFi router can sometimes feel like navigating a minefield. But fear not, fellow internet explorers! This isn't just another guide. This is your express lane to a blazing-fast, effortlessly configured ASUS WiFi network. We're ditching the tech jargon and embracing pure, unadulterated simplicity. Get ready to experience the internet freedom you deserve.
Unboxing the Magic: Initial Prep is Key
First things first, unwrap your shiny new ASUS router. Inspect all the components: the router itself, the power adapter, and (hopefully!) an Ethernet cable. Make certain all the necessary parts are there. You'll also require a modem, the device that connects your home network to your internet service provider (ISP). Ensure your modem is currently functioning properly, as you'll need it. Now, identify a location for your router. Choose a spot with minimal obstructions. Also, pick a place that offers adequate ventilation. Avoid placing it in enclosed spaces. That's the initial prep done.
Plugging In and Powering Up: The First Steps
Next, get connected. Physically. Plug the power adapter into your ASUS router and into a working wall outlet. After that, connect your modem to the router using the Ethernet cable. It's a simple plug-and-play situation, really. The cable will go into the "WAN" or "Internet" port on the router. You can usually find this port easily, as it is often a different color. Give both the router and modem a moment to boot up. A few minutes will do the trick. The lights on the devices will tell you when they are ready.
Accessing the Router's Interface: Diving into Settings
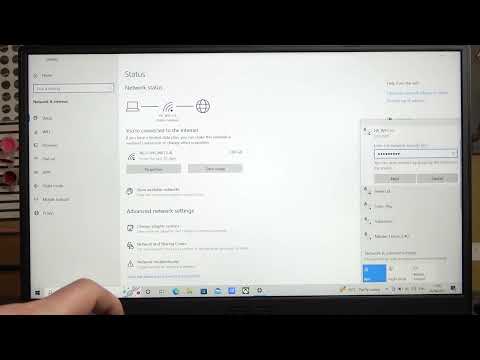
Now, you'll need to access your router's settings page. This is where the real magic happens. You can usually do this by opening a web browser on any device connected to your router's default network. This is usually labeled as "ASUS" followed by a number or letters. However, to make things easier, ASUS often provides a default IP address. Try typing "192.168.1.1" or "asus.router.com" into your browser's address bar. Chances are one of these will get you there. You will be greeted by the login screen. The default username and password are often "admin" for both. If you do not know them, check the router's manual or the sticker on the router itself.
Customizing Your WiFi: Setting Up the Network
Once logged in, you're in the router's control panel. The interface may vary slightly depending on your ASUS router model. But, in general, the steps are similar. First, you'll locate the "Wireless" or "WiFi" settings. From there, you will be able to configure your network name (SSID) and security settings. Choosing a strong, unique password is important. Consider using WPA2 or WPA3 encryption for superior security. Then, make sure your network is broadcasting. You can usually toggle that on or off in the settings. Decide whether you want a 2.4 GHz, a 5 GHz, or both. Each frequency offers its own benefits. The 2.4 GHz band has better range, but slower speeds. The 5 GHz band offers faster speeds but may have a shorter range.
Advanced Settings: Taking it to the Next Level
Now, for the power users. You can explore advanced settings, like quality of service (QoS), which prioritizes the bandwidth for certain devices. You can also enable guest network for visitors. It is very useful for keeping your main network secure. Consider parental controls to protect everyone. Keep an eye out for any firmware updates. They often add new features or fix bugs. Explore these advanced settings options according to your needs.
Troubleshooting Common Issues: Quick Fixes
Things don’t always run smoothly. So what do you do? First, check the physical connections. Make certain all cables are securely plugged in. Also, try restarting your router and modem. This is often the simplest solution. If you are still facing issues, check your internet connection. Call your ISP, just in case. You should also consider factory resetting your router. Just be careful with this step. You'll need to reconfigure everything after the reset. Most importantly, stay patient.
Maintaining Your Network: Keeping Things Smooth
After setup, maintain your network. Regularly update your router’s firmware. Change your WiFi password periodically. Keep your router in a well-ventilated space. Restart your router from time to time. Finally, keep an eye on your network traffic. That way, you can quickly catch any problems.
The ASUS WiFi Guarantee: You've Got This!
You've made it! You've successfully configured your ASUS WiFi router. You now have a fast and secure internet connection. So go forth and enjoy the digital world! You've got the tools, and you are equipped. With these steps, you've turned a potentially daunting task into a simple triumph. Enjoy your new, lightning-fast WiFi!
Laptop WiFi Nightmare? FIX It NOW! (My Phone Works!)Asus WiFi Setup: The Easiest Guide EVER! (Guaranteed!)
Hey there, fellow internet travelers! Ever felt like setting up your Asus router was akin to navigating a labyrinth blindfolded, armed only with a rusty compass? Fear not! We’ve all been there. But guess what? We’re here to demystify the Asus WiFi setup process and make it so simple, you’ll feel like a network ninja in minutes. Consider this your digital comfort food – a step-by-step guide so easy, your grandma could (and probably should) do it!
1. The Setup Safari: Why Asus Routers Rule (And Why You’re Smart for Choosing One!)
First things first, why Asus? Well, let's be honest, they're the superhero of the router world. Think of them as the Iron Man or Wonder Woman of your home network. They're reliable, often packed with features that’ll make your network sing, and generally user-friendly – once you know the ropes! They are designed to provide everything from a simple family network to an advanced gaming experience. We're talking incredible speed, robust security features, and options to customize your network. Choosing Asus signifies you're after quality.
2. Unboxing Bliss: What’s in the Box (Besides Your Sanity?)
Before we even touch the config, let's get acquainted with your new tech sidekick. Typically, you'll find:
- Your Asus router (duh!)
- A power adapter (vital!)
- An Ethernet cable (the gateway to the internet)
- A quick start guide (we're going to make ours MUCH better!)
- Maybe some warranty info (always a good read, even if you don't understand it!)
Take a brief look at the router itself. Note the ports – WAN (where you plug in your internet cable), LAN (for your wired devices), and the power button. Knowing the basics before we begin is going to be a major help.
3. The Prep Stage: Gathering Your Tools (And Your Patience!)
Okay, before we dive in, let’s gather some essential tools. You won't need a toolbox, thankfully!
- Your Asus router (again!)
- Your modem (the box from your internet service provider, or ISP)
- An Ethernet cable (the one included is perfect)
- A computer, laptop, or smartphone (a device that can connect to Wi-Fi or has an Ethernet port)
- Your internet login details (username and password provided by your ISP – locate these before we start!) – This is the most important part!
- A touch of patience (we’re aiming for speedy but don’t panic if you get stuck for a moment)
Remember, Rome wasn't built in a day. A little preparation goes a long way and streamlines the setup process.
4. Wired to the Web: Hooking Up the Hardware (The Physical Connection)
This is the easy part! Think of it like connecting LEGO bricks.
- Power Up: Plug the power adapter into your Asus router and a wall outlet. Turn on the router. Most routers have a power button, but some power on automatically.
- Connect the Modem: Take an Ethernet cable (the blue one is a common color) and plug one end into the “WAN” port on your Asus router. Plug the other end into the Ethernet port on your modem.
- Wait: Give both the modem and the router a minute or two to boot up. You’ll notice lights blinking on your router – that’s a good sign! A steady light indicates that it is working.
5. Connecting Your Device: Finding Your Router's Fortress
Now that everything's plugged in, we need to connect a device (computer, smartphone, tablet) to your router. Here are a few ways to do it:
- Wired Connection: If you're using a desktop, connect an Ethernet cable (again!) from a LAN port on your router to your computer's Ethernet port. Easy peasy! This is the easiest and most secure method.
- Wireless Connection: Look for your Asus router's Wi-Fi network on your device. The network name (also known as SSID – Service Set Identifier) and password are usually printed on a sticker on the router itself (or in the quick start guide). Connect to the Wi-Fi network using the provided password.
6. The ASUS Router GUI: Entering the Command Center
Once connected, you'll need to access your Asus router’s web interface (also known as the GUI – Graphic User Interface) to configure things.
- Open Your Web Browser: On your connected device, open a web browser (Chrome, Safari, Firefox, etc.).
- Enter the Router's IP Address: In the address bar, type in your router's IP address, usually
192.168.1.1or192.168.50.1. You can also consult your manual for the correct IP address. Press Enter. - Log In: You'll be prompted for a username and password. If this is your first setup, use the default credentials. The default username is often "admin" and the default password is "admin" (or sometimes just leave it blank). Check the router's sticker or your manual if these don't work. Change these defaults immediately after your first login to increase security.
7. The Setup Wizard: Your Digital Sherpa
Once logged in, you’ll likely be greeted by a setup wizard. This is your guided tour through the setup process. Follow the on-screen instructions. The wizard will usually guide you through:
- Setting the Wireless Network Name (SSID): This is the name of your Wi-Fi network that will appear on your devices (e.g., “MyAwesomeWiFi”). Choose something memorable that you like!
- Setting a Wi-Fi Password: This is essential for security! Create a strong, unique password. Think of it as the lock on your digital treasure chest.
- Choosing the Internet Connection Type: The wizard will ask how your modem connects to the internet (e.g., automatic IP, PPPoE, etc.). It will provide the correct configuration for your Internet Service Provider.
8. Fine-Tuning Your Network: The Advanced Options
Once the wizard is finished, you can explore some more advanced settings (optional but recommended for optimized performance and security):
- Changing the Router’s Login Credentials: Seriously, do this! The default admin and password are a security risk. Go to the "Administration" or "System" settings and change them.
- Setting Up Guest Network: This is awesome for visitors. It allows guests to use your Wi-Fi without giving them access to your private network and files.
- Enabling WPA3 Encryption: This is the latest and most secure Wi-Fi encryption protocol. Go to the "Wireless" settings and ensure that your "Security" settings use WPA3 (if your router supports it). If not, selecting WPA2 is also secure.
- Checking for Firmware Updates: Keep your router's software up to date. Go to the "Administration" or "Firmware Upgrade" section and look for updates. This improves security and performance.
9. Troubleshooting Troubles: When Things Go Wrong (And How to Fix Them!)
Sometimes, even with the best guide, things can go sideways. Don't panic! Here are a few common issues and how to fix them:
- Can't Connect to the Internet: Check your modem’s lights to ensure it's connected to the internet. Restart your modem and router (unplug them for 30 seconds, then plug them back in). Double-check your internet login details. Contact your ISP.
- Can't Access the Router's GUI: Make sure you're connected to the router's Wi-Fi or have an Ethernet cable plugged in. Try different IP addresses (192.168.1.1 and 192.168.50.1 are the most common). Clear your browser’s cache and cookies.
- Slow Wi-Fi: Try moving your router to a more central location, away from walls and obstructions. Restart the router. Check for interference from other devices (microwaves, cordless phones).
- Forgotten Password: If you've forgotten your login credentials, most routers have a “reset” button (usually a small button you need to press with something small like a paper clip) that will reset the router to factory settings. Consult your manual before resetting.
10. Boosting the Signal: Optimizing Your Wi-Fi Coverage (And Your Sanity)
Wi-Fi signals, like us, can be a little fickle. Here's how to ensure your signal reaches every corner of your home:
- Router Placement: Place your router in a central, elevated location, away from walls, metal objects, and other electronic devices.
- Channel Selection: Your router automatically selects a Wi-Fi channel; try switching to a less crowded channel to prevent interference. Experiment with different channels in your router's wireless settings (channels 1, 6, and 11 are good starting points).
- Use a Wi-Fi Extender: If you have a
Wifi option not showing in windows 11 asus laptop

By IT Magics Wifi option not showing in windows 11 asus laptop by IT Magics
Cara atasi WiFi tidak bisa connect di laptop not connected

By ijal tutorial Cara atasi WiFi tidak bisa connect di laptop not connected by ijal tutorial
How To Connect Wifi Network With Asus Tuf Gaming Laptop
By HardReset.Info How To Connect Wifi Network With Asus Tuf Gaming Laptop by HardReset.Info

Title: Memperbaiki WiFi yang Tidak Muncul di Pengaturan Windows 11 Memperbaiki WiFi yang Hilang
Channel: Sandeep Singh
Memperbaiki WiFi yang Tidak Muncul di Pengaturan Windows 11 Memperbaiki WiFi yang Hilang by Sandeep Singh
Laptop Wifi Connect
Asus WiFi Setup: Your Seamless Connectivity Starts Now!
Are you ready to unleash the full potential of your Asus WiFi router? Forget the frustration of convoluted setup processes and endless troubleshooting. We're here to guide you through every step, transforming the daunting task of WiFi configuration into a streamlined, user-friendly experience. Consider this your definitive compass, navigating you from the initial unboxing to a robust, secure, and lightning-fast wireless network.
Unboxing and Preparation: Laying the Groundwork for Wireless Success
First things first: the unboxing. Carefully remove your brand-new Asus router from its packaging. Take stock of the included components. You should find the router itself, a power adapter, an Ethernet cable, and potentially a quick start guide and warranty information. Locate the power adapter and plug it into your router. Now, plug the power adapter into a wall outlet.
Next, the physical connection. Your internet source – typically a modem provided by your internet service provider (ISP) – needs to communicate with your Asus router. Locate the Ethernet cable included in the box. Plug one end of this cable into the WAN (or Internet) port on the back of your Asus router. This port is usually a different color than the other ports (often blue or yellow). Now, connect the other end of the Ethernet cable to the appropriate port on your modem. The modem port is typically labeled "Ethernet" or "LAN."
Once the physical connections are complete, power on both your modem and your Asus router. It is best to give the modem a few minutes to fully boot up before you switch on the router. Observe the lights on the front of your modem. They will typically flash during the boot-up process and become solid when the internet connection is established. Now, turn on your Asus router and wait for it to initialize. This usually takes a minute or two. You'll know it's ready when the power light is solid, and the internet light is blinking or solid.
Accessing the Asus Router's Interface: Your Digital Gateway
With the physical setup complete and the devices powered on, it's time to access your Asus router's settings. There are two primary methods for doing so:
Method 1: Using the Asus Router App: Asus offers a user-friendly mobile app, typically named "ASUS Router," available for both iOS and Android devices. This app provides a streamlined interface for setup and management. Download and install the app on your smartphone or tablet. Ensure your device is connected to your WiFi network (if you haven't set up WiFi yet, you can connect via the default WiFi network name and password, usually printed on a sticker on the router). Launch the app, and follow the on-screen prompts. This process often automatically detects your Asus router and guides you through the initial setup.
Method 2: Through a Web Browser: This method grants you access to a more comprehensive suite of settings and configurations. Open a web browser on your computer (or any device connected to the Ethernet cable or default WiFi) and enter the router's default IP address in the address bar. The default IP address is typically
192.168.1.1or192.168.50.1. You can find this information in your Asus router's quick start guide or on a sticker on the router. Press Enter.You will be prompted for a username and password. The default username is usually "admin," and the default password is also often "admin." However, it is advisable to check the documentation or the sticker on your router, as some models might have different default credentials. Enter the credentials and hit Enter.
The Setup Wizard: Your Guided Tour to Wireless Excellence
Once you successfully log into the router's interface (either through the browser or the app), you'll likely encounter a setup wizard. This wizard is designed to simplify the configuration process by walking you through the essential steps.
Step 1: Internet Connection Type: The wizard will prompt you to specify your internet connection type. This setting depends on the type of connection provided by your ISP. Common options include:
*   **Automatic IP/DHCP**: This is the most common option and works for most cable internet connections. Your router automatically obtains an IP address from your ISP.
*   **PPPoE**: Used for DSL connections, you'll need to enter the username and password provided by your ISP.
*   **Static IP**: If your ISP assigned you a static IP address, you'll enter that IP address, subnet mask, gateway, and DNS server information here.

Consult your ISP's documentation or contact their support team if you are unsure about your connection type.
Step 2: WiFi Network Name (SSID) and Password: This is where you customize the identity of your WiFi network. Enter a name for your network (SSID) that you can easily recognize (e.g., "MyHomeWiFi"). Then, create a strong, unique password. Choose a password that is at least 12 characters long, combines uppercase and lowercase letters, numbers, and symbols. This password will protect your network from unauthorized access.
Step 3: Security Settings: The wizard usually provides options for wireless security protocols. WPA2-PSK (AES) is still generally considered a strong and secure option. For newer routers, WPA3-PSK might be available. Consider switching to WPA3 if it is supported by your devices. This protocol provides enhanced security for a more secure experience.
Step 4: Finishing the Setup: After entering the necessary information, the wizard should prompt you through review or a summary of your settings. Confirm and finalize the setup. The router will then apply the settings and restart.
Fine-Tuning Your Network: Enhancements for Peak Performance
Once the initial setup is complete, you can delve deeper into your router’s settings to optimize your network performance and security. The Asus interface offers extensive customization options.
Changing the Router Password: Immediately after setup, change the default username and password for accessing the router's interface. Choose a strong, unique password different from your WiFi password. This is a critical security measure to prevent unauthorized access to your router's administrative settings.
Wireless Channel Selection: In the wireless settings, you can manually select the wireless channels for both the 2.4GHz and 5GHz bands. By default, the router often chooses the best channel. However, in crowded environments, you might experience interference from other networks. Use a WiFi analyzer app (available for smartphones and computers) to scan for the least congested channels in your area and manually set your router to one of these channels. This can improve your WiFi speed and reliability.
Guest Network: Configure the guest network feature. This feature allows you to create a separate WiFi network for guests, isolates them from your primary network and protects your files and private data. You’ll be able to set up an SSID and password. You can also set up access restrictions.
Quality of Service (QoS): QoS settings allow you to prioritize certain types of network traffic. You can prioritize gaming, video streaming, or other applications to ensure those activities receive the bandwidth they need for optimal performance.
Firmware Updates: Regularly check for firmware updates for your Asus router. Firmware updates often include bug fixes, security enhancements, and performance improvements. You can usually find the firmware update option in the router's administration or maintenance settings.
Parental Controls: If you have children, configure parental controls to restrict access to certain websites or limit internet usage times. This feature can help protect your children from inappropriate content and monitor their online activity.
Troubleshooting Common Issues: Conquering the Connectivity Hurdles
Even with a well-configured network, you might encounter some common issues:
No Internet Connection: Double-check the physical connections between your modem and router. Ensure the modem is powered on and connected to the internet. Restart both the modem and the router. If the issue persists, contact your ISP to verify your internet service is active.
Slow WiFi Speeds: Restart your router and devices. Make sure your device is connected to the 5 GHz band if your router supports it, as it typically offers faster speeds than the 2.4 GHz band. Move your router to a central location and away from obstructions. Ensure that the router is updated to the latest firmware.
WiFi Network Not Showing: Make sure the WiFi is enabled in your router’s settings. Restart your router and the devices that are having trouble connecting. Check that the SSID is correct on your devices. Verify you are not too far from the WiFI Router or being obstructed by objects.
Cannot Connect to Router Interface: Ensure you are entering the correct IP address in your browser, or using the Asus Router app. Reset your router to factory settings if you are unable to access the interface.
Advanced Configuration and Features
For advanced users, Asus routers offer a wealth of features:
VPN Server: Create a Virtual Private Network (VPN) server allowing you to securely connect to your home network from anywhere in the world.
USB Applications: Connect a USB drive to the router to create file-sharing and media-streaming capabilities.
AiMesh: The AiMesh feature lets you combine multiple Asus routers to create a whole-home mesh network, offering seamless WiFi coverage throughout your property.
Security Best Practices: Fortress Your Wireless Network
Securing your WiFi network
