how to create a wifi hotspot in laptop windows 7

Title: How to Create a WiFi Hotspot with Windows 7
Channel: 1stepatatime
How to Create a WiFi Hotspot with Windows 7 by 1stepatatime
how to make laptop as wifi hotspot windows 7
Windows 7 Hotspot: The Secret Trick They DON'T Want You to Know!
Unlocking the Wireless Frontier: Your Windows 7 Hotspot Secret
Ever felt tethered, trapped by the limitations of a single internet connection? Let's face it, we've all been there. Picture this: a dead zone, a digital desert where Wi-Fi signals fear to tread. But what if the solution resided within your trusty old Windows 7 machine? Believe it or not, a hidden power lurks within, waiting to be unleashed. Thus, you can transform your laptop into a potent mobile hotspot.
The Hidden Potential: Your Windows 7 Revelation
Before we proceed, understand that we're not discussing some obscure, techy hack. We're talking about a straightforward method. It's something that many overlook. You've probably had the key all along. The ability to create a Wi-Fi hotspot on Windows 7 is, in fact, a built-in feature. The irony? It's surprisingly simple to set up. However, it’s not necessarily the most obvious process.
Setting the Stage: What You'll Need
First, make sure your Windows 7 laptop has a working internet connection. This could be through Ethernet, or even a previously established Wi-Fi network. In addition, you’ll need a network adapter that supports hosted networks. Most modern laptops do. You should verify this before we continue.
Initiating the Magic: The Command Prompt Dance
Now, this is where the magic begins. Don't let the word "command prompt" intimidate you. We'll navigate this step with ease.
Open the Command Prompt as an administrator. You can do this by typing "cmd" into the search bar. Right-click on "Command Prompt" and select "Run as administrator."
Type the following command and hit Enter:
netsh wlan set hostednetwork mode=allow ssid=[YourHotspotName] key=[YourPassword]. Replace[YourHotspotName]with the name you want for your hotspot and[YourPassword]with a strong password.For instance, you may type
netsh wlan set hostednetwork mode=allow ssid=MyAwesomeHotspot key=MySecretPassword.Next, type the following command and press Enter:
netsh wlan start hostednetwork. This activates the hotspot.
Bridging the Gap: Sharing Your Internet
The next step is crucial. You need to share your existing internet connection with your newly created hotspot. We’re almost there.
Go to the "Network and Sharing Center" in the Control Panel.
Click on "Change adapter settings".
Locate your primary internet connection (the one you use to connect to the internet). It is usually labeled "Local Area Connection" if using Ethernet or "Wireless Network Connection" if using Wi-Fi.
Right-click on it, go to "Properties".
Click the "Sharing" tab.
Check the box that says, "Allow other network users to connect through this computer's Internet connection."
In the "Home networking connection" dropdown, select your hosted network adapter. It will likely be something like "Microsoft Virtual WiFi Miniport Adapter".
Click "OK".
Troubleshooting Time: Because Things Happen
Sometimes, things don't go as planned. That’s perfectly normal. Don’t worry. Here are a few common issues and how to address them:
"Hosted network could not be started" error: Ensure your network adapter supports hosted networks. Also, try updating your network drivers.
No internet access on connected devices: Double-check that you correctly shared your internet connection. Make sure your firewall isn't blocking the connection. Furthermore, ensure your password is correct.
Hotspot disappearing: This can sometimes happen. Simply restart the hosted network using the commands
netsh wlan stop hostednetworkand thennetsh wlan start hostednetwork.
The Takeaway: Freedom in Your Hands
There you have it. You’ve now unlocked the hidden potential of your Windows 7 machine! You can now create your very own Wi-Fi hotspot. Moreover, you can share your internet connection with other devices. Because of this, you’re no longer chained to a single connection point. As a result, you’ve expanded your digital reach. You can now connect your phone, tablet, or any other Wi-Fi enabled device.
Beyond the Basics: Customizing Your Connection
While the basic setup works wonders, you can fine-tune your hotspot for optimal performance. Also, you could change the SSID (network name). Update your password. By doing this, you enhance security. The command prompt offers greater control. You can also tweak the network's channel for stability.
Why This Matters: The Power of Knowledge
This isn't just about creating a Wi-Fi hotspot. It's about understanding your technology. Now, you control your digital experience. You don’t need to rely on expensive mobile hotspots. Instead, you can stay connected on your terms. Thus, this knowledge empowers you.
Embrace the Wireless Revolution
So, go forth and explore. Use your newfound knowledge responsibly. Share the connection when needed. Moreover, relish the freedom this secret trick provides. You now possess a powerful tool. This is a valuable skill in a world that demands constant connectivity.
Laptop's WiFi Dying? This SHOCKING Fix Will BLOW Your Mind!Windows 7 Hotspot: The Secret Trick They DON'T Want You to Know!
Hey there, fellow tech enthusiasts! Remember those days when Wi-Fi wasn't an automatic right? Well, even though the world's gone wireless crazy, there's still a little magic hidden in your trusty old Windows 7 machine – a secret trick to turn it into a hotspot, and, frankly, it's something they don't tell you about often enough! We're talking about sharing your internet connection with all your devices, without needing to shell out for a separate router or complicated setups. Sounds good, right? It is! Let’s dive in.
1. The Problem: Why Windows 7 Hotspot Knowledge is a Lost Art
Think about it: you're in a hotel, Wi-Fi's expensive, and you've got a laptop with a wired connection. Or maybe you're at a friend's place with limited Wi-Fi and desperately need to connect your phone to browse. The frustration is real! This "secret" we're about to unlock has always been hiding in plain sight, unfortunately, many of the tutorials out there are either convoluted, outdated, or just plain wrong. We’ve all stumbled upon those dense, tech-jargon-filled guides that leave us feeling more confused than enlightened. It’s like trying to read ancient hieroglyphics. We're here to demystify this and bring the knowledge back to everyone who needs it.
2. The Simple Truth: Windows 7 Has a Built-In Secret Weapon
Here’s the kicker: Windows 7 actually has the capability to create a Wi-Fi hotspot natively. It’s like having a hidden power switch tucked away in your system. The functionality is there, ready and waiting to be used. We’re not talking about installing obscure software or hacking your system.
3. Preparation is Key: What You'll Need Before We Start
Before we get our hands dirty, let's make sure we’ve got everything we need. Think of it like baking a cake – you need the ingredients first!
- A Windows 7 Laptop or Desktop: This is the star of the show.
- An Internet Connection: This can be anything – a wired Ethernet connection, a USB dongle – anything that provides internet access to your PC.
- A Wi-Fi Card: Most laptops have them, but you'll need one to broadcast the signal. Desktop users will want to ensure they have a wireless network adapter installed.
- A Little Patience: It might take a couple of tries, but trust me, it's worth it.
4. The Classic Method: Ad-Hoc Network (The Tried and True)
The original approach, the one that was around before all the fancy GUIs, is setting up an ad-hoc network. It's the OG. This method, although a bit less user-friendly than the modern approaches, still works and is a good starting point to understand how the underlying processes function.
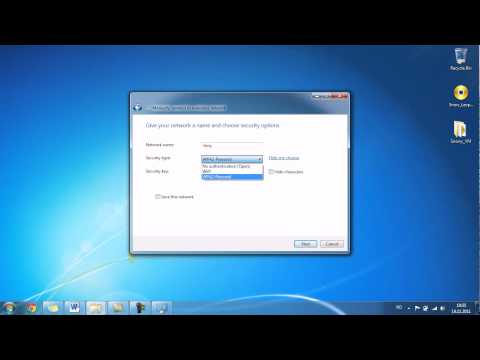
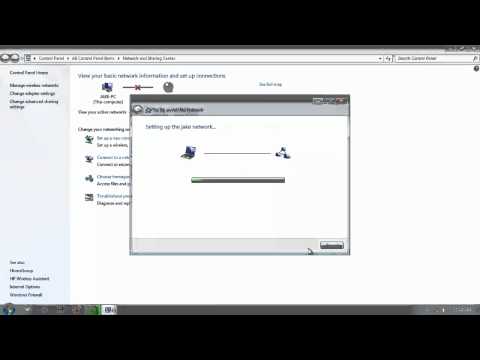
- Go to the Network and Sharing Center. (You can find this by right-clicking the network icon in your system tray and selecting "Open Network and Sharing Center.")
- Click "Set up a new connection or network."
- Choose "Set up a wireless ad hoc (computer-to-computer) network."
- Give your network a name, choose a security type (WPA2-Personal is recommended for its security), and set a password.
- Follow the prompts to share your internet connection.
5. The Command Prompt Power Move (Unleashing the Beast)
Now, let’s get into the gritty stuff. The Command Prompt is like your computer’s secret command center. This method offers a more effective and secure way to create a hotspot. Don’t worry, it's not as scary as it sounds.
Open Command Prompt as an administrator. (Search for “cmd” in the Start menu, right-click it, and choose “Run as administrator.”)
Type the following commands, pressing Enter after each.
netsh wlan set hostednetwork mode=allow ssid="Your Hotspot Name" key="YourPassword"
netsh wlan start hostednetwork
Replace "Your Hotspot Name" with whatever you want to call your hotspot and "YourPassword" with a secure password.
Next, you need to share your internet connection. Go back to the Network and Sharing Center, right-click on your internet connection (e.g., Ethernet), select “Properties”, and go to the “Sharing” tab.
Check the box that says “Allow other network users to connect through this computer’s internet connection” and select your newly created Wi-Fi hotspot in the dropdown menu. Click “OK.”
This process allows you to have more control over your hotspot.
6. Troubleshooting: When Things Go Wrong (and How to Fix It!)
Sometimes, things don't work perfectly the first time. That's okay! We've all been there. Here are some common issues and how to solve them:
- "The hosted network couldn't be started." Make sure your wireless network adapter is enabled and that your Wi-Fi drivers are up to date.
- Devices Can't Connect: Double-check your password, and make sure the network name (SSID) is correct on the connecting device.
- No Internet Access on Connected Devices: Ensure you've enabled internet connection sharing as explained earlier.
7. Security First! (Protecting Your Digital Fortress)
This is critical! Don't just blindly set up a hotspot and forget about security.
- Always use a strong password for your hotspot. Think of it like a fortress gate – you want to keep the bad guys out.
- Use WPA2-Personal encryption, which offers the best balance of security and compatibility.
- Monitor the connected devices to see if any unwanted users are accessing your network.
8. The Advantages: Why Bother With a Windows 7 Hotspot?
Why go through all this effort? Because the benefits are fantastic!
- Share Internet Anywhere: Perfect for hotels, friend's houses, or anywhere with limited Wi-Fi access.
- Cost Savings: No need to pay for another router just to connect a few extra devices.
- Flexibility: Set up a hotspot on the go and avoid tethering your phone (which often has data limits).
9. Addressing the Elephant in the Room: Is Windows 7 Still Safe?
We understand the concern. Windows 7 officially reached its end-of-life (EOL), but that doesn’t mean it’s a completely unsafe platform.
- Keep it Updated: Ensure you've installed all available security updates (although support has ended, some security updates may still be available).
- Use a Robust Antivirus: A good antivirus program is essential on any operating system.
- Browse Carefully: Be cautious when browsing the web and avoid clicking on suspicious links.
10. Unleashing the Power: Beyond Sharing Internet
Creating this hotspot isn’t just about sharing your internet connection. It can be used in several incredible ways.
- Connecting Multiple Devices: Connect your phone, tablet, and laptop seamlessly.
- File Sharing Share files between your devices without USB drives.
- Gaming with Friends Even play online games with friends.
11. The Downsides: Things to Consider Before You Leap
Before you jump in, be aware of a few potential drawbacks.
- Battery Drain: Using your laptop as a hotspot can drain the battery faster.
- Performance Hit: Your internet speed might be slightly reduced because it's being shared.
- Compatibility: While widely compatible, some older devices might have issues connecting.
12. Step-by-Step: Command Prompt Magic (A Refresher)
Let’s quickly recap the command prompt method because it's really the powerhouse here.
- Open Command Prompt as Administrator.
- Enter the commands:
netsh wlan set hostednetwork mode=allow ssid="Your Network Name" key="YourPassword". - Run :
netsh wlan start hostednetwork. - Share your internet connection through Network and Sharing Center.
13. Fine-Tuning Your Hotspot: Advanced Customization
For those who want to get more advanced with their hotspot.
- Channel Selection: You can manually choose a Wi-Fi channel for your hotspot via the Device Manager, possibly improving the performance and mitigating interference.
- Limit Connections: Some command-line tools or third-party software can help limit the number of devices connected to your hotspot.
14. The Legacy Lives On: Windows 7's Lasting Impact
Even though Windows 7 is no longer the newest kid on the block, it has left a lasting legacy! It’s a reliable OS.
15. The Future is Now: What's Next?
While Windows 7 might be aging, this demonstrates that we still can keep it alive. Keep experimenting, and always stay curious. Technology continues to evolve.
Closing Thoughts: Unlock Your Windows 7's Hidden Potential!
So there you have it. You now have the knowledge to create a Windows 7 hotspot, the secret weapon they don't shout about! We’ve taken you from
Laptop WiFi Hotspot: The Secret Trick Google Doesn't Want You To Know!how to create a wifi hotspot on windows 7 Professional
By iTon how to create a wifi hotspot on windows 7 Professional by iTon
Create a laptop WiFi hotspot in under 30 seconds Windows 7
By jacobspeeds Create a laptop WiFi hotspot in under 30 seconds Windows 7 by jacobspeeds
Cara Mengaktifkan Hotspot Wifi Laptop Windows 7

By LAPTOP TUTORIAL Cara Mengaktifkan Hotspot Wifi Laptop Windows 7 by LAPTOP TUTORIAL

Title: How to turn your Windows 7810 Laptop or PC into a WiFi Hotspot UpdatedHD
Channel: iTech
How to turn your Windows 7810 Laptop or PC into a WiFi Hotspot UpdatedHD by iTech
My Laptop Work
Windows 7 Hotspot: Unlock Wireless Freedom the Easy Way
We’ve all been there: craving a Wi-Fi connection when only Ethernet is available, or wanting to share your internet with multiple devices but lacking a dedicated router. The good news? You don't need to invest in expensive hardware or wrestle with complicated configurations. Windows 7, despite its age, possesses a powerful built-in feature that can transform your laptop into a fully functional mobile hotspot. Forget what you think you know about complicated setups; this is about simplifying the process and achieving seamless connectivity. Let's dive in and explore the secrets to creating a Windows 7 hotspot, unlocking wireless freedom with ease.
Understanding the Foundation: Windows 7's Hidden Wireless Feature
Before we delve into the configuration, understanding the core technology is crucial. Windows 7 houses a hidden gem: the capability to share your existing internet connection wirelessly. This isn't just a rudimentary sharing function; it's a full-fledged hotspot, complete with encryption options and connection management. The magic lies primarily within the "Hosted Network" feature. This feature, accessible through the command prompt, allows your laptop to act as a wireless access point, broadcasting a Wi-Fi signal that other devices can connect to. It's an ingenious workaround that turns your machine into a mini-router, effectively enabling you to extend your internet access to other gadgets like smartphones, tablets, and even other laptops.
Preparing for Takeoff: Checking Prerequisites for a Smooth Experience
Before getting started, ensure your system meets the essential requirements. Thankfully, the prerequisites for this process are generally straightforward. First, and most critically, your laptop must have a wireless network adapter. This is the hardware component responsible for transmitting the Wi-Fi signal. Almost all modern laptops come equipped with this, but double-checking in your Device Manager is always wise. You can find this by searching for "Device Manager" in the Windows Start menu. Look under "Network adapters"; you should see your wireless adapter listed there.
Second, you need an internet connection on the laptop itself. This can be via Ethernet cable, another Wi-Fi network, or even a mobile broadband connection. The important aspect is that the source of internet access is established.
Lastly, and though less frequently a problem, verify that your network adapter drivers are up to date. Outdated drivers can sometimes cause compatibility issues. You can update these through the Device Manager by right-clicking on your wireless adapter and selecting "Update driver."
The Command Prompt: Your Gateway to Wireless Mastery
The primary tool we'll be utilizing to create our Windows 7 hotspot is the Command Prompt. This powerful utility is where we'll execute a series of commands to configure and activate the hosted network. Accessing the Command Prompt is simple; select “Run as administrator.” Navigate to the Start menu and type "cmd" into the search bar. Right-click on "cmd" and select "Run as administrator." This is crucial; otherwise, you won’t have the necessary permissions to make the required network changes.
Activating the Hosted Network: Step-by-Step Guide
Now for the moment of truth: activating the hosted network. Follow these specific commands meticulously:
Step 1: Initiate the Hosted Network
In the Command Prompt, type the following command and press Enter:
netsh wlan set hostednetwork mode=allow ssid="YourHotspotName" key="YourPassword"
Replace "YourHotspotName" with your desired network name (the name other devices will see) and "YourPassword" with a passphrase of at least eight characters. Choose a robust password for security.
Step 2: Starting the Hosted Network
Once the hosted network is set, start it with this command:
netsh wlan start hostednetwork
This initiates the wireless network broadcast.
Step 3: Sharing Your Internet Connection
The final and crucial step is to share your existing internet connection with the hosted network.
- Open the "Network and Sharing Center" by searching for it in the Start Menu or right-clicking the network icon in your system tray and selecting "Open Network and Sharing Center."
- Click "Change adapter settings" on the left-hand side. This opens a window showing your network connections.
- Identify the connection that's providing your internet access (e.g., "Ethernet" if you're using a wired connection or your current Wi-Fi connection).
- Right-click on that connection and select "Properties."
- Go to the "Sharing" tab.
- Check the box that says "Allow other network users to connect through this computer's Internet connection."
- From the "Home networking connection" dropdown menu, select the name of your hosted network that you created earlier (it will likely be named "Microsoft Hosted Network Virtual Adapter").
- Click "OK."
Troubleshooting Common Roadblocks
Even with meticulous steps, you may encounter occasional hiccups. Here are some common issues and their solutions:
The Hosted Network Fails to Start: Double-check the commands you entered in the Command Prompt for any typos. Verify that your wireless adapter is enabled and functioning correctly. Ensure you’re running the Command Prompt as an administrator.
Devices Can't Connect to the Hotspot: Confirm that you entered the correct password when setting up the hotspot. Check your firewall settings (Windows Firewall or third-party firewalls) to prevent them from blocking the connection.
No Internet Access on Connected Devices: Verify you correctly shared your internet connection in the Network and Sharing Center, as described above. Ensure the internet connection source is working on your laptop.
Enhancing Security: Protecting Your Wireless Hotspot
Security is paramount when creating any Wi-Fi network. Here are some best practices:
Use WPA2 Encryption: When setting the security key (password), make sure you use a strong password. Never use easily guessable terms.
Regularly Change Your Password: Periodically updating your password further enhances the network security.
Monitor Connected Devices: Keep an eye on the devices connected to your hotspot. If you notice any unrecognized devices, consider changing your password.
Beyond the Basics: Advanced Customization
While the core setup is straightforward, you can customize the hosted network further. For example, you can change the network name or password via the command prompt at any time using the netsh wlan set hostednetwork command, as shown in the initial setup. You can also stop the hosted network with the command netsh wlan stop hostednetwork.
The Benefits: Unlocking Wireless Freedom
Creating a Windows 7 hotspot offers numerous advantages:
Share Your Internet: Easily share your internet connection with multiple devices, regardless of their location.
Cost-Effective Solution: Avoid investing in dedicated routers, especially when only sharing internet access occasionally.
Simplified Connectivity: Turn your laptop into a mobile router, providing wireless connectivity.
Enhanced Productivity: Access the internet on your devices, enabling you to work or connect from any spot.
Windows 7 Hotspot: Mastering the Art of Seamless Connectivity
The ability to turn your Windows 7 laptop into a hotspot is a testament to its hidden capabilities. Mastering the steps outlined here enables you to unlock wireless freedom and extend your internet connectivity effortlessly. With the proper knowledge and an understanding of the fundamentals, you can transform your laptop into a versatile mobile router, providing internet access wherever you go. Don't let the perceived age of Windows 7 deter you; its built-in features hold the secret to easy wireless connectivity.
