how to create wifi hotspot from laptop windows xp
Title: How to make your laptop to a wifi hotspot on windows xp788.1
Channel: Arafatur Rahman Shimul
How to make your laptop to a wifi hotspot on windows xp788.1 by Arafatur Rahman Shimul
Unlock Your XP Laptop's Hidden Hotspot: Free WiFi NOW!
Unleash the Power: Turn Your XP Laptop into a WiFi Dynamo!
Ever craved instant internet access, especially when far from a reliable connection? That dusty old XP laptop lurking in the closet? Believe it or not, it holds the key. Right now, you can resurrect it and unlock a hidden ability. Transform it into a powerful WiFi hotspot. It'll be a lifesaver, and also keep you connected.
Dust Off That Relic: Why XP Still Matters
Before we dive in, let's address the elephant in the room. Yes, Windows XP is ancient. However, it's also surprisingly capable. Furthermore, for specific tasks, it can be incredibly useful. Consider this: you have a spare XP laptop. It's simply gathering dust. Instead of letting it rot, give it a purpose. Turn it into a portable WiFi hub. It's a fantastic way to recycle old tech. Plus, it’s an act of digital resourcefulness.
Gearing Up: Essentials for WiFi Hotspot Glory
Firstly, you'll need your XP laptop, of course. Ensure it has a working network card. Most likely, it does, but check its specs. Secondly, you'll need a method to connect the XP machine to the internet. This could be an Ethernet cable. Or, it might be a USB wireless adapter. This depends on your main internet source. Thirdly, make sure you have the necessary drivers. If you don't, download them beforehand. Therefore, have everything prepared before you start. Finally, and this is important, write down the steps. This will save you time and confusion.
The Software Side: Setting Up Your Hotspot
Here's where the magic begins. Surprisingly, creating a hotspot on XP is relatively straightforward. Even though Microsoft no longer supports it, the process is still possible, especially with third-party software or workarounds.
Method 1: The Ad-Hoc Network (A Blast from the Past)
You could try setting up an ad-hoc network. However, this method is less secure and less reliable. Therefore, it might not be the best approach. Nevertheless, it's a possibility. You'll configure it in the Network Connections settings within the Control Panel.
Method 2: Third-Party Software (The Modern Approach)
Several free programs designed for this very purpose exist. They're often far more user-friendly. Therefore, they enhance your experience. Search online for "WiFi Hotspot software for Windows XP". Research the options. Most importantly, select a program that's reputable and safe. Some popular choices include Connectify, or similar alternatives.
Step-by-Step Guide: Using Third-Party Software
- Download and install the software. After downloading your chosen program, run the installation. Follow the on-screen instructions.
- Configure your connection. Next, you'll likely need to select your internet connection source. This could be Ethernet, or a USB wireless adapter. This step directs where the XP machine gets its internet.
- Create your hotspot name and password. Think up an easily remembered name for your network (SSID). And absolutely do not forget to set a strong password. This safeguards others from unauthorized access.
- Start the hotspot. Most programs have a prominent "start" button. Click it. Soon, your XP laptop will be broadcasting its own WiFi signal.
- Connect your devices. Finally, on your phone, tablet, or other computer, search for available WiFi networks. Look for your newly created hotspot's name. Enter the password when prompted. And there you have it! You’re online.
Troubleshooting Troubles: Common Roadblocks
Encountering issues is normal. Don't despair! Often, the fix is simple.
- No internet connection: Double-check your source connection. Ensure the XP laptop is connected to the internet. Verify the settings within your chosen software.
- Devices can’t connect: Confirm the password entered is correct. Also, check if your device is compatible with the network's security settings.
- Slow speeds: The speed depends on your initial internet connection. Also, many devices connected can affect it. Try disconnecting some devices to see if it improves.
- Software errors: If the software malfunctions, try reinstalling it. Also, research online for specific solutions.
Security First: Protecting Your Hotspot
Security is paramount. Remember, you're sharing your internet connection. Never overlook these steps:
- Use a strong password. Avoid birthdays or easily guessed phrases. Use a combination of letters, numbers, and symbols.
- Choose WPA2 or WPA3 encryption. Avoid older, less secure options.
- Monitor connected devices. Most hotspot software allows you to see who's connected. If you see unfamiliar devices, block them.
- Keep your software updated. Regularly update your hotspot software. Updates often include security patches.
Beyond the Basics: Expanding Your WiFi Horizons
This is not just about connectivity. Think about other applications. First, you could use your XP hotspot for file sharing. You could easily share files between devices on the same network. Also, consider printing. Many printers can connect via WiFi. Now, you can print documents. This could be very handy in a pinch.
Final Thoughts: Embracing the XP Revival
Turning your XP laptop into a WiFi hotspot is more than just a tech trick. It's a demonstration of resourcefulness. It's also a testament to the enduring power of older technology. This also provides a practical solution. Furthermore, it's a rewarding project. So, revive your old XP machine today. Unlock its hidden potential. Then, embrace the freedom of free WiFi, wherever you roam!
Mobile WiFi Nightmare? Laptop Won't Connect! (Solved Inside!)Unlock Your XP Laptop's Hidden Hotspot: Free WiFi NOW!
Hey there, fellow tech adventurers! Remember those trusty old XP laptops gathering dust in the attic or basement? The ones that still hum with the faint whir of a hard drive and the nostalgic glow of a CRT-era screen? Well, instead of letting them become relics of a bygone age, we’re going to breathe new life into them. We're not just talking about dusting them off; we're talking about transforming them into portable, free WiFi hotspots! Yes, you heard that right. Forget paying for extra data or relying on dodgy public WiFi. Today, we’re diving deep into the world of unleashing your XP laptop’s hidden potential, transforming it into a WiFi-slinging, data-saving champion. Buckle up; this is going to be fun!
The XP Revival: Why Bother?
Before we get our hands dirty with the technical wizardry, let's address the elephant in the room: Why bother with an XP laptop in the age of sleek smartphones and lightning-fast internet? Well, the answer is multifaceted. Firstly, it’s a fantastic way to recycle and repurpose old tech. Giving a purpose to an old device is empowering, it's a bit like giving a pensioner a new lease on life; they've got stories to tell, and we get free WiFi! Secondly, it's a clever way to save money on data costs, especially if you're a heavy internet user or travel frequently. Imagine the freedom of having a personal WiFi bubble wherever you go! Finally, think about the learning experience. We gain valuable skills while resurrecting a near-forgotten operating system. It’s a win-win-win situation!
Preparing Your XP Laptop for its New Role
Alright, let's get down to brass tacks. The first step is preparation. This isn't rocket science, but a little groundwork makes the process smoother.
- Clean Up Crew: Start by giving your XP laptop a good cleanup. Remove unnecessary files, uninstall programs you don't use, and run a disk defragmentation. A clean system runs faster and is less prone to hiccups. Consider a fresh install of XP; it's like giving your laptop a spa day!
- Get Connected (Wired, Preferably): Ideally, connect your XP laptop to the internet via an Ethernet cable. This provides a stable internet connection to share as a hotspot. If you only have wireless, then you can still make it work, but stability may vary.
- Security Checkup: Update your antivirus software and run a full system scan. XP is old, and security holes are plentiful; a proactive approach is crucial. Think of this as putting your laptop in a digital bubble wrap.
- Hardware Check: Ensure your laptop has a working wireless network adapter. Without this, we're dead in the water. Most XP laptops came with them, but it's worth double-checking in the Device Manager.
The Magic Ingredient: Software is Your Friend
Now for the fun part: the software. We'll need a piece of software that transforms your laptop into a WiFi hotspot. There are a few different options, but we'll focus on a reliable and user-friendly one.
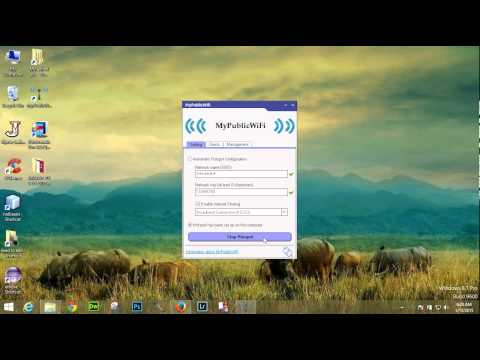
Connectify Hotspot: The Easy Route
Connectify Hotspot is a popular choice. It's user-friendly and relatively easy to set up. Sadly, the free version has some limitations, but the paid versions unlock more features. If you're hesitant about the techy stuff (we've all been there!), Connectify is a great starting point.
HostedNetwork: The Built-In Option (If Your XP Allows It!)
Some XP laptops, depending on their network adapter and installed drivers, might have a built-in feature that allows them to share their Internet connection. This is called HostedNetwork. We need to check if your wireless network adapter is compatible and the necessary drivers are properly installed, and then we can configure it through command prompt. If this works, it is a perfect solution.
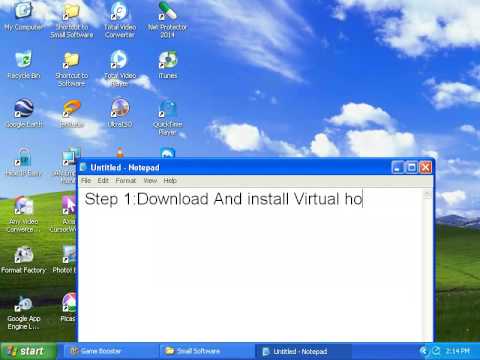
Virtual Router Manager: The Free and Feature-Rich Choice
Virtual Router Manager is a free, open-source utility that does the same thing. It is a more robust option offering customization options and it gets regular updates.
Step-by-Step: Setting Up Your XP Hotspot (Using Virtual Router Manager)
Let's walk through how to set up a hotspot using Virtual Router Manager. We'll be using the simplest approach, but feel free to experiment!
- Download and Installation: Download Virtual Router Manager from a reputable source (search on Google and be careful). Install it on your XP laptop.
- Configuration: Open Virtual Router Manager. You'll see a simple interface.
- Network Name (SSID): Give your hotspot a name. Something memorable is fine, like "MyFreeWiFi" or "XP_Hotspot."
- Password: Set a strong password. This is your digital lock and key!
- Shared Connection: From the "Shared Connection" dropdown, select the internet connection your XP laptop is currently using (e.g., your Ethernet connection or your existing WiFi connection).
- Start the Hotspot: Click the "Start Virtual Router" button. After a few seconds, your XP laptop will begin broadcasting a WiFi signal!
Troubleshooting: When Things Go a Little Sideways
Sometimes things don't go exactly as planned. Don't despair; it's a common technological experience. Here are some common troubleshooting tips:
- No Internet on Connected Devices: Double-check your XP laptop's internet connection. If it's not connected, your hotspot won't share anything. Try plugging the Ethernet cable into a different port or restarting your router/modem.
- Can't Connect to the Hotspot: Ensure you're entering the correct password. Also, make sure the hotspot is running (Virtual Router Manager should show a "Running" status).
- Slow Connection: XP laptops are old. They aren't going to win any speed races. Be realistic about the speeds you can expect.
- Driver Issues: Missing or outdated network drivers can cause problems. Check your Device Manager and update the drivers if necessary.
Security Considerations: Guarding Your New Hotspot Fort
We are sharing the internet. So, we need to be aware of security. Here are some key considerations:
- Strong Password: Use a strong, complex password for your hotspot. Avoid easily guessable phrases or personal information.
- Encryption: Ensure your hotspot is using WPA2 or WPA3 encryption (if your XP laptop and adapter support it). This encrypts the data transmitted over the WiFi.
- Firewall: Keep your XP laptop's firewall enabled. It acts as an extra layer of protection against unwanted access.
- Monitor Connected Devices: Regularly check which devices are connected to your hotspot. If you see any suspicious activity, immediately change your password. After all, it is your precious WiFi!
The Joy of Free WiFi: What You Can Do With it
So, what can you do with your newfound free WiFi? The possibilities are vast and varied.
- Connect Your Devices: Connect your smartphone, tablet, and other devices to your hotspot and enjoy free internet access anywhere within the hotspot's range.
- Extend Your Existing WiFi: If you have a weak WiFi signal, use your XP laptop as a range extender. Place it in a strategic location to improve coverage.
- Travel Companion: During travel, having a hotspot is a lifesaver. Connect your devices to the internet.
Power Consumption and Battery Life: A Realistic Evaluation
Let's be honest. XP laptops aren't known for their exceptional battery life. Expect significant power consumption when running the hotspot. Consider keeping your laptop plugged in or invest in an external power bank for extended use.
Beyond the Basics: Experimenting with Your Setup
Once you've mastered the basics, consider these advanced options:
- Use a VPN: A Virtual Private Network (VPN) encrypts your internet traffic and protects your privacy. Consider using a VPN on your XP laptop to enhance security.
- Set Bandwidth Limits: Most hotspot software allows you to limit the bandwidth allocated to each connected device. This is useful to ensure fair usage and prevent one device from hogging all the bandwidth.
- Schedule Hotspot Activation: Some software allows you to schedule when the hotspot starts and stops automatically. This helps conserve energy.
The Future of XP Hotspots: Looking Ahead
While XP is outdated, this project is not just a throwback. It’s about resourceful ingenuity and the power of repurposing technology. Although XP is no longer supported by Microsoft with security patches, a properly secured XP hotspot can still serve a useful purpose. It can act as a temporary solution to network issues.
So, Why Now?
The beauty of this project lies in its simplicity and accessibility. There is no need to spend a lot of money to gain access to free WiFi. What is more, you get to experiment with technology. You learn and have time to enjoy yourself without a large financial burden.
Unleash Your XP Laptop: Free WiFi NOW!
So many of us have older laptops, they are hidden in the attic or stuffed in a box. These devices are ready for a new purpose, a new life. We discussed the steps required and the challenges. We want to give you the freedom to connect to the internet safely and freely.
Frequently Asked Questions (FAQs)
Here are some common questions:
- **Is it safe to
Create Hotspot in Windows xp
By isoft Developer Create Hotspot in Windows xp by isoft Developer
Wi-Fi Hotspot in Windows XP Step by Step
By alexn1138 Wi-Fi Hotspot in Windows XP Step by Step by alexn1138
How to Setup Wifi in Windows XP

By Etechlic How to Setup Wifi in Windows XP by Etechlic
Title: How to connect Windows XP to your wireless network
Channel: NetComm
How to connect Windows XP to your wireless network by NetComm
My Laptop Work
Unlock Your XP Laptop's Hidden Hotspot: Free WiFi NOW!
Tired of being tethered to a power outlet or reliant on expensive mobile data plans? Imagine transforming your trusty, yet perhaps aging, Windows XP laptop into a powerful WiFi hotspot, broadcasting a signal for all your devices. Yes, you read that correctly. We’re going to liberate your laptop and unleash its inner networking prowess, providing free WiFi wherever you find yourself. This isn't some technical wizardry; it's a practical, readily achievable solution. Let’s delve into the simple steps required to turn your XP machine into a WiFi beacon.
Prepping Your XP Laptop for Hotspot Duty
Before we begin, a few preliminary checks are crucial. These initial preparations will ensure a smoother, more successful configuration.
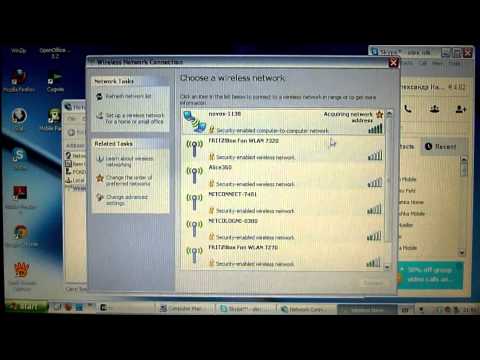
- Wireless Network Adapter Check: Your Windows XP laptop needs a built-in wireless network adapter. Most laptops from that era have one, but confirm its presence. Go to Start > Control Panel > Network Connections. If you see "Wireless Network Connection," you're good to go. If not, you might need to install a wireless adapter – either a USB wireless adapter or one installed internally. Consult your laptop’s documentation or search online for drivers specific to your model if necessary.
- Driver Verification: Outdated drivers can wreak havoc on connectivity. Ensure your wireless adapter drivers are updated. Right-click on "Wireless Network Connection" in the Network Connections window and select "Properties." Then, click "Configure." Navigate to the "Driver" tab. Click "Update Driver…" to ensure you have the latest version. If prompted, allow the system to search for drivers online. Failing this, visit the manufacturer's website for your laptop or wireless adapter to download.
- Internet Connection Source: You need a stable internet connection to share. This could be via a wired Ethernet connection plugged into your XP laptop, another WiFi network available to the XP laptop, or a USB tethering connection to your smartphone. The choice is yours, but a reliable connection is essential.
- Windows XP Service Pack: Ensure you have the latest Service Pack installed. This is particularly important for security and compatibility. Go to Start > Run, type "winver," and press Enter. The window displayed will show your OS version. If you are running Service Pack 2 or earlier, consider upgrading to Service Pack 3. This process can be found on the Microsoft website.
The Simple Way: Using a Third-Party Software Solution
The most straightforward approach involves using third-party software designed to simplify the hotspot creation process. Several excellent free options are available, making setup a breeze. My recommendation would be Connectify Hotspot, but other softwares can also be considered. Here's how this method works:
- Download and Install Connectify Hotspot: Download the free version of Connectify Hotspot from their official website. Run the installer and follow the on-screen prompts.
- Launch Connectify Hotspot: After installation, launch the Connectify Hotspot application.
- Configure Your Hotspot:
- Hotspot Name (SSID): Enter a name for your WiFi network. This is what your other devices will see when searching for WiFi signals.
- Password: Set a strong password to protect your network. This is crucial for security. Choose a password with a combination of uppercase and lowercase letters, numbers, and symbols.
- Internet to Share: Select the internet connection you want to share. This will typically be your wired Ethernet connection, your phone's USB tethering connection, or another available WiFi network for the XP laptop.
- Sharing Mode: Choose "WiFi Hotspot" or a similar option.
- Start the Hotspot: Click "Start Hotspot." The software will configure your XP laptop to act as a WiFi access point. Your other devices, such as smartphones, tablets and laptops, can now connect to the WiFi network you just created.
- Troubleshooting: If you encounter issues, double-check your internet connection, ensure your firewall isn't blocking the software, and try restarting your XP laptop. Also, consider checking Connectify's website for updated solutions.
The Manual Route: Building a Hotspot with Windows XP's Built-in Features
For those who prefer a hands-on approach, XP provides the tools to create a hotspot directly. While this method is slightly more technical, it grants granular control over your network settings.
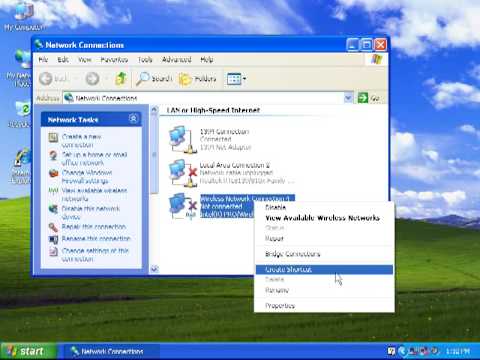
- Open Network Connections: Go to Start > Control Panel > Network Connections.
- Create a New Connection: Click "Create a new connection." The New Connection Wizard will appear.
- Set Up a Network Connection: Choose "Set up a home or small office network." Click "Next."
- Connection Method: Select "Set up my network for home or small office." Click "Next."
- Internet Connection Method: Choose "This computer connects to the Internet through a residential gateway or a network connection." Click "Next."
- Name Your Network: Enter a name for your wireless network. This will be your SSID (Service Set Identifier), the name other devices will see. Then, click "Next."
- Security: Decide your wireless security. For optimal security, select "Use the following network key" and create a strong password (WPA2-PSK is recommended if supported; WEP is less secure but may be compatible with some older devices).
- Finish and Share: Click "Next" to apply the settings. At the final step, check the box "Enable Internet Connection Sharing." Share your current internet connection with other network users. Click "Next" and finish the wizard.
- Configure Wireless Network Properties: Right-click the "Wireless Network Connection" in the Network Connections window and select "Properties."
- Wireless Networks Tab: Click the "Wireless Networks" tab.
- Preferred Networks: If your network doesn’t appear, click “Add.” Enter your SSID and select your security type (WEP, WPA, or WPA2). Enter your password.
- Advanced Settings: Adjust advanced settings like Ad-Hoc or infrastructure mode. If this configuration is for your other devices to connect to, select Infrastructure.
- Enable Internet Connection Sharing (If Not Enabled): In the "Properties" window of your wired internet connection (or the connection you intend to share), go to the "Advanced" tab. Check the box "Allow other network users to connect through this computer's Internet connection". You may see a warning about IP addresses; ignore this, as this is normal with this configuration.
- Restart Your XP Laptop: Restarting ensures all changes are implemented correctly. After restarting, your XP laptop should broadcast a WiFi signal and allow devices to connect and use your internet connection.
Troubleshooting Common Issues
Setting up a hotspot, particularly on a legacy operating system, can sometimes present minor challenges. Here's how to tackle some common hurdles:
- No Internet Access on Connected Devices: The most frequent issue. Verify your XP laptop has a working internet connection. Double-check the "Internet Connection Sharing" settings. Try restarting your XP laptop and the connecting devices.
- Connection Problems: Ensure your password is correct. If you are using WEP security and encountering connection issues, try disabling WEP or using WPA2. Also, consider updating the drivers for your XP laptop's wireless adapter.
- Firewall Interference: Your Windows firewall or a third-party firewall might be blocking the WiFi signal. Temporarily disable the firewall (for testing purposes only; enable it later), or configure the firewall to allow the hotspot software/networking services.
- Limited Signal Range: The signal strength of your XP laptop's wireless adapter will determine the range. Consider using a WiFi signal booster or move your laptop to a central area in your house.
- Compatibility Issues: Some older devices may struggle to connect with modern security protocols like WPA2. If this happens, switch to WEP, but only if absolutely necessary due to its lower security.
- Driver Problems: Faulty or outdated drivers are a frequent source of problems. Reinstall the adapter drivers from the manufacturer’s website.
Enhancing and Optimizing Your XP Hotspot
Beyond the basic configuration, specific tweaks can significantly improve your hotspot experience.
- Channel Selection: Most wireless adapters allow you to manually select a WiFi channel. In areas with many WiFi networks, choose less congested channels (1, 6, and 11 are generally good choices). Use a free WiFi analyzer app on your smartphone or another device to identify the least crowded channels.
- MAC Address Filtering: Enhance security by adding device MAC addresses to your hotspot. This allows only specific devices to connect, adding an extra layer of protection. You can find the MAC addresses of devices in their network settings.
- Optimize Power Settings: To conserve your laptop's battery life while running as a hotspot, adjust power settings. Go to Start > Control Panel > Power Options. Select a power plan that balances performance and battery usage. Consider enabling the "Battery Saver" or a custom plan.
- Antivirus/Security Software: Ensure that your antivirus/security software is up-to-date and does not interfere with the WiFi connection. Often, they offer firewall features with configurable permissions that need adjustments.
- Consider a USB WiFi Adapter: If your laptop's built-in adapter has issues or
