cara menjadikan laptop sebagai wifi windows xp

Title: MENJADIKAN LAPTOP SEBAGAI HOTSPOT WIN XP, WIN 7, WIN 8
Channel: Mikel Afif
MENJADIKAN LAPTOP SEBAGAI HOTSPOT WIN XP, WIN 7, WIN 8 by Mikel Afif
Turn Your XP Laptop into a WiFi Hotspot: The SHOCKINGLY Easy Trick!
Unleash the Wireless Wizard Within: Transforming Your XP Laptop into a Hotspot
Remember those trusty Windows XP laptops? They might seem relegated to the annals of computing history, gathering dust in a forgotten corner. However, hold onto that thought. Because, believe it or not, these vintage machines still possess a few tricks up their sleeves. One, in particular, is quite remarkable: transforming your XP laptop into a fully functional WiFi hotspot. This isn't just a simple configuration; it's a testament to the lasting power of technology. Indeed, you can breathe new life into your old friend.
The Secret Weapon: Ad-Hoc Networking (and a Dash of Nostalgia)
The key to this seemingly impossible feat lies in a well-hidden feature: ad-hoc networking. This technology, though somewhat archaic by today's standards, was designed for exactly this purpose. Essentially, it allows your XP laptop to broadcast a WiFi signal. As a result, other devices can connect to it, just like they would to a regular router. But first, you'll need appropriate hardware.
Prepping Your Arsenal: Hardware Essentials
Before you begin, ensure your XP laptop is equipped. You should have a compatible wireless network adapter. Most XP laptops do have these built-in. If not, a USB wireless adapter will do the trick. Also, you'll need a working internet connection. This will be the source your hotspot shares with other devices. Ensure you have a stable internet connection for a smooth experience.
Step-by-Step: Conjuring Your WiFi Magic
Now, let's get our hands dirty with the step-by-step process:
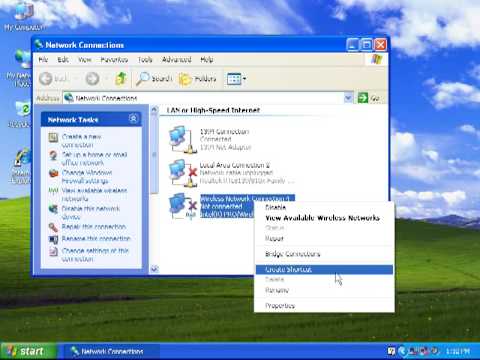
Navigate to "Network Connections": First, open the Control Panel. Go to Network and Internet connections. Then, select Network Connections.
Setting up the Ad-Hoc Connection: right-click on your wireless network adapter. Then, select "Properties". Next, go to the "Wireless Networks" tab. In addition, click "Add".
Configuration Time: Enter a network name (SSID) for your hotspot. This is what other devices will see. Set the network to "Open" or configure security settings. For example, you can select WEP or WPA-PSK. Furthermore, you can set your authentication options.
Sharing Your Internet Connection: Go back to Network Connections. Also, locate the adapter that gives your laptop internet, and right-click. Select "Properties". Then, go to the "Advanced" tab. Besides that, check the box to allow other network users to connect. Finally, choose which network to use.
Starting the Ad-Hoc Network: You'll see your new ad-hoc network in the list of available connections. Hence, right-click on it and select "Connect". If all goes well, in the end, you should see the network broadcasting its SSID.
Troubleshooting Troubles: Navigating the Potential Pitfalls
The process can sometimes be a little finicky. Here are a few common issues and their fixes:
- Connection Issues: Are devices unable to connect? Double-check your security settings or try an open network for troubleshooting. Ensure the devices are within range of your laptop.
- Internet Access Problems: If devices connect but can't access the internet, then double-check your internet sharing settings. In other words, ensure the sharing box is checked. Also, you might need to restart the XP laptop or the connected devices.
- Compatibility Woes: Note that some older wireless cards struggle with modern security protocols. Consider using older security settings. However, this might compromise security.
Beyond the Basics: Enhancing Your Hotspot Experience
So, now that you've established your hotspot, you can tweak a few things for optimal performance. In other words, consider these enhancements. First, set your power plan to "High Performance". This ensures your laptop doesn't throttle its wireless adapter. Next, consider using a channel scanner. This helps you pick the least congested WiFi channel. Finally, you might consider tweaking your laptop's antenna. This increases your range.
A Modern Marvel: Embracing the XP Era
Your XP laptop is now a bridge. In other words, it's a link. By connecting to your WiFi hotspot, you can access the internet. Also, you will also leverage many other functions. Hence, your XP laptop is not just a relic. It is also a testament to human ingenuity. As a result, you are giving it new purpose. It’s a chance to marvel at the enduring appeal of old technology.
The Final Verdict: A Surprisingly Useful Tool
Moreover, the process is generally simple. Therefore, transforming your XP laptop into a WiFi hotspot is a feasible task. It's also a surprisingly useful trick. It's a perfect solution for sharing an internet connection. Meanwhile, you might be in a pinch, or traveling. Furthermore, it's great for connecting older devices. Ultimately, it's about getting the most from your tech. You're not just reviving an old machine. You're gaining a practical tool. So, go ahead, unleash your inner tech wizard.
Is Your Laptop's Wi-Fi a Joke? (This SHOCKING Fix Works!)Turn Your XP Laptop into a WiFi Hotspot: The SHOCKINGLY Easy Trick!
Hey tech adventurers! Ever found yourself staring at your ancient, yet still trusty, Windows XP laptop, wishing it could magically beam Wi-Fi signals for your other devices? Perhaps you're in a hotel with lousy internet, or maybe your main router just decided to take a nap. Whatever the reason, we've all been there! And the good news? Turning that aging XP machine into a Wi-Fi hotspot is not only possible, it’s astoundingly simple. Forget complex command lines and hours of troubleshooting – we're talking a few clicks and you're golden. Let's dive in and resurrect that old workhorse!
1. Why Bother with XP in the First Place? The Unexpected Resurrection
Okay, I know what you're thinking: "XP? Isn't that, like, prehistoric?" And yes, in terms of operating systems, it's pushing the boundaries of ancient history. However, that old XP laptop might have a hidden superpower: it's likely sitting around gathering dust. And sometimes, having a backup hotspot is like having a spare tire when you're miles from civilization. Imagine the sweet satisfaction of saving the day when your fancy new phone or tablet is desperate for a connection! Plus, as someone who enjoys tinkering with old tech for fun, I can tell you it’s oddly satisfying.
2. The Hardware Check: Does Your XP Laptop Have the Right Stuff?
Before we get to the nitty-gritty, let's make sure your XP machine is equipped for the task. Think of it like preparing the ingredients before baking a cake.
- A Wireless Network Adapter: This is the most crucial element. Almost all laptops these days have them built in; it's the little antenna icon in your system tray. If you don’t see it, you might need an external USB Wi-Fi adapter.
- An Active Internet Connection: Your XP laptop needs a way to get the internet before it can share it. This can be through an Ethernet cable plugged into a modem, a dial-up connection (remember those?), or even a USB mobile broadband dongle.
- Slight Patience and a Sense of Humor: Because, let's face it, tech can be a bit… temperamental.
3. The Secret Weapon: ICS - Internet Connection Sharing
Here's where the magic happens. Windows XP actually has a built-in feature called Internet Connection Sharing, or ICS. It's like a built-in Wi-Fi router that's been hiding in plain sight!
3.1. Accessing the Connection Settings Panel
First, you'll need to access your network connections settings. This is usually found by right-clicking on the network icon in your system tray (the little computer-looking icon) and then selecting "Open Network Connections."
3.2. Choosing Your Internet Pathway
Find the connection that your XP laptop is using to access the internet. This is likely your Ethernet connection if you're plugged directly into a modem, or a dial-up connection if you're on a dinosaur. If it’s a wired Ethernet connection, it will probably say "Local Area Connection."
- Right-click on your internet connection (Local Area Connection) and choose Properties.
3.3. Unleashing the Sharing Powers
- Go to the "Advanced" tab within the properties.
- There it is! Check the box that reads, "Allow other network users to connect through this computer's Internet connection."
- If you have more than one network adapter, a drop-down box will appear. Select the wireless adapter you want to use for sharing the connection.
3.4. A Quick Word About Security
Before you gleefully blast your Wi-Fi signal into the ether, let's talk security. ICS doesn't come with the most robust security settings out of the box. It does have some, but for maximum peace of mind, we want to use something extra. You can set a password to protect your new hotspot.
3.5. Configuring the Connection Manually (Advanced Users!)
If you want to get a bit more hands-on, you can configure the connection manually. You can set a static IP address range and customize other settings to your liking. But for most folks, the default settings will work just fine.
4. The DHCP Dance: Assigning IP Addresses
DHCP (Dynamic Host Configuration Protocol) is a behind-the-scenes helper that automatically assigns IP addresses to devices that connect to your hotspot. ICS typically handles this automatically; however, just ensure that DHCP is enabled. This enables your phone, tablet, or other gadgets to discover the Wi-Fi signal and connect. It is a necessary step in the process.
5. Setting Up the Wireless Network for The Hotspot
Now we get to the wireless network setup. This is important:
- Go to Network Connections: in the XP control panel or system tray.
- Right-click on your wireless network connection and select Properties.
- Go to the Wireless Networks tab.
- Click on the "Add" button. This will bring up the properties for your hotspot.
- Network Name (SSID): Think of this as the name of your WiFi network. Choose something memorable or fun!
- Network Authentication: This is where you select your security type. Use a strong security type such as "WPA2-PSK" (recommended) or "WPA-PSK". Try to avoid WE. It is very simple to unlock.
- Data encryption: Choose AES
- Network Key: Create a strong password here. It's your digital security guard.
After you've entered your password, confirm it.
6. Troubleshooting: Hiccups and How to Fix Them
Sometimes, things don't go as planned. But don't panic! Here are some common issues and how to resolve them:
- "Unable to Connect": Double-check your password; make sure your device can 'see' the Wi-Fi network; restart both the computers. This can often clear out any temporary glitches.
- Slow Speeds: XP isn't known for lightning-fast Wi-Fi. Keep the laptop close to your other devices for the best signal.
- "Limited Connectivity": The most prevalent issue. This mostly comes from the wrong network settings. Recheck your configuration!
7. Safety First: Security Best Practices for Your makeshift Hotspot
While ICS itself provides some basic security, we're not going to make your hotspot an open buffet for hackers. To stay secure, consider the following:
- Strong Passwords: Never use weak passwords. Make it long, complex, and unique.
- Update XP (as much as possible): Even though XP is outdated, install any available security patches.
- Firewall: Make sure your XP laptop's firewall is enabled.
- Beware Public Usage: Avoid accessing sensitive information like banking or personal accounts.
8. Boosting the Signal: Maximizing Your Hotspot's Reach
If your signal is weak, consider these tips:
- Proximity: Place the XP laptop in a central location.
- Obstacles: Keep the laptop away from walls and metal objects.
- External Antenna: If your laptop has an external antenna port, consider connecting an external antenna.
- WiFi Analyzer App: Download a WiFi analyzer app on your phone or tablet. This will help you find the best channels!
9. The Power of a Static IP: An Alternative to DHCP
While DHCP is awesome, in niche cases, you might opt for a static IP address. It's a bit more hands-on, and isn't a must-have, but can be useful for more advanced networking.
10. Compatibility Check: What Devices Can Connect?
Almost anything that supports Wi-Fi!
- Smartphones (Android, iPhone, etc.)
- Tablets (iPad, Android tablets)
- Other laptops
- Gaming consoles
- Smart TVs
If it has Wi-Fi, it should connect.
11. Fine-Tuning the Connection: Advanced Settings
For the adventurous types, there are more advanced settings. But most people don't need to touch these.
12. The Battery Life Dilemma: Powering Your Hotspot for Prolonged Use
Running an XP laptop as a hotspot will drain the battery. Always plug in your laptop while using it as a hotspot, or you could lose connection quickly.
13. Monitoring Your Data Usage: Keep Tabs on Bandwidth
It's easy to chew through data when sharing your connection. Keep an eye on your hotspot's data usage.
14. Turning Off the Hotspot: Closing Down and Cleaning Up
When you no longer need the hotspot, disable the network sharing in the XP settings.
15. Beyond the Basics: Other uses for your XP Hotspot!
XP laptops can find new life, so they are not so useless!
- Guest Network: Provide Wi-Fi for visitors.
- Gaming: Share your Internet Connection.
- File Sharing: Share files.
Closing Thoughts: XP Never Truly Dies!
So there you have it! Turning your old Windows XP laptop into a Wi-
Laptop WiFi Hotspot: The SHOCKINGLY Easy Trick You NEED!Cara Menjadikan Laptop SEBAGAI PEMERLUAS WIFIWIFI EXTENDER

By Achmad Tutorial Cara Menjadikan Laptop SEBAGAI PEMERLUAS WIFIWIFI EXTENDER by Achmad Tutorial
Bagaimana menghubungkan Windows XP ke jaringan nirkabel Anda
By NetComm Bagaimana menghubungkan Windows XP ke jaringan nirkabel Anda by NetComm
Cara Setting Wifi di Windows XP

By Etechlic Cara Setting Wifi di Windows XP by Etechlic

Title: 1.3a - Koneksi internet dengan Windows XP
Channel: jackjohn684
1.3a - Koneksi internet dengan Windows XP by jackjohn684
Wifi On Laptop Phone
Turn Your XP Laptop into a WiFi Hotspot: The SHOCKINGLY Easy Trick!
Introduction: Breathe New Life into Your Legacy Laptop
The digital landscape marches onward, and with it, the steady march of technology. While newer machines boasting the latest features and blazing speeds command attention, let us not forget the stalwart companions of yesterday: our trusty Windows XP laptops. Often relegated to dusty shelves, collecting the forgotten memories of a bygone era, these machines still possess a surprising utility. Today, we'll resurrect those laptops, breathing new life into them by transforming them into powerful WiFi hotspots. Forget complex configurations and daunting technical jargon; we're about to unveil a remarkably simple method that will have your old XP machine broadcasting a wireless signal in mere minutes.
Decoding the Windows XP Hotspot Potential
The initial hurdle many stumble upon is the assumption that creating a hotspot on Windows XP is an intricate endeavor. Contrary to popular belief, XP inherently possesses the capabilities to share its internet connection wirelessly. The critical factor resides not in the operating system's limitations, but rather in the method we employ. We'll bypass convoluted command-line interfaces and third-party software, opting for a streamlined approach that leverages the inherent functionalities of the operating system: the ad-hoc wireless network.
Unleashing the Ad-Hoc Wireless Network: The Simple Path
Forget the complexities often associated with modern hotspot creation; the ad-hoc wireless network is the key. Ad-hoc mode allows your XP laptop to act as a wireless access point, broadcasting a signal that other devices can connect to. The magic lies in the simplicity.
Step-by-Step Activation: The Intuitive Approach
Navigate to the Network Connections: Begin by accessing your network connections. You can typically find this by clicking the "Start" button, then navigating to "Control Panel," followed by "Network and Internet Connections," and finally, "Network Connections." The precise location might slightly differ depending on your XP configuration, but it will always be within the "Control Panel."
Identify Your Wireless Network Adapter: Within the Network Connections window, you'll encounter your network adapters. Look for your Wi-Fi adapter; it will most likely be labeled as “Wireless Network Connection” or a similar designation. Double-click this adapter to open its properties.
Set up the Ad-Hoc Connection: Within the properties panel of your wireless network connection, select the "Wireless Networks" tab. Inside the "Preferred networks" section, click the "Add…" button.
Configure Your New Wireless Network: A new window, "Wireless network properties," will appear. This is where the real transformation begins. In the "Network name (SSID)" field, enter the name you want your WiFi hotspot to broadcast. Choose something memorable and unique; it’s the name other devices will see when searching for a WiFi network.
Select a Security Authentication and Encryption: This is a critical step for establishing security. From the "Network Authentication" drop-down menu, choose a security type. While options like "Open" may be available, we strongly recommend selecting "WPA-PSK" or "WPA2-PSK." The “PSK” stands for “Pre-Shared Key.” These are the most common security setting. For "Data encryption," choose “TKIP” or “AES."
Create Your Security Key (Password): In the "Network key" fields, and the "Confirm network key" field, enter your desired password. This password is vital; it prevents unauthorized access to your hotspot and protects your internet connection. Choose a strong password, comprising a mix of upper and lowercase letters, numbers, and symbols. Write it down safely, as you'll need it to connect devices.
Check the Key is set up: The “Key is provided for me automatically” checkbox must be unchecked.
Confirm and Enable: Click “OK” to close the “Wireless network properties” window. Then click “OK” again to close the wireless network connection properties window.
Share Your Internet Connection: Now, right-click on your internet connection; this will be, for example, your Ethernet connection. Click "Properties."
Allow other Network Users and save: Find and check the "Allow other network users to connect through this computer's Internet connection" checkbox option. In the drop-down menu, select your newly created wireless network connection. Then click "OK".
Restart your XP Laptop (Optional): In some cases, a restart of your XP laptop is necessary for the changes to fully take effect. However, often, the hotspot will be operational immediately.
Connecting Your Devices: A Seamless Experience
Once your XP laptop has been configured as a hotspot, connecting your other devices is straightforward. Activate the Wi-Fi functionality on your smartphone, tablet, or other devices. Search for available wireless networks, and you should see the network name (SSID) you created in the configuration steps. Select the network and enter the password you established. Your device will then connect to the internet, utilizing the connection shared by your XP laptop.
Fine-Tuning Your Connection: Optimization Tips
Achieving optimal performance involves a few additional steps.
Positioning: Place your XP laptop in a central location to maximize wireless signal range. Avoid obstructions such as thick walls, metal objects, and electronic devices that may interfere with the signal.
Channel Selection (Advanced): Although XP typically selects a channel automatically, you can influence this. In the properties of your wireless adapter, navigate to the “Advanced” tab. Then, in the “Property:” drop-down, look for the “Wireless Mode” option. Change this from “Automatic” to “802.11g” or a similar configuration.
Power Saving: If your XP laptop is running on battery power, consider adjusting the power settings to optimize battery life. Access the "Power Options" within the "Control Panel" and select a balanced or power-saving profile.
Firewall Considerations: Ensure that your XP laptop’s firewall doesn't inadvertently block traffic from connected devices. Configure your firewall to allow incoming and outgoing connections for necessary services.
Troubleshooting Common Challenges: Solutions at Your Fingertips
- Can't find the hotspot: Verify that your XP laptop's wireless adapter is enabled. Check the physical switch on the laptop (if applicable) and within the "Network Connections" window to ensure it's active. Double-check the SSID name and password for any typos.
- "Limited Connectivity" error: This message often indicates that the XP laptop cannot obtain an IP address from the connected devices. Try restarting both your XP laptop and the connecting device. Sometimes simply restarting the XP laptop and the other device that you want to connect to the hotspot will resolve the issue.
- Slow internet speeds: The speed of your hotspot is directly dependent on the speed of the internet connection shared by your XP laptop. If the connection appears slow, check the internet speed provided by your internet service provider (ISP).
Beyond the Basics: Expanding Your Hotspot's Capabilities
Range Extenders: If you require a wider signal range, consider using a dedicated Wi-Fi range extender. These devices connect to your existing wireless network and re-broadcast the signal, extending its coverage.
Static IP Addresses (Advanced): For more advanced control, you can assign static IP addresses to the connected devices instead of relying on DHCP. This can improve network stability, but it requires a more in-depth understanding of networking.
The Enduring Value of Windows XP: A Conclusion
The ability to transform your Windows XP laptop into a WiFi hotspot is more than just a technical exercise; it's a testament to ingenuity and resourcefulness. By embracing the inherent capabilities of this older operating system, you can breathe new life into your equipment. You can also share an internet connection, and extend the functionality of your existing technology without incurring the expense of newer devices. With this simple method, you can unlock the hidden potential of your XP laptop and transform it into a functional and valuable networking tool.
