hp pavilion laptop wifi antenna

Title: Tutorial penggantian kartu WLAN HP PAVILION DV6000 Peningkatan WIFI - dengan subjudul
Channel: Laptop Repair
Tutorial penggantian kartu WLAN HP PAVILION DV6000 Peningkatan WIFI - dengan subjudul by Laptop Repair
HP Pavilion Laptop Wifi Antenna: Fix Your Wi-Fi Woes NOW!
HP Pavilion Laptop Wi-Fi Antenna: Reclaim Your Online Freedom!
Let's face it: spotty Wi-Fi is a digital plague. It can cripple your productivity and test your patience. If you own an HP Pavilion laptop and that Wi-Fi signal is consistently weak, you are not alone. Many users experience these frustrating connection issues. But, don't despair! There are solutions. In fact, fixing your HP Pavilion's Wi-Fi antenna problems is often easier than you think. Prepare to bid farewell to buffering and signal dropouts.
Understanding the Culprit: Why Is Your Wi-Fi Weak?
First, let's pinpoint potential culprits. Sometimes, the issue isn't the antenna itself. It's something else entirely. Consider your environment. Are you far from the router? Thick walls, especially those made of concrete, can block Wi-Fi signals. Furthermore, interference from other devices is also a factor. Microwaves, Bluetooth devices, and even some appliances can disrupt your connection. Therefore, it is important to consider these factors.
Troubleshooting 101: Simple Fixes to Try First
Before you start dismantling your laptop, try these basic fixes. They might surprise you.
- Restart Everything: This is the classic, for a reason. Reboot your laptop and your router. Quite often, this simple step resolves the problem.
- Check the Router's Location: Is the router hidden away? Move it to a more central, open location. This improves signal distribution.
- Update Your Drivers: Outdated network drivers are a common cause. Go to HP's support site. Download and install the newest drivers for your Wi-Fi adapter. After that, restart your laptop.
- Run the Windows Network Troubleshooter: Windows has a built-in troubleshooter. It can automatically identify and fix some common network problems. Access it via the settings menu.
- Examine Your Wi-Fi Settings: Ensure your Wi-Fi is enabled. Check that you’re connected to the correct network. Furthermore, verify the password is correct.
Diving Deeper: Assessing the Antenna Itself
If the simple solutions don't work, we need to investigate further. While the HP Pavilion's Wi-Fi antenna is internal, some models may allow some access.
- Physical Inspection: Power down your laptop. Remove the battery and the back panel (if accessible). Then, look for any physical damage to the Wi-Fi antenna cables. These are usually thin wires connected to the Wi-Fi card.
- Re-seating the Wi-Fi Card: The Wi-Fi card itself might have come loose. Carefully reseat it in its slot. Be very gentle during this process.
- Antenna Cable Connections: Inspect the antenna cables. Ensure they’re securely connected to the Wi-Fi card. Often, loose connections result in weak signals.
- External USB Wi-Fi Adapter: An external USB Wi-Fi adapter is an alternative. It can sometimes bypass internal antenna issues. It's a quick fix if your internal antenna is the problem.
Software Solutions and Advanced Tweaks
Beyond the hardware, software can also play a part.
- Check for Interference: Use a Wi-Fi analyzer app on your smartphone. It shows you the Wi-Fi channels in use. Switch your router to a less congested channel. This can help improve connection quality.
- Router Firmware Update: Outdated router firmware can cause issues. Check your router's manufacturer's website. Download the latest firmware and follow the installation instructions.
- Change Wi-Fi Security Protocol: Although this is not a typical fix, consider upgrading your router's security, from WEP to WPA2 or WPA3. This helps with both security and performance.
- Advanced Network Settings (For the Tech-Savvy): Explore your laptop's advanced Wi-Fi settings. Experiment with the power management settings for your Wi-Fi adapter. Some settings might be preventing optimal signal strength.
When to Seek Professional Help
If you've tried everything, it's time for backup.
- Complex Hardware Problems: If you suspect a hardware malfunction you can't handle, consult a professional. Repairing laptops requires expertise.
- Warranty Considerations: If your laptop is still under warranty, avoid opening it yourself. Contact HP support for assistance. This preserves your warranty benefits.
- Component Failure: If the antenna itself is damaged or the Wi-Fi card has failed, a professional can replace the parts.
Maintaining Optimal Wi-Fi Performance: Proactive Tips
Here are some tips to prevent future issues.
- Regular Cleaning: Keep the laptop's vents clear of dust to prevent overheating. Overheating can impact performance, including Wi-Fi.
- Strategic Placement: Avoid placing your laptop near sources of interference. Avoid placing it directly on metal surfaces.
- Keep Software Updated: Regularly update your drivers and operating system. These updates often include performance improvements.
Finally, Reclaim Your Online Life!
Having reliable Wi-Fi is essential today. By following these steps, you can significantly improve your HP Pavilion laptop's Wi-Fi performance. You can often solve these issues yourself. You can watch videos without interruption. You can successfully attend online meetings. With a little troubleshooting and some patience, you can get your Wi-Fi back on track. Therefore, say goodbye to Wi-Fi woes and hello to a seamless online experience.
iPhone to Laptop WiFi: The Secret Trick They DON'T Want You to Know!HP Pavilion Laptop Wi-Fi Antenna: Fix Your Wi-Fi Woes NOW!
Hey there, fellow laptop warriors! Let’s face it, nothing kills productivity, or a good Netflix binge, faster than a flaky Wi-Fi connection. And if you're an HP Pavilion laptop owner, you've probably wrestled with this beast more than once. We're here, today, to dive headfirst into the frustrating world of Wi-Fi antenna troubles and, more importantly, how to tame those signal demons. Forget staring at your router with a desperate hopefulness – we're going to bring your Wi-Fi back to life!
1. The Mystery of the Crumbling Connection: Why Your Pavilion is Struggling
Think of your Wi-Fi antenna like the ears of your laptop. It's what listens for the sweet sound of the internet, but sometimes, those ears get a little blocked up. There are a whole heap of reasons why your HP Pavilion might be struggling. It could be something as simple as distance from the router, or something more complex like a faulty antenna or corrupted drivers. It’s like trying to shout over a raging waterfall – the signal just gets lost.
2. Demystifying the Antenna: Where is this Thing, Anyway?
Okay, before we start hacking away, let's get a handle on what we're dealing with. In most HP Pavilion laptops, the Wi-Fi antenna is cleverly tucked away. It's usually integrated into the display bezel, or sometimes, cleverly concealed in the laptop's chassis, near the hinges. It resembles an antenna inside of your laptop and is connected to your computer’s motherboard, receiving and transmitting signals. Understanding where it is is crucial to fixing the issue.
3. The First Line of Defence: Basic Troubleshooting – The Easy Wins
Before you start tearing your laptop apart, let's start with the easy fixes. We're talking about the low-hanging fruit of Wi-Fi troubleshooting. These often solve 80% of the problems without breaking a sweat. Ready?
- Restart Your Laptop: The classic! Often, a simple restart can clear up temporary glitches that are interfering with your connection. It's like giving your laptop a mental reset.
- Restart Your Router: This is the other half of the dynamic duo. Your router may need a little refresher of its own. Unplug it for 30 seconds and plug it back in.
- Check Your Distance: Are you sitting in a Wi-Fi dead zone? Try moving closer to the router. Thick walls and metallic objects can also play havoc with your signal.
- Forget and Reconnect to Your Wi-Fi Network: Sometimes, your laptop's connection to your Wi-Fi just gets… confused. Forgetting the network and then reconnecting can often clear the cobwebs.
- Run the Troubleshooter: Windows (and other operating systems) have built-in troubleshooters specifically for network issues. Let them do their magic! It is a fantastic simple trick!
4. Driver Dilemma: The Silent Culprit
Your Wi-Fi antenna needs drivers – little software translators – to speak the language of your laptop. If these drivers are outdated, corrupted, or simply missing, it’s like trying to have a conversation with someone who speaks a different language. Getting the latest drivers is crucial for smooth Wi-Fi operation.
5. How to Update Your Wi-Fi Drivers: Step-by-Step Guide
Updating your drivers is easier than you think. Here’s how to get it done:
- Open Device Manager: Search for "Device Manager" in the Windows search bar and open it.
- Expand "Network Adapters": Click the arrow beside "Network Adapters" to reveal your Wi-Fi adapter (it might be listed as "Wireless Network Adapter" or something similar).
- Right-click Your Wi-Fi Adapter: Select "Update driver."
- Choose Your Update Method: You can either "Search automatically for drivers" to let Windows find an updated driver automatically, or "Browse my computer for drivers" if you've already downloaded a driver file (usually from HP’s support website).
- Restart Your Laptop: After the update is complete, restart your laptop to ensure the changes take effect.
6. The Antenna’s Physical Condition: Inspecting the Internal Hardware
Sometimes, the problem isn't software; it's hardware. Over time, the Wi-Fi antenna can become damaged. This is where we need a little more technical finesse.
Important: If you're not comfortable working with the internal components of your laptop, it's best to take it to a qualified technician. Opening your laptop improperly could void your warranty or cause further damage.
If you feel confident, here’s what you can look for:
- Loose Connections: Carefully open the laptop and check the antenna connections. Ensure the antenna cables are securely attached to the Wi-Fi card and the display bezel (if applicable).
- Physical Damage: Inspect the antenna itself. Is it bent, broken, or corroded? If it is, it probably needs to be replaced.
- Location of the Antenna: Ensure that metal objects are not obscuring the Antenna.
7. The Antenna Disassembled: Step-by-Step Removal (Advanced!)
If you're brave (and confident in your abilities), here’s a simplified outline of how to remove the Wi-Fi antenna (This is very generic so you should follow the instructions specific to your HP Pavilion model). This will often involve removing the display bezel.
- Power Down and Disconnect: Shut down your laptop and disconnect the power adapter.
- Gather Your Tools: You'll need a small Phillips head screwdriver, a plastic pry tool (or a guitar pick), and possibly a heat gun (for the bezel, if it’s glued).
- Consult Your Manual: Before you start, refer to your HP Pavilion's service manual (search online for your specific model). This will provide detailed instructions and diagrams.
- Remove The Bezel: Use the plastic pry tool to carefully separate the bezel from the display. The bezel may be held in place with clips or adhesive.
- Remove Screws and Connections: The antenna cables will be connected to the Wi-Fi card itself. Carefully remove the screws securing the card and disconnect the antenna cable.
- Replace the Antenna: Unscrew, and replace the old antenna and reverse the process, taking extra care to reassemble everything correctly.
- Test the Connection: After reassembling your laptop, test your Wi-Fi connection.
8. Replace or Repair? Knowing When to Call for Backup
When is it time to admit defeat and call in reinforcements? Well, here’s when:
- You've Tried Everything and Still No Connection: If you've exhausted all the troubleshooting steps and your Wi-Fi is still dead as a doornail, it’s time to seek professional help.
- You're Not Comfortable with Internal Components: If the thought of taking your laptop apart makes you break out in a cold sweat, trust us – it's better to be safe than sorry.
- Physical Damage is Significant: If the antenna is obviously damaged, it’s best to have it replaced by a professional.
- The Issue Keeps Recurring: If your Wi-Fi issues come and go, then come back again, there may be is an underlying hardware problem that needs attention from a tech.
9. Router Revelation: Optimizing Your Wi-Fi Signal
Your router plays is a critical part of your Wi-Fi ecosystem. Sometimes, the trouble isn't your laptop; it’s your router.
- Router Placement: Position your router in a central, open location, away from walls, metal objects, and other sources of interference.
- Update Router Firmware: Just like your laptop, your router needs occasional software updates to perform at its best.
- Wireless Channel Selection: Interference can come from neighboring Wi-Fi networks. Experiment with different Wi-Fi channels on your router to find the one with the least congestion.
- Wireless Mode: Select the most currently compatible wireless mode your devices support (e.g., Wi-Fi 6, Wi-Fi 5).
10. Signal Strength: The Art of Reading Your Wi-Fi's Vital Signs
Understanding your Wi-Fi signal strength is like knowing your laptop’s health. There are various ways to gauge how well you are connecting.
- Windows Wi-Fi Icon: The Wi-Fi icon in your system tray should show bars, indicating your signal strength. The more bars, the stronger your signal.
- Network and Sharing Center: Right-click on the Wi-Fi icon and select "Open Network & Internet Settings" and then “Show adapter properties” for more detailed information on your connection, including signal strength.
- Third-Party Applications: There are many free Wi-Fi analyzer apps (like Wi-Fi Analyzer for Android) that can provide a more in-depth analysis of your Wi-Fi signal.
11. The Power of Prevention: Keeping Your Wi-Fi Healthy Long-Term
Preventing Wi-Fi issues is a lot easier than constantly fixing them. Here are some tips:
- Keep Drivers Updated: Regularly check for and install updated Wi-Fi drivers.
- Protect Your Laptop: Avoid exposing your laptop to extreme temperatures or humidity.
Replace the Wireless Antenna Cables HP Pavilion Gaming Notebook HP Support

By HP Support Replace the Wireless Antenna Cables HP Pavilion Gaming Notebook HP Support by HP Support
Replace the Wireless Antenna Cables HP Pavilion 15-au000 notebooks HP Support

By HP Support Replace the Wireless Antenna Cables HP Pavilion 15-au000 notebooks HP Support by HP Support
Replace the Wireless Antenna Cables HP Pavilion x2 Detachable 10t-n000 Notebook HP Support

By HP Support Replace the Wireless Antenna Cables HP Pavilion x2 Detachable 10t-n000 Notebook HP Support by HP Support
Title: How to remove and reattach WiFi antenna cables
Channel: James Has Answers
How to remove and reattach WiFi antenna cables by James Has Answers
Laptop Wifi Hotspot
HP Pavilion Laptop Wi-Fi Antenna: Fix Your Wi-Fi Woes NOW!
Imagine the frustration: You're settled in, ready to stream your favorite show, participate in that crucial video conference, or finally finish that project, only to be met with the dreaded spinning wheel of buffering or the infuriating "no internet connection" error. If you're the owner of an HP Pavilion laptop, you've likely experienced this Wi-Fi induced torment. But fret no more! We're here to guide you through a comprehensive, step-by-step plan to banish those Wi-Fi woes and restore your access to the digital world. This isn't just about quick fixes; it's about truly understanding and resolving the underlying issues preventing a stable and reliable internet connection on your HP Pavilion. Let's dive in and get you back online!
Diagnosing the Problem: Identifying the Root of Your Wi-Fi Issues
Before we begin any troubleshooting, it’s essential to pinpoint the source of your Wi-Fi problems. Is the issue widespread, affecting all devices in your home? Or is it isolated to your HP Pavilion? Assessing this critical first step is important for the solution. There are a few common culprits we'll explore:
- Router Issues: Is your router functioning correctly? Are other devices successfully connecting to the internet? Try restarting your router – this simple step resolves many connection problems. Observe the router’s indicator lights. A blinking or solid light of a specific color indicates a particular status and may indicate your router's connection status. Consult your router's manual for the specific meaning of the color codes.
- Network Interference: Is your laptop far from the router, obstructed by walls, or surrounded by electronic devices that could be causing interference? The presence of other wireless devices, microwave ovens, or even certain types of building materials can degrade Wi-Fi signals.
- Driver Problems: Outdated or corrupted network adapter drivers are a common cause of connection issues. These software components are essential for the laptop's wireless card to communicate with the router.
- Hardware Malfunctions: In less common situations, the Wi-Fi antenna within your HP Pavilion might be damaged. This is a more complex issue that requires more advanced troubleshooting.
- Operating System Glitches: Sometimes, the operating system itself can have problems that can interrupt connectivity. Software conflicts or corrupted system files can interfere with network functionality.
First Steps: Basic Troubleshooting for Immediate Relief
Let's begin with a series of straightforward troubleshooting steps that often resolve Wi-Fi problems quickly:
- Restart Your Laptop: A simple restart clears temporary files and resets system processes, which can often resolve unexpected issues, including Wi-Fi connectivity. Ensure that after the restart, the Wi-Fi is enabled by checking if the Wi-Fi icon is shown in the notification bar and the Wi-Fi is switched on.
- Toggle Wi-Fi On and Off: Toggle this setting off, give it a moment, and then turn it back on. You can usually do this through the action center (accessed by clicking the notification icon in the taskbar) or through the network settings. Again, double check that Wi-Fi is enabled after the toggle.
- Check Airplane Mode: Make absolutely sure that Airplane mode is off. Airplane mode disables all wireless communications, which would, of course, include your Wi-Fi. This is a common, but easily overlooked, culprit.
- Move Closer to the Router: Try moving your HP Pavilion closer to your router. This simple test can help determine if signal strength is the issue. See if your Wi-Fi connection improves.
- Forget and Reconnect to Your Network: In your network settings, "forget" the Wi-Fi network you're trying to connect to. Then, reconnect by entering your network password. Sometimes, old and corrupted network settings can cause problems, and this straightforward step frequently resolves these issues.
Diving Deeper: Advanced Troubleshooting Techniques
If the basic steps don’t resolve the problem, it's time to delve deeper. Don’t worry; we'll guide through each step:
Updating Your Network Adapter Driver
This is arguably the most common solution to Wi-Fi problems. Outdated or corrupted drivers are a frequent cause:
- Access Device Manager: Right-click on the Start button (or press the Windows key + X) and select "Device Manager."
- Locate Network Adapters: Expand the "Network adapters" category. You will see a list of devices; your wireless network adapter will be named something similar to "Intel Wireless-AC 9650" or "Realtek 8821CE Wireless LAN 802.11ac PCI-E NIC" (the name will vary depending on the specific model of your HP Pavilion).
- Update the Driver: Right-click on your wireless network adapter and select "Update driver." Choose either "Search automatically for drivers" to let Windows search for the latest driver online or choose "Browse my computer for drivers" if you have a driver file downloaded on your computer (often downloaded from the HP support website).
- Restart Your Laptop: After the driver updates, restart your laptop to ensure the changes are applied.
Reinstalling Your Network Adapter Driver
If updating doesn’t work, consider reinstalling the network adapter driver:
- Uninstall the Driver: In Device Manager (as described above), right-click on your wireless network adapter and select "Uninstall device." In the confirmation dialog box, check the box that says "Delete the driver software for this device" and then click on "Uninstall."
- Restart Your Laptop: Restart your laptop. Windows will automatically attempt to reinstall the correct driver. If Windows does not automatically reinstall, use the steps in the "Updating Your Network Adapter Driver" section to manually reinstall the driver.
Running the Windows Network Troubleshooter
Windows has a built-in troubleshooter specifically designed to diagnose and fix network problems:
- Access Network Settings: Right-click the Wi-Fi icon in your system tray (in the bottom-right corner of your screen) and select "Troubleshoot problems." Alternatively, go to "Settings" > "Network & Internet" > "Status" and click "Network troubleshooter."
- Follow the Prompts: The troubleshooter will scan for potential issues and offer solutions. Follow the on-screen instructions.
Checking Your Router's Settings
Sometimes, the problem isn’t with your laptop but with your router:
- Access Your Router's Configuration: Open a web browser and type your router's IP address (usually 192.168.1.1 or 192.168.0.1) into the address bar. You will need your router's login credentials (username and password) to access the settings, which can usually be found on the router itself or in the router's documentation.
- Check Wireless Settings: Ensure that your Wi-Fi is enabled, the network name (SSID) is correct, and the chosen security protocol (WPA2 or WPA3) is up to date.
- Channel Selection: Experiment with changing the Wi-Fi channel. Some channels may be less congested than others, depending on the surrounding wireless environment. In the router settings, look for the option to change the channel (usually under the "Wireless" settings). Try different ones like 1, 6, or 11, as these don’t overlap.
- Firmware Update: Verify that your router's firmware is up to date. Outdated firmware can cause performance and compatibility issues. Look for a “Firmware Update” option in your router's settings and follow the steps.
Examining the Physical Hardware: When To Consider Internal Components and Antennas
If the previous steps haven’t solved your Wi-Fi problems, it's time to consider potential hardware issues. While not common, the Wi-Fi antenna or wireless network card within your HP Pavilion might be faulty:
Inspecting the Antenna Connections (Advanced)
- Disclaimer: This procedure involves opening your laptop and working with internal components. If you are not comfortable doing this or do not have the necessary technical skill, seek professional assistance to avoid further damage to your laptop.
- Power Down and Disconnect: Power off your laptop completely and unplug the power adapter.
- Open the Laptop: Carefully open the laptop according to the HP Pavilion’s service manual. You can usually find this on the HP support website.
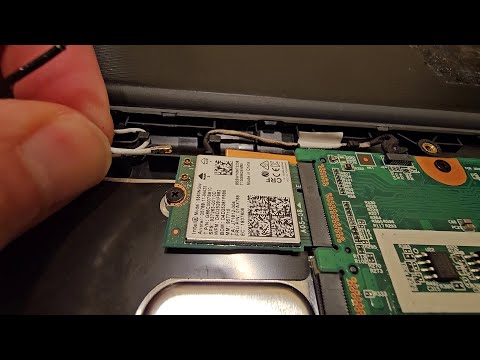
- Locate the Wi-Fi Card and Antennas: Identify the wireless network card and the antennas. The Wi-Fi card is usually a small card plugged into a slot on the motherboard. The antennas are small wires, typically two or three, that are routed around the screen.
- Check Antenna Connections: Ensure the antenna wires are securely connected to the Wi-Fi card. These can sometimes become loose over time. If any are disconnected, carefully reattach them.
- Inspect the Antenna Wires: Check the antenna wires for any visible damage, such as breaks or kinks. Replace any damaged antennas.
Replacing the Wireless Network Card (Pro Level)
- Disclaimer: This procedure involves opening your laptop and working with internal components. Only attempt this if you are comfortable with these tasks, as you need to have the ability to handle delicate electrical components,
- Acquire a Replacement Card: Purchase
