how to connect wifi printer to laptop windows 7
Title: How to Install a WiFi Printer to Windows 7
Channel: DIY PC Repairs
How to Install a WiFi Printer to Windows 7 by DIY PC Repairs
how to connect wifi printer to laptop windows 7, how to connect printer to laptop windows 7
Wifi Printer on Windows 7? This Trick Makes It INSTANT!
Seamless Wi-Fi Printing on Windows 7: Unlock Instant Connectivity!
Alright, let's be honest. Windows 7, a classic, still hums along for many of us. Getting that Wi-Fi printer to cooperate can feel like wrestling an octopus. But do not fret, there’s a secret weapon. It’s a trick that will make your printing experience instant.
The Pre-Flight Checklist: Ensuring Smooth Sailing
Before we begin, let's conduct some preliminary checks. Ensure your printer is indeed Wi-Fi enabled. Furthermore, verify your printer is powered on and connected to your home network. Check also, that your Windows 7 PC is also happily connected to that same network. Finally, take a glance at your printer's documentation. You might unearth some manufacturer-specific nuggets of info. Now, with your ducks in a row, we are ready. So, let's get started.
Unveiling the Magic: The Printer Installation Wizard
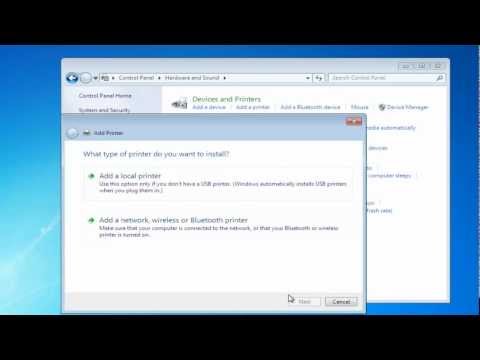
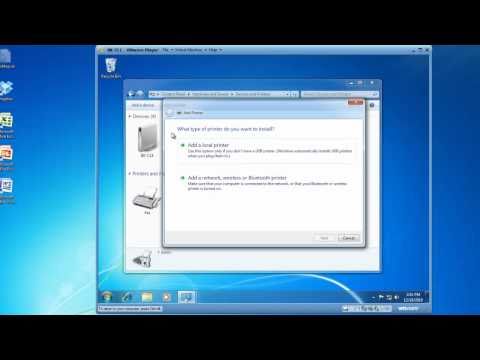
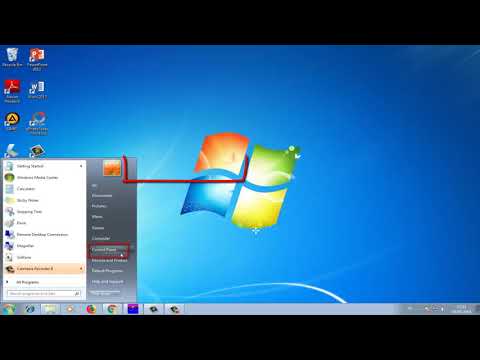
The heart of this method lies within Windows 7 itself. The built-in Printer Installation Wizard is your guide. It’s a user-friendly tool that simplifies the entire process. To begin, click the "Start" button, and then select "Devices and Printers." Inside this window, you'll find an "Add a printer" option. Click it. You will see the real magic begin to unfold.
Navigating the Network: Finding Your Printer
This is where your network plays a crucial role. The wizard will provide you with a few choices. Select "Add a network, wireless, or Bluetooth printer." Windows 7 will start searching for your Wi-Fi-enabled printer. This scanning process might take a short while, so be patient.
The Driver Dilemma: Sorting Out Compatibility
If Windows 7 detects your printer, fantastic! It might prompt you for the printer driver. The driver is vital as it tells your computer how to "speak" to your printer. If the driver is not already installed, you will be prompted to install it. You can often download the driver from the printer manufacturer’s website. Moreover, you may have a driver CD that came with your printer. Make use of these useful resources.
Install the Driver and Print a Test Page
Once you've installed the driver, Windows 7 will usually ask you if you would like to print a test page. Do it! This step confirms everything is working seamlessly. Then, you can celebrate a successful connection.
Troubleshooting Troubles: When Things Get Tricky
Sometimes, things go awry. It’s a fact of life. But, do not worry. Let's tackle some common hiccups. Is your printer not showing up in the search? Double-check that it's powered on, connected to the network, and not in sleep mode. Ensure you are indeed on the same network as your printer.
Firewall Fantasies: The Security Aspect
Windows Firewall, while essential for your security, sometimes acts as a gatekeeper. It can inadvertently block your printer's communication. So, temporarily disable the firewall during the installation. Be sure you re-enable it after completion. You can also create an exception for your printer in the firewall settings.
IP Address Intrigue: A Manual Touch
In rare instances, the automatic detection doesn't work. You might need to add the printer manually using its IP address. The IP address is a unique identifier for your printer on your network. You can find the IP address in your printer's settings or on a configuration page. Use that IP address to install the printer manually.
Shared Printer Setup: Extending the Reach
Do you need to share your printer with other computers? No problem. Once your printer is installed on your Windows 7 PC, you can share it. Go back to "Devices and Printers", and then right-click your printer. Choose “Printer properties”. Then, select the “Sharing” tab. Check the "Share this printer" box. Now, other devices on your network can easily access your new Wi-Fi printer.
The Grand Finale: Printing with Ease
Congratulations! You’ve successfully connected your Wi-Fi printer to your Windows 7 system. Now, printing should be a breeze. Simply select your printer from the print dialog box of any application. Click “Print,” and voila! Your document should appear on your Wi-Fi printer.
Advanced Tips: Fine-Tuning Your Experience
For optimal performance, update your printer's firmware regularly. This often improves its functionality. Also, keep your printer drivers up to date. They can address potential bugs and security vulnerabilities. To do so, check the printer manufacturer’s website.
Conclusion: Print On!
Getting your Wi-Fi printer up and running on Windows 7 doesn't have to be a headache anymore. By following these easy steps, you'll connect effortlessly. So, grab your favorite beverage. Celebrate your printing victory. Now you can print from anywhere in your home. You are all set for instant, stress-free printing. Happy printing!
WiFi Router Nightmare on Windows 7? FIX IT NOW!WiFi Printer on Windows 7? This Trick Makes It INSTANT!
Hey there, fellow tech adventurers! Remember the days when setting up a printer felt like deciphering ancient hieroglyphics? We've all been there, staring at a blinking light, wondering if we'd ever experience the sweet, sweet satisfaction of a printed document. Well, if you're rocking a Windows 7 machine (and let's be honest, a lot of us still are – it’s a trusty old friend!), and you’re wrestling with a Wi-Fi printer, then buckle up. We're about to unlock a secret, a trick, a magic spell that will have your printer humming in no time. Forget the frustration. Let's make it instant!
1. The Windows 7 Wi-Fi Printer Woes: A Familiar Tale?
Sound familiar? You’ve got this sleek, wireless printer, promising seamless connectivity. But then comes the reality check: endless searching, driver nightmares, and that dreaded "printer not found" error. It’s like the printer is playing hide-and-seek, and you're always "it." We get it. Windows 7, while still a champ for many, can sometimes be a little… particular about playing nice with newer tech. These setup hiccups can genuinely sap your patience and make you feel like chucking the whole thing out the window. But fear not, we’re here to help you navigate these choppy waters.
2. Before We Begin: Checking the Essentials
Before we dive headfirst into the fix, let's make sure we've got our ducks in a row. Think of this as doing the pre-flight checklist before taking off on a virtual printing odyssey.
- Is Your Printer Wi-Fi Enabled? Okay, this might seem obvious, but double-check that your printer actually has Wi-Fi capabilities. Look for a Wi-Fi logo on the printer itself or in its documentation.
- Is Your Printer Connected to the Wi-Fi Network? Your printer needs to be connected to the same Wi-Fi network as your Windows 7 computer. Most printers have a setup procedure that involves pressing buttons on the printer panel or using a companion app to connect.
- Do You Have Your Wi-Fi Password Handy? You’ll need it to connect your printer to your network. Don't start tearing the house apart looking for it.
- Do You Have the Latest Printer Driver? The most crucial requirement before proceeding. You can procure this from the printer manufacturer's website.
3. The Magic Bullet: Adding a Printer Wirelessly in Windows 7
Alright, let’s get to the good stuff! This is the main course of our printing meal. Here's the step-by-step guide to setting up your Wi-Fi printer on Windows 7.
- Step 1: Open the "Devices and Printers" Window: Click the Start button and then select "Devices and Printers." Think of this as the control center for all things connected to your computer.
- Step 2: Add a Printer: At the top of the "Devices and Printers" window, click "Add a printer." This will launch the "Add Printer" wizard.
- Step 3: Choose "Add a wireless, Bluetooth or network printer": This is the option that tells Windows 7, "Hey, I'm looking for a Wi-Fi printer, not one that's physically plugged in!" Click it.
- Step 4: Let Windows Search for Your Printer: Windows 7 will now start searching your network for available printers. This might take a minute or two, so grab a coffee while it does its job.
- Step 5: Select Your Printer and Install the Driver: Once your printer appears in the list, click on it to select it, then click "Next." Windows 7 should automatically detect and install the correct drivers. If it doesn’t, you'll likely need to point it to the driver file you downloaded earlier from the printer manufacturer's website. Don't worry; the wizard will guide you.
- Step 6: Follow the On-Screen Instructions: The wizard will prompt you to complete the installation, which might involve some testing pages or checking printer settings. Follow the instructions carefully.
- Step 7: Print a Test Page! Once the installation is complete, Windows 7 will ask if you want to print a test page. Do it! This is your moment of truth. If all goes well, you’ll hear the delightful whirring of your printer, and you’ll get a test print. Victory!
4. Troubleshooting Troubles: When Things Go Wrong (And How to Fix Them)
Sometimes, even with the best intentions, things don’t quite click. Don't panic! Here’s a breakdown of common problems and how to fix them. Think of these as your printing first-aid kit.
- Printer Not Found: This is the most common headache. Make sure your printer is turned on, connected to your Wi-Fi network, and not in "sleep" mode. Also, ensure your network connection is stable. Also, ensure that your Windows Firewall isn’t blocking the printer. Try temporarily disabling it to see if that resolves the issue (but remember to re-enable it afterward for security).
- Driver Issues: If Windows 7 struggles to find the right drivers, manually download them from the printer manufacturer's website. Download the latest version and follow the installation instructions.
- Connection Problems: Double-check your Wi-Fi password. It's easy to mistype it. Restart your printer and your computer. Sometimes, a simple restart works wonders.
- Printer Showing Offline: This usually means either the printer isn’t connected to the network or there's a communication problem. Check your printer’s connection status in its settings or its control panel.
5. The Power of a Static IP Address
This is a more advanced trick, but it can often solve persistent connectivity problems. Assigning a static IP address to your printer bypasses potential conflicts with your router's dynamic IP assignment. It's like giving your printer a permanent address so that your computer always knows where to find it.
- Access Your Router's Configuration: This usually involves typing your router's IP address (like 192.168.1.1 or 192.168.0.1) into a web browser.
- Find the DHCP Settings: Look for "DHCP Client List," "Address Reservation," or similar settings. The exact wording varies from router to router.
- Reserve an IP Address for Your Printer: Find your printer in the list of connected devices and assign it a static IP address. Make sure it's outside the range of your DHCP settings.
- Configure Your Printer: Enter the static IP address you assigned into your printer's network settings. Consult your printer's manual for specific instructions.
- Try Adding Your Printer Again: Once you've assigned a static IP, try adding your printer in Windows 7 again.
6. Ensuring Smooth Sailing: Essential Wifi Printer Maintenance
Once your printer is up and running, here are some tips to keep it humming:
- Regular Driver Updates: Keep your printer drivers up to date. Manufacturers often release updates to fix bugs and improve performance. Check the manufacturer's website periodically.
- Network Health: Ensure your Wi-Fi network is stable. A weak signal can cause printing problems. Consider moving your printer closer to your router or using a Wi-Fi extender.
- Printer Maintenance: Regularly clean your printer's print heads to prevent ink clogs.
- Check Your Ink Levels: Sounds simple, right? But running out of ink mid-print is frustrating. Check your ink cartridges before you start a big job.
7. Sharing the Love: Printing from Multiple Windows 7 Machines
Got multiple computers in the house? No problem! Once your printer is set up on the first machine, it's easy to share it with others.
- Go to "Devices and Printers" on the First Computer.
- Right-Click on Your Printer and Select "Printer Properties."
- Go to the "Sharing" Tab and Check "Share this printer."
- On the Other Windows 7 Computers, Go to “Devices and Printers” and Click “Add a printer".
- Select "Add a network, wireless or Bluetooth printer" again.
- Windows 7 should find the shared printer.
8. The Joy of Wireless Printing: No More Cables, No More Hassle
Seriously, think of all the desk space you're saving! Wireless printing gives you the freedom to place your printer wherever it's most convenient, not just where the cable reaches.
9. The Importance of Printer Drivers: Your Printer's Operating System
Without proper drivers, your computer and printer can't communicate! Keeping them updated is like making sure your printer can “speak” your computer's language and understand the instructions.
10. The Hidden Secrets of the Printer Wizard: Uncovering the Setup Process
We’ve already covered the main steps, but the "Add Printer" wizard is often more helpful than you might initially think. Take your time and read the prompts to make sure you're following the correct steps based on your printer model.
1
Unlock Your Laptop's Wi-Fi Potential: The Ultimate External Adapter GuideHow to Set up a Wireless Printer in Windows 7

By How-To Guide How to Set up a Wireless Printer in Windows 7 by How-To Guide
Install a Printer using Windows 7
By brickhouselabs Install a Printer using Windows 7 by brickhouselabs
Cara Sharing Printer di Windows 7
By nofemi jafri Cara Sharing Printer di Windows 7 by nofemi jafri

Title: CARA SHARING PRINTER LEWAT WIFI WINDOWS 10 DAN WINDOWS 7
Channel: yayan abuahkam
CARA SHARING PRINTER LEWAT WIFI WINDOWS 10 DAN WINDOWS 7 by yayan abuahkam
Laptop Wifi Connect
WiFi Printer on Windows 7? This Trick Makes It INSTANT!
Navigating the digital landscape, we've all encountered the frustration of paper jams, ink smears, and the general unreliability of printing. But perhaps the most persistent challenge is connecting wirelessly to a printer, particularly when using the now-legacy Windows 7 operating system. We recall the days of tangled USB cables and the agonizing wait for drivers to install. Thankfully, with a bit of technical know-how and a dash of patience, we’ve discovered a remarkably streamlined and INSTANT solution to connect your WiFi printer to your Windows 7 computer. The following procedure unlocks a hassle-free printing experience, allowing you to print documents, photos, and more with minimal effort.
Understanding the Foundation: Network Configuration
Before diving into the specifics, it is crucial to establish a solid groundwork. This begins with verifying your home network's configuration. Ensure your WiFi network is up and running, your router securely connected to the internet, and that all other devices, such as smartphones and tablets, are successfully connected to the same WiFi network as your Windows 7 PC. This preliminary step is often overlooked, yet it is the bedrock of a successful wireless printer setup. Double-check your network name (SSID) and password; these critical components will be required throughout the process. Should you experience any connectivity issues with your network, consult your internet service provider or your router's user manual for comprehensive troubleshooting. A weak or intermittent WiFi signal will hinder the entire setup process. A reliable network will dramatically enhance the printing experience.
Prepping Your Printer: Initiating the Wireless Connection
Now, focus your attention on the printer itself. Most modern WiFi printers possess an intuitive setup process, often guided by an LCD screen or a series of illuminated indicator lights. Consult your printer's user manual for precise instructions specific to your model. In general, you will need to:
- Power On: Make certain your printer is turned on and ready for action.
- Access Wireless Settings: Navigate to the printer's control panel. This might involve pressing a menu button, selecting a settings icon, or using the built-in LCD screen.
- Select WiFi: Initiate the wireless setup process. Choose "WiFi setup," "Wireless LAN setup," or a similar option from the printer's control panel menu.
- Choose Your Network: Your printer will then scan for available WiFi networks. Select the name of your home network (the SSID you identified earlier).
- Enter the Password: You will be prompted to enter your WiFi password. Use the printer's on-screen keyboard or, in some models, a physical keypad to input the password accurately.
- Wait and Confirm: The printer will attempt to connect to your network. This may take a few moments. Once connected, the printer will display confirmation messages, such as "Connected to WiFi" or a corresponding indicator light will illuminate.
The Driver Dilemma: Installation and Compatibility
With your printer connected to your WiFi network, the next step is to install the appropriate drivers on your Windows 7 computer. Drivers are the software bridges that allow your computer to communicate with the printer. This step is pivotal, and the correct driver selection is paramount for a seamless printing experience.
- Obtain the Correct Driver: It is critical to obtain the latest driver version directly from the printer manufacturer's website (e.g., HP, Epson, Canon, Brother). Avoid downloading drivers from untrusted sources, as they might contain malware or be outdated.
- Download and Run: Download the driver package from the website. After the download completes, run the executable to begin the driver installation process.
- Follow the On-Screen Prompts: The installation wizard will guide you through the process. You will be prompted to accept the terms and conditions, select the printer model, and choose the installation type.
- Choose the Right Connection: During the installation, you will likely be asked how you will connect your printer. Select "Wireless" or "WiFi" as your connection method.
- Network Detection: The wizard will search for your printer on the network.
- Printer Selection: Once the printer is found, select it from the list of detected printers.
- Complete the Installation: Allow the installation to complete. The wizard will notify you when the driver installation is successful.
The Crucial Step: Adding Your Printer in Windows 7
This step integrates your newly installed printer driver into your Windows 7 operating system. This process enables your computer to recognize and utilize your wireless printer for printing tasks.
- Open Devices and Printers: Navigate to the "Devices and Printers" section in the Windows 7 Control Panel. You can access this by clicking the Start button and selecting "Devices and Printers".
- Add a Printer: Click on "Add a printer" in the Devices and Printers window.
- Choose "Add a network, wireless or Bluetooth printer": Select the second option. This choice instructs Windows 7 to look for printers connected via a network.
- Search for Your Printer: Windows 7 will now search for connected printers on your home network. It should detect your WiFi printer if the setup was successful.
- Select the Printer and Add It: Once your printer is found, select it from the available devices. If prompted, select the correct driver from the list or browse for it if it wasn't automatically detected.
- Test the Connection: After successful installation, Windows 7 will offer to print a test page. This is a critical step to verify the printer is set up correctly. Print a test page to confirm functionality.
Troubleshooting Common Issues
The path to wireless printing bliss isn't always smooth. Here are potential roadblocks and their corresponding solutions:
- Printer Not Found:
- Solution: Double-check that your printer is turned on and connected to the WiFi network. Ensure your computer and printer are on the same network. Restart both the printer and your computer.
- Driver Installation Problems:
- Solution: Download the latest driver from the manufacturer's website. Run the installer as an administrator, and ensure compatibility with Windows 7. Consider uninstalling and reinstalling the printer driver.
- Printing Errors:
- Solution: Verify the printer's ink or toner levels. Ensure the printer is not in an error state (e.g., paper jam). Check for loose network cables. Restart the printer and your computer.
- Firewall Interference:
- Solution: Temporarily disable your firewall to determine if it's blocking printer communication. If it is, add your printer to the firewall's exception list.
- Incorrect Printer Selection:
- Solution: Make sure you are selecting the correct printer from the "Printer" dropdown menu when printing a document. You may have multiple printers installed.
Refining the Experience: Advanced Configuration
Once your printer is functioning, you can fine-tune the settings to optimize your printing.
- Set as Default: Right-click on your printer icon in "Devices and Printers" and choose "Set as default printer." This simplifies the printing process by automatically selecting your wireless printer.
- Printer Preferences: Right-click on the printer icon and select "Printer properties" or "Printing preferences." From here, you can adjust print quality, paper size, orientation, and other settings to suit your specific preferences.
- Sharing the Printer: If you have multiple computers on your network, you can share the printer. Go to the printer properties and enable the "Share this printer" option on the "Sharing" tab. This will allow other computers on your home network to print to the same device.
The INSTANT Triumph: Embracing Wireless Freedom
We've simplified the process, making it easy to connect your WiFi printer to Windows 7. By adhering to this step-by-step guide, you've conquered the connectivity conundrum and unlocked the convenience of wireless printing. With reliable WiFi connectivity, driver installation, and Windows 7 configuration, the frustration of tangled cables and cumbersome setups becomes a distant memory. Now, you can print from any room in your home, enjoying the freedom and flexibility that WiFi printing provides. We trust you now enjoy the effortless printing it offers.
