diy boost wifi signal laptop

Title: WiFi Booster Homemade WiFi booster how to increase WiFi signal
Channel: SF Crafting
WiFi Booster Homemade WiFi booster how to increase WiFi signal by SF Crafting
Laptop WiFi Dead Zone? This DIY Trick Boosts Signal Instantly!
Conquering the WiFi Wasteland: Resurrect Your Laptop's Signal!
Have you ever wrestled with a frustratingly weak WiFi signal? Your laptop, once a portal to the world, becomes a digital desert. The connection sputters, pages crawl, and your patience wears thin. This is a common plight, but thankfully, solutions exist. You don't have to suffer in silence, nor do you need expensive tech upgrades.
Understanding the WiFi Wilderness: Why Your Signal Suffers
First, let us consider the culprits. Many factors conspire to weaken your WiFi. Your router’s location significantly impacts its range. Thick walls, metal appliances, and even other electronic devices can wreak havoc on your signal. Furthermore, distance is a key enemy. The farther you are from your router, the weaker the signal becomes. This can easily create those dreaded dead zones throughout your home.
Then, your laptop’s antenna itself plays a crucial role. Some laptops boast robust antennas, while others have less-powerful designs. The antenna's placement within the laptop’s chassis also matters. For example, it is often located in the screen bezel. Therefore, physical obstructions can frequently hinder the signal.
The DIY Signal Savior: A Simple, Effective Solution
Fortunately, there is a simple, readily available solution. This DIY trick requires minimal effort. It can dramatically improve your laptop's WiFi reception. You will become the master of your own connectivity destiny. All you need is a simple tool found in nearly every household: a standard aluminum foil.
Crafting Your WiFi Booster: A Step-by-Step Guide
Here’s how to build your own WiFi signal amplifier:
- Gather Your Supplies: You'll need aluminum foil and scissors. That is all you require.
- Cut the Foil: Cut a piece of foil slightly larger than your laptop's screen. The exact size is less important than you might think.
- Fold and Shape: Fold the aluminum foil into a curved reflector. Think of a shallow dish or a parabolic shape. This concentrates the signal towards your laptop.
- Position Your Booster: Place the curved foil reflector behind your laptop's screen. Make sure the curved side faces toward your router.
- Experiment and Fine-Tune: Adjust the position and angle of the foil until you achieve the best signal strength. You might need to experiment to find the optimal placement.
- Test the Results: Run a speed test or browse the web to see the difference. The change can be quite remarkable.
Boosting Your Signal: Other Considerations to Improve Connectivity
However, the foil trick is not a magic bullet. Furthermore, other factors influence WiFi performance. Therefore, consider these tips:
- Router Placement: Position your router in a central, elevated location. Avoid placing it in closets or behind obstructions.
- Channel Selection: Your router broadcasts on a specific channel. Crowded channels can cause interference. To optimize, check your router's settings. Switch to a less-congested channel.
- Reduce Interference: Minimize the number of devices operating near your router. Also, keep it away from microwaves and other sources of electromagnetic interference.
- Update Your Router Firmware: Keep your router’s firmware updated. This ensures optimal performance and security. Manufacturers regularly release updates.
- Security: Secure your WiFi network with a strong password. This prevents unauthorized users from slowing down your connection.
Beyond the DIY Fix: When to Seek Professional Help
Sometimes, a DIY solution is not enough. If you consistently experience WiFi problems, you may need professional help. Consider these scenarios:
- Extreme Distance: If you are far from your router, a stronger signal may be necessary. Consider investing in a range extender.
- Slow Speeds: Test your internet speed. If it is significantly slower than what you pay for, contact your internet service provider.
- Constant Dropouts: Consistent connection drops can indicate a hardware issue. In this case, consider replacing your router.
Embrace the Online World: Reclaim Your WiFi Freedom
In conclusion, fighting a weak WiFi signal doesn't need to be a battle. With a simple DIY trick and a few troubleshooting steps, you can dramatically improve your laptop’s connectivity. So, grab some aluminum foil, experiment, and enjoy a smoother, faster online experience. Now, go forth and conquer the WiFi wasteland! Don't let your internet be a frustrating burden! After all, a strong WiFi signal is within your grasp. Happy surfing.
HP Laptop WiFi Nightmare? Erase That Network NOW!Laptop WiFi Dead Zone? This DIY Trick Boosts Signal Instantly!
Alright, fellow digital nomads and cozy couch surfers! Let's be honest, a weak Wi-Fi signal can be the bane of our existence. It's the digital equivalent of a leaky faucet – a constant, frustrating drip that slowly erodes your sanity. You're in the middle of a crucial video call, ready to binge-watch your favorite show, or trying to download that essential document, and bam! The dreaded buffering wheel of death appears. Sound familiar? We've all been there. We've all paced around our homes, desperately searching for that elusive sweet spot of connection. But what if I told you there's a simple, almost ridiculously easy DIY trick that could banish those Wi-Fi dead zones and bring your laptop screaming back to life? Let's dive in!
1. The Silent Struggle: Recognizing the Wi-Fi Dead Zone
First things first, let's acknowledge the problem. Recognizing you have a dead zone is the crucial first step. Think about it: is your Wi-Fi signal consistently spotty in certain areas of your home? Does your laptop choke when you venture away from the router? Do you find yourself huddled in the corner, desperately trying to catch a stray bar? If you're nodding your head right now, congratulations – you're likely battling a Wi-Fi dead zone! It's like having a ghost in your house – invisible, frustrating, and always making things difficult.
2. Why Are We Losing Signal? The Culprits Behind the Curse
Before we get to the fix, let's understand why these digital black holes exist. Several culprits can be behind your weak Wi-Fi signal.
- Distance: The further you are from your router, the weaker the signal. Simple physics.
- Obstacles: Walls, furniture, and even water (think aquariums) can obstruct and weaken the signal. Think of it like trying to shout across a crowded room - the voice fades as it hits obstacles.
- Interference: Other electronic devices (microwaves, cordless phones) can interfere with your Wi-Fi signal, creating noise and disrupting the connection.
- Router Placement: Where you place your router is crucial. Hiding it in a closet or behind a metal object is a recipe for disaster.
- Outdated Hardware: An old router might not be able to handle the demands of multiple devices and modern Wi-Fi standards.
3. The Myth of Buying a New Router… (Not Always the Answer)
Now, the tech industry loves to sell you the solution of a brand new, top-of-the-line router. While a new router can sometimes help, it's often an overkill solution. It's like buying a new car because your favorite coffee shop is too far away – it might work, but there's a much simpler (and cheaper!) solution.
4. The Secret Weapon: The DIY Signal Booster
Here's the good stuff. The DIY trick that can dramatically improve your laptop's Wi-Fi reception. It's simple, it's effective, and it costs next to nothing. Are you ready?
The trick involves creating a simple signal reflector using materials you probably already have lying around the house. Think aluminum foil, cardboard, and a bit of tape. The beauty of this is that it’s akin to the principle of how satellite dishes focus radio waves, but on a much smaller scale and for a very low cost.
5. Gathering Your Materials: The DIY Arsenal
You'll need:
- A piece of cardboard (cereal box works perfectly!)
- Aluminum foil
- Tape (masking tape or even scotch tape will do)
- Scissors or a craft knife (use caution!)
- A ruler or straight edge (optional, but helpful for neatness)
6. Constructing Your Wi-Fi Amplifier: The Hands-On Guide
Now, for the fun part: building your signal booster!
- Cut and Shape the Cardboard: Cut the cardboard into a shape that can cup behind your laptop or wrap around your router antenna – a parabolic (bowl-shaped) or rectangular shape is ideal. You can experiment with different shapes.
- Foil Time: Cover the entire cardboard surface with aluminum foil, shiny side facing out. Make sure the foil is smooth and taut. This is the reflective surface.
- Secure the Foil: Tape the foil down securely around the edges of the cardboard. You don't want any flapping foil!
- Placement is Key: Position your DIY reflector behind your laptop's screen or near the router's antenna. Experiment with different angles and positions to find the optimal signal boost.
7. Experimentation: Finding the Sweet Spot
This is where things get interesting. Don't expect instant results. This DIY solution is not a magic wand. Experiment with the positioning of your DIY reflector. Move it around, adjust the angle, and see what configuration gives you the strongest signal. Think of it as tuning a radio, slowly tweaking the dials until that crystal-clear sound emerges.
8. The Science Behind the Magic: Demystifying the Tech
So, how does this DIY reflector actually work? It's all about manipulating the electromagnetic waves that carry your Wi-Fi signal. The aluminum foil acts as a reflector, focusing and redirecting the signal toward your laptop. It's similar to how a satellite dish focuses radio waves toward a receiver. This concentrated signal strength often allows your laptop to "hear" the Wi-Fi router more clearly. The cardboard structure simply provides a foundation for the reflective foil.
9. Putting It to the Test: The Signal Strength Showdown
To measure the effectiveness of your DIY booster, use a Wi-Fi analyzer app on your smartphone or laptop. These apps show the signal strength in decibels (dBm). Before you deploy your reflector, measure your signal strength in the dead zone. Then, position your reflector and measure again. You should see a noticeable improvement in signal strength.
10. Beyond the Reflector: Additional Wi-Fi Boosting Hacks
While the DIY reflector is fantastic, it's not always a complete fix. Here are some additional tips to maximize your Wi-Fi signal:
- Router Placement: Position your router in a central, elevated location, away from walls and obstructions.
- Channel Optimization: Use your router's settings to change the Wi-Fi channel. Interference from other routers can be a problem.
- Firmware Updates: Keep your router's firmware updated for optimal performance.
- Restart Regularly: Reboot your router and modem regularly to clear any temporary glitches.
- Limit Bandwidth Hogging: Devices like streaming videos can eat up valuable bandwidth. Minimize their use while working.
11. Troubleshooting Troubles: When Things Don't Go Smoothly
Sometimes, even with the best intentions, things don't work. If your DIY reflector isn't providing a significant boost, don't fret! Here are some troubleshooting tips:
- Check Your Materials: Ensure you're using enough foil and that it's securely attached to the cardboard.
- Experiment with Placement: Keep adjusting the angle and position of your reflector. The optimal spot might be tricky to find.
- Test Other Devices: See if the problem exists on other devices. This helps narrow down the source of the issue.
- Consider Upgrading: If multiple troubleshooting steps consistently fail for your old model router, it might be time for an upgrade if signal is still weak.
12. The True Cost of Weak Wi-Fi: More Than Just Frustration
Weak Wi-Fi isn't just an annoyance; it can truly cost you. Think about lost productivity, missed deadlines, and the sheer frustration of constant buffering. A stable internet connection is essential in today's digital world. The DIY reflector is a budget-friendly solution to help ensure a stable work environment.
13. The Unsung Heroes: Alternative Hacks If Crafting's Not Your Forte
If a DIY project is not something you relish, there are other routes. You can buy Wi-Fi extenders, which amplify your existing signal. Mesh routers can also drastically improve Wi-Fi coverage. Often these are more expensive but offer enhanced performance and ease of use.
14. The Future of Wi-Fi: What's Next for the Digital Frontier?
The future of Wi-Fi is constantly evolving. We're moving toward faster speeds, more reliable connections, and smarter home networks. Wi-Fi 6 and Wi-Fi 6E are already here, promising even greater performance. As technology advances the demand for better signal strength increases.
15. Triumph Over Buffering: Embrace Your Strong Signal!
We've explored the causes, the DIY fix, and the alternative solutions. We've gone from frustration to empowerment! You have the knowledge and the power to banish your Wi-Fi dead zones. Grab your materials, build your reflector, experiment with placement, and enjoy the freedom of a strong, reliable internet connection. No more buffering, no more dropped calls, and no more digital despair! You've got this!
Closing:
So, there you have it. Your very own, super-simple, cost-effective solution for combating those annoying Wi-Fi dead zones. From my own personal experience, this trick has been a lifesaver, especially when I'm trying to work from my comfy armchair! By
Laptop WiFi Booster: Insane Speed Hack You NEED!Convert LNB to a very powerful antenna to receive remote WiFi networks
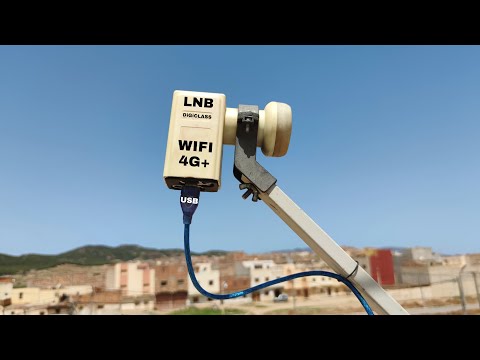
By Digital Sat Pro Convert LNB to a very powerful antenna to receive remote WiFi networks by Digital Sat Pro
Cara Meningkatkan Sinyal Wi-Fi di Laptop Windows Mempercepat Wi-Fi

By MJ Tube Cara Meningkatkan Sinyal Wi-Fi di Laptop Windows Mempercepat Wi-Fi by MJ Tube
Wi-Fi Gun DIY Antena Kuat untuk Wi-Fi
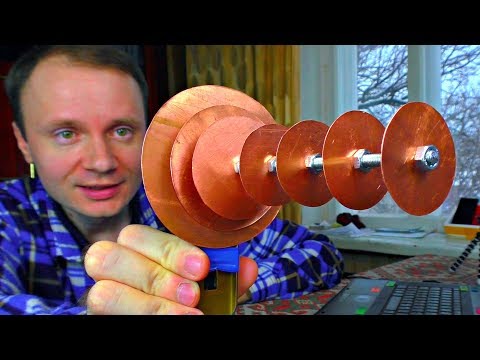
By Kreosan English Wi-Fi Gun DIY Antena Kuat untuk Wi-Fi by Kreosan English

Title: How to make long-range WiFi antenna at home
Channel: QThink
How to make long-range WiFi antenna at home by QThink
Working With Laptop
Laptop WiFi Dead Zone? This DIY Trick Boosts Signal Instantly!
Have you ever found yourself wrestling with a frustratingly weak WiFi signal on your laptop? That moment when you’re desperate to finish an important email, stream a video, or join a video call, only to be met with buffering, dropped connections, and the dreaded “no internet” notification? We understand the pain. Those WiFi dead zones can transform your laptop into a glorified paperweight. However, before you resign yourself to expensive network upgrades or technical complexities, we have a simple, incredibly effective, and completely free solution you can implement right now. Prepare to bid farewell to those irritating dropouts and embrace a stronger, more reliable WiFi connection.
Understanding the Enemy: Common Culprits of Weak WiFi Signals
Before we jump into the fix, let's briefly explore the usual suspects responsible for your laptop's WiFi woes. Understanding these factors will not only help you appreciate the effectiveness of our DIY trick but also empower you to troubleshoot future connectivity issues.
- Distance from Router: This is the most obvious, but often understated, culprit. The farther your laptop is from the router, the weaker the signal. Walls, floors, and other obstructions further diminish the signal strength.
- Obstructions: Physical barriers like thick walls, metal appliances, and even large aquariums can dramatically interfere with WiFi signals. These objects absorb or deflect the radio waves, weakening the connection.
- Router Placement: The placement of your router is crucial. Placing it in a central location, away from obstructions, maximizes signal distribution. Avoid placing it in closets, behind metal objects, or near other electronic devices that could cause interference.
- Interference: Your WiFi signal competes with other wireless signals, such as those from other routers, microwaves, and even Bluetooth devices. This competition can lead to slower speeds and dropped connections.
- Router Age and Hardware Limitations: Older routers may not support the latest WiFi standards or have the processing power to handle the demands of multiple devices and high-bandwidth activities.
- Laptop Antenna Design: The internal antennas in laptops can vary in quality and effectiveness. Some laptops are designed with less robust antennas than others, leaving them more susceptible to signal weaknesses.
The Secret Weapon: The DIY WiFi Booster – Your Personalized Antenna Enhancement
Now, for the moment you've been waiting for. Forget expensive boosters and complicated technical jargon. We're going to harness the power of a simple, readily available household item to dramatically improve your laptop's WiFi reception: a repurposed aluminum can. Yes, you read that correctly. This method is remarkably effective and utilizes the principles of antenna design to focus and amplify your laptop's WiFi signal.
What You'll Need:
- An empty aluminum can (a standard soda or beer can works perfectly).
- Scissors or a utility knife (be careful using these!).
- Gloves (optional, but recommended to avoid cuts).
- A pen or marker.
- A ruler (optional, for more precise cuts, but not essential).
Step-by-Step Guide to Building Your DIY WiFi Booster:
- Preparation is Key: First, carefully wash and thoroughly dry the aluminum can. This will remove any sticky residue and ensure a clean working surface.
- The Cutting Process: Using your scissors or utility knife, carefully cut the top and bottom lids off the can. Exercise extreme caution during this step to avoid any accidental cuts.
- The Vertical Cut: Next, make a single vertical cut down the side of the can. This cut should run from the top opening of the can down to the bottom opening. The goal is to create a flat, rectangular sheet of aluminum.
- The Antenna Design: Gently flatten the aluminum sheet. Now, using your pen or marker, draw a U-shaped design on the flattened can. The base of the "U" should align with the bottom of the can (the opening), and the arms of the "U" should extend towards the top (the other opening). The depth of the "U" will determine the gain of your antenna. Experimenting with a deeper “U” (closer to the middle of the can) may result in better performance
- Refinement and Shaping: Carefully cut along the lines you've drawn to create the U-shaped reflector. Be precise with your cuts to create clean, consistent edges. The more precise your cuts, the better the performance.
- Positioning is Everything: Position the opening of the can facing towards your WiFi router. The opening of the “U” shape should be perpendicular to your laptop screen. The sides of the can should act as a reflector, focusing the WiFi signal towards your router. The point is to direct the signal, not to receive it.
- Experiment and Optimize: Now, the most important part – experimentation. Gently position the can behind your laptop, ensuring the U-shaped reflector is aligned with the direction of your router. You may need to adjust the angle and position of the can to achieve the best results. Move the can around, rotating it slightly, until you see a noticeable improvement in your WiFi signal strength.
The Science Behind the Magic: How Your DIY Booster Works
This seemingly simple trick works due to the principles of antenna design. The aluminum can acts as a reflector, redirecting and focusing the radio waves emitted by your router. By shaping the can into a U-shape, we're creating a parabolic reflector. This shape concentrates the scattered radio waves and directs them towards your laptop's WiFi antenna, effectively boosting the signal strength. Much like a satellite dish focuses radio waves from space, this DIY booster focuses the WiFi signal from your router.
Beyond the Booster: Additional Tips for Maximizing Your WiFi Performance
While the DIY WiFi booster is a highly effective solution, combining it with these additional tips will further enhance your laptop's WiFi performance:
- Router Placement Revisited: Ensure your router is in a central, unobstructed location in your home. Elevated locations are often ideal to broadcast WiFi coverage more openly. Try to keep your router away from other electronic devices.
- Channel Selection: Log into your router's configuration panel. The router will automatically pick the best channel. However, sometimes manually switching to a less congested WiFi channel can improve performance, particularly in areas with many WiFi networks. Consider using a WiFi analyzer app on your smartphone or laptop to identify the least crowded channels.
- Router Firmware Updates: Keep your router's firmware up to date. Router manufacturers regularly release firmware updates to improve performance, security, and address potential bugs.
- Restart Regularly: Reboot your router and modem periodically. This simple act often resolves temporary glitches and improves overall performance. Shutting down and restarting both devices can clear accumulated temporary files and optimize performance.
- Minimize WiFi Interference: Reduce the number of electronic devices operating near your router. Microwave ovens, Bluetooth devices, and cordless phones can interfere with your WiFi signal. Keep these devices away from your router.
- Security Settings: Make sure your home WiFi network is secured. Encryption is the only way to make sure others cannot use your network, which can impact speed.
- Analyze your WiFi with software: Download a WiFi analyzer app. The app usually provides information on the networks surrounding your device, their strength, and channels. You could use this information to optimize your network's performance.
- Laptop Antennas: If your laptop's antennas are weak, consider purchasing an external WiFi antenna for your laptop. This may require some technical knowledge, but the results may be worth it.
Troubleshooting Common Problems and Refining Your Setup
Even with our DIY booster and other optimization tips, you may encounter unexpected issues. Here’s how to troubleshoot and refine your setup:
- No Improvement: If you don't see an improvement, double-check your booster's construction. Ensure the U-shape is properly formed and that the can is positioned correctly. Experiment with different angles and distances from your laptop.
- Intermittent Drops: This may indicate interference or congestion. Try changing your router's channel and relocate your router.
- Slow Speeds: If speeds are still slow, test your internet speed using a speed test website. You may have a slower internet plan than you thought.
- Router Issues: If your router is old, it may be time to upgrade to a newer model.
- Laptop Problems: Ensure your laptop's WiFi drivers are up to date. Outdated drivers can lead to connectivity problems.
Embrace the Power of a Strong WiFi Signal
We've provided you with a simple, cost-effective, and highly effective solution to combat those frustrating laptop WiFi dead zones. Not only will this DIY trick improve your signal strength instantly, but it also gives you the power to control your connectivity. By understanding the sources of weak WiFi signals and employing our DIY booster and the additional tips, you'll transform your laptop experience, allowing you to work, play, and connect without those annoying interruptions. Say goodbye to buffering, dropped connections, and frustration, and embrace the power of a strong, reliable WiFi signal. Begin your journey towards a seamless online experience today. The DIY WiFi booster is your secret weapon for conquering WiFi dead zones.
