laptop wifi only connects with static ip and not dhcp

Title: Set a Static IP Address for a Device DHCP IP Reservation
Channel: AsoftClick
Set a Static IP Address for a Device DHCP IP Reservation by AsoftClick
Laptop WiFi Nightmare: Static IP ONLY? FIX THIS NOW!
Laptop WiFi Static IP Blues: Ditching the Digital Dread
Have you ever encountered a digital head-scratcher that makes your palms sweat? You're ready to dive into work or binge-watch that new series, but your laptop's WiFi connection is throwing a curveball. It's a familiar scenario, a static IP address stubbornly refusing to budge. This can transform your sleek, portable computer into a technologically challenged paperweight. We've all been there, right?
The Static IP Specter: Unmasking the Culprit
So, what's the deal? Why does your laptop insist on clinging to a static IP when it should be dynamically receiving one from your router, like a good little network citizen? Consider this: a static IP is assigned manually, like a permanent address. Usually, this is done for network devices that need a persistent identifier. But when your laptop suddenly decides to play the role of a device, it doesn't belong. It’s a digital identity crisis! It’s preventing you from connecting.
Decoding the DHCP Dance: Finding the Flow
Your router likely utilizes DHCP (Dynamic Host Configuration Protocol), the network's traffic controller. DHCP automatically assigns IP addresses, making connecting easier. You should always have DHCP enabled unless you have a specific reason to use a static IP.
Troubleshooting Tango: Steps to Salvation
Now, let's banish this static IP demon. Prepare to troubleshoot. First, go to your network settings. It may seem complex, but it doesn’t have to be. Then, locate your WiFi adapter's configuration. Next, dig into its settings. You should find the IP configuration. Choose "Obtain an IP address automatically." Also, "Obtain DNS server address automatically."
These settings enable DHCP to do its job. And, voila you're back online. This is the simplest fix. However, sometimes, the issue lingers. Therefore, let's proceed.
The Reset Ritual: Reboot and Reconnect
Okay, you’ve changed your settings but still encounter a static IP. It’s time for a digital reset. First, restart your router. Unplug it for a minute. Then, plug it back in and reconnect. Your router, effectively, gets a fresh start.
Next, restart your laptop. This clears outdated configurations. Often, this is all that's needed. If you’re still stuck, something else could be wrong.
Software Showdown: Check for Conflicts
Unforeseen software conflicts can also create issues. Ensure your antivirus or firewall isn't blocking your connection. These security programs, sometimes, interfere with network settings. Temporarily disable these programs and test your connection. If your connection works, identify the culprit. Reconfigure your software to allow network access.
Driver Debrief: Ensuring Compatibility
Outdated or corrupted network drivers can also cause problems. Therefore, it's essential to update them. Visit your laptop manufacturer's website. Download the latest driver for your WiFi adapter. Install them, and restart your computer. This ensures everything is using the correct pathways.
Network Nirvana: Advanced Adjustments
If all else fails, you could try a few additional tactics. Firstly, flush your DNS cache. This clears outdated DNS information. Open the command prompt as an administrator. Type "ipconfig /flushdns" and hit enter. This often resolves intermittent connection problems. Furthermore, consider manually setting Google's or Cloudflare's DNS servers in your network adapter settings. These are often more reliable than default ones.
The Final Farewell: Staying Connected
Dealing with a static IP can be frustrating. These troubleshooting steps should help you regain control of your laptop's WiFi. Remember to check your settings systematically. It may take persistence, but the solution is usually within reach. Don’t give up!
So, the next time your laptop throws a static IP tantrum, you'll be prepared. You'll know what to do. You can, in fact, conquer your digital dread. You can get back to your crucial work or your favorite streaming service. Your WiFi should work properly! Finally, happy browsing!
HP Laptop WiFi Driver Nightmare? Solved! (Download Now!)Laptop WiFi Nightmare: Static IP ONLY? FIX THIS NOW!
Hey everyone! Let's be honest, we've all been there. That sinking feeling when your laptop's WiFi decides to stage a full-blown revolt. You're staring at your screen, ready to delve into some serious work (or maybe just binge-watch your favorite show), and BAM! No internet. Then you dig a little deeper and discover the dreaded words: "static IP only." Ugh. It's the WiFi equivalent of your car refusing to start on a Monday morning. But fear not, because we're going to untangle this WiFi Gordian knot, and get you back online in no time. This isn't just a 'how-to'; it's a survival guide for the modern digital age.
The Static IP Static-uation: What's Actually Happening?
Before we dive into the fix, let's briefly decode what a static IP even is. Imagine your internet connection is like a bustling city. Every device – your laptop, your phone, your smart fridge (yes, even those!) – needs an address, a unique "street address." Usually, your router acts like the friendly city hall, handing out temporary addresses (dynamic IPs) to all the devices that connect. These are temporary, like a rental. However, a static IP is like owning property; a permanent, assigned address.
The problem? Your laptop is expecting a rental and is only getting offered a permanent one. This can happen for a variety of reasons, the most common being:
Router Configuration Issues: Sometimes, your router's settings are accidentally set to assign only static IPs or it's configured to only allow specific devices connect
Accidental Static IP Settings: You, or someone who's used your laptop before, accidentally set it up with a static IP address. Maybe while troubleshooting another problem.
Network Interference: Other devices are interfering with your machine's ability to obtain its needed address.
Software Conflicts: A faulty driver or an application is causing the issue.
Why Is My Laptop Stuck in Static IP Hell? A Deep Dive
Think of your laptop as a detective and your router as the dispatch office. The detective (your laptop) needs a dynamic IP address (a temporary badge) to access the internet. But the dispatch office (your router) is only offering a static badge (a permanent address). The detective won't connect, the laptop won't connect to wifi. So, why the static IP?
Common Culprits: Identifying the Root of the Problem
Let's get our detective hats on and pinpoint the usual suspects. We'll go through some common culprits and possible solutions.
Router Settings gone haywire: This is often the culprit. Your router, the gatekeeper of your internet connection, might be configured to only hand out static IPs. This could be intentional (for network management) or accidental.
- Solution: Access your router's configuration page (usually by typing 192.168.1.1 or 192.168.0.1 into your browser). Look for the DHCP settings (Dynamic Host Configuration Protocol). Make sure DHCP is enabled. This allows the router to automatically assign dynamic IPs. Sometimes a simple reboot of the router can fix a lot issues.
Laptop's Network Configuration: Your laptop might have been manually configured with a static IP address. Think of it as a self-imposed restriction.
- Solution: You need to revert your laptop back to automatically obtaining an IP address. We'll walk you through this step-by-step later.
Interference: Sometimes, other devices on your network are interfering.
- Solution: Rebooting your router and your laptop can often resolve this. If that doesn't work, try temporarily disabling other devices to see if it resolves the issue.
Faulty Drivers: Often an overlooked issue, but outdated or corrupted network drivers can be a problem.
- Solution: Update or reinstall your network adapter's drivers.
Step-by-Step Guide: Fixing the Static IP Nightmare
Alright, time to roll up our sleeves and get our hands dirty. Here's a breakdown of how to fix the dreaded static IP issue on your laptop.
Windows: The Familiar Territory
Open your Network and Sharing Center: In the search bar, type "Network and Sharing Center" and open it.
Change Adapter Settings: On the left side, click "Change adapter settings." This will show you your network connections.
Find Your WiFi Adapter: Right-click on your WiFi adapter (it'll likely be named something like "Wi-Fi" or "Wireless Network Connection") and select "Properties."
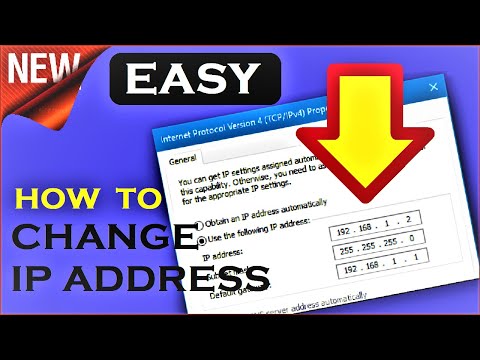
The Internet Protocol Version 4 (TCP/IPv4): In the "Properties" window, find "Internet Protocol Version 4 (TCP/IPv4)" and click on it. Then, click the "Properties" button.
The Address Assignment: Here's where the magic happens. Make sure "Obtain an IP address automatically" and "Obtain DNS server address automatically" are selected. If they aren't, select them, then click "OK."
Reboot: Restart your laptop to let the changes take effect. Hopefully, presto! Your WiFi should now connect and obtain an automatic IP.
macOS: Navigating the Apple Orchard
Open System Preferences: Click the Apple menu in the top-left corner of your screen and choose "System Preferences."
Network: Click on "Network."
Select Your WiFi Connection: In the left-hand pane, select your WiFi connection.
Advanced Settings: Click the "Advanced" button at the bottom.
TCP/IP Tab: Select the "TCP/IP" tab.
Configure IPv4: Ensure that "Configure IPv4" is set to "Using DHCP." If it's not, select it from the drop-down menu.
DNS Tab: Click the "DNS" tab. You can leave this as is, usually.
Apply and Restart: Click "OK," then "Apply." Restart your Mac.
Troubleshooting Tips: What If It's Still Not Working?
If these steps don't work immediately, don't panic. Here are some additional troubleshooting tips:
Restart Your Router: Sometimes, the problem lies with your router. Unplug it, wait 30 seconds, and plug it back in. This forces it to reset and reassign IP addresses.
Flush Your DNS Cache: A corrupted DNS cache can sometimes cause connection problems. Google "Flush DNS cache [your operating system]" for specific instructions.
Check for Network Conflicts: If you have multiple devices using static IPs, ensure they don't have the same IP address. This can create conflicts.
Contact Your ISP: If all else fails, reach out to your Internet Service Provider. They might be able to troubleshoot your router settings or identify any network-side issues.
Beyond the Basics: Advanced Troubleshooting
Sometimes, the fix isn't so straightforward.
Driver Issues: Updating Your Network Adapter
As mentioned earlier, outdated or corrupted drivers can cause a static IP problem.
- Windows: Right-click the Start button, select "Device Manager." Expand "Network adapters." Right-click your WiFi adapter and select "Update driver." Choose "Search automatically for drivers."
- macOS: MacOS usually handles driver updates automatically.
Router Firmware: Keeping it Updated
Just like your laptop, your router needs updates. Check your router manufacturer's website for firmware updates.
The Importance of Dynamic IPs: Why We Love Auto!
Why is a dynamic (automatic) IP so much better than a static one for most home users? Simple: convenience and security! Your router automatically manages the IP addresses, making it a much easier experience. Dynamic IPs also make it harder for hackers to target your home network.
The Final Words: Back to the Digital Highway
We did it! We've journeyed through the tangled web of static IPs, untangled the wires, and gotten your laptop back on the digital highway! Remember, WiFi woes are common, and with a little patience and these steps, you can troubleshoot and conquer them. You've now got the tools and the knowledge to handle this issue and more.
Principal Keywords: Laptop WiFi Static IP Fix.
SEO Headline: Laptop WiFi Stuck? Static IP? Fix It Now!
Pathway: Fix Static IP
Meta Summary: Laptop WiFi problems? Stuck with a static IP? Don't worry! This guide provides easy steps to fix your connection and get you back online.
Image Alt Text: A laptop displaying a WiFi connection problem with a static IP.
Image Caption: Fixing the dreaded static IP issue and getting back online
FAQs: Your Burning Questions Answered
What is a static IP address? A static IP address is a fixed, permanent address assigned to a device on a network.
How do I find my router's IP address? Typically, you can find it by looking at your router itself (it's often printed on a sticker). You can also try 192.168.1.1 or 192.168.0.1 in your browser.
Connect Series Setting Up A Static IP When There's No DHCP Server

By LEA Professional Connect Series Setting Up A Static IP When There's No DHCP Server by LEA Professional
Fix ethernet doesn't have a valid ip configuration issue in windows 10 Windows 11
By IT Magics Fix ethernet doesn't have a valid ip configuration issue in windows 10 Windows 11 by IT Magics
How to Change IP Address on Windows 10 8 7 100 Helpful Change IP Address Windows 10 Easy
By How to Fix Your Computer How to Change IP Address on Windows 10 8 7 100 Helpful Change IP Address Windows 10 Easy by How to Fix Your Computer

Title: Failed to Obtain IP Address From DHCP Server Solution
Channel: MDTechVideos
Failed to Obtain IP Address From DHCP Server Solution by MDTechVideos
My Laptop Work
Laptop WiFi Nightmare: Static IP ONLY? FIX THIS NOW!
Is your laptop's WiFi connection plagued by instability? Does your device stubbornly cling to a static IP address, rendering your network experience a frustrating rollercoaster of dropped connections and intermittent access? You aren't alone. Many users encounter this bewildering issue, often without understanding its root cause. We've all been there, staring at a screen, desperately trying to join a network, but encountering nothing but frustration. This guide is crafted to navigate you through the intricacies of this common problem, offering clear, actionable solutions to restore your laptop's WiFi functionality and finally banish that "static IP only" WiFi nightmare. Let's get your laptop back online, seamlessly and without constraint.
Understanding the Static IP Stalemate: Why Is This Happening?
Before we delve into solutions, understanding the potential culprits behind your laptop's static IP predicament is important. Having a grasp of the likely causes will allow us to tailor the troubleshooting process and ensure we address the root of the problem effectively. Here are the primary reasons why your laptop might be stuck with a static IP, struggling to connect to WiFi:
- Incorrect Network Configuration: The most common culprit is likely an improperly configured network setting. Perhaps a previous network setup required a static IP, and the settings haven't been adjusted for your current WiFi network. This is often the source of the problem.
- Router Conflicts: Your router might be set to assign static IPs to specific devices based on their MAC addresses, or there may be an IP address conflict. Routers frequently have such settings that can interfere with your laptop's ability to obtain an automatic IP address, resulting in the static IP problem.
- Operating System Glitches: On rare occasions, the operating system itself might experience a temporary glitch, causing it to misinterpret network settings.
- Third-Party Software Interference: Some network-management applications or VPN software can override your network settings, forcing a static IP. The software may be interfering or incorrectly configured.
- Driver Issues: Outdated or corrupted network adapter drivers can also lead to connectivity woes, potentially causing your laptop to default to a static IP.
Step-by-Step Solutions: Reclaiming Your WiFi Freedom
Now that we've identified the potential causes, let's move on to the solutions. The following step-by-step guide is designed to provide you with troubleshooting methodologies that will help you free your laptop from the static IP, enabling a more seamless and reliable WiFi experience.
1. The Obvious Check: Verifying Your Network Settings
This step should be your first line of defense. Let's double-check your network configuration to make sure everything is set up for automatic IP assignment.
Windows:
- Open Network Connections: Right-click the network icon in your system tray (bottom right corner), and select "Open Network & Internet settings."
- Change Adapter Options: Click on "Change adapter options." This will open a new window displaying all your network adapters.
- Select Your WiFi Adapter: Right-click on your WiFi adapter (generally identified by the name of your wireless network or "WiFi") and select "Properties."
- Inspect Internet Protocol Version 4 (TCP/IPv4): In the Properties window, find "Internet Protocol Version 4 (TCP/IPv4)" and double-click it, or select it and click "Properties."
- Ensure Automatic Settings: In the TCP/IPv4 Properties window, ensure that "Obtain an IP address automatically" and "Obtain DNS server address automatically" are selected. Clear anything that is not automatically set.
- Apply and Restart: Click "OK" on all the windows to save the changes. Then, restart your laptop. This step will refresh the network settings.
macOS:
- Open System Preferences: Click the Apple menu (top left corner) and select "System Preferences."
- Go to Network: Click on "Network."
- Select Your WiFi Connection: Select your WiFi connection from the list on the left.
- Configure IPv4: Click the "Advanced…" button at the bottom right. Then, select the "TCP/IP" tab.
- DHCP Configuration: Make sure the "Configure IPv4" dropdown is set to "Using DHCP." DHCP is important.
- DNS Settings: In the "DNS" tab, remove any manually entered DNS servers. You can add Google's DNS addresses again later (8.8.8.8 and 8.8.4.4) if you wish but they should not be the problem.
- Apply and Restart: Click "OK"and then "Apply." Restart your laptop.
2. Router Reset: Clearing the Cobwebs
Sometimes, the issue lies with the router itself. A simple reset can often resolve temporary glitches or configuration errors.
- Locate the Reset Button: Most routers have a recessed "reset" button. It's usually located on the back or side of the router.
- Press and Hold: Using a paperclip or similar object, press and hold the reset button for about 15-30 seconds.
- Allow the Router to Reboot: Release the button and wait for the router to fully reboot. This process can take a few minutes.
- Reconnect Your Laptop: After the router restarts, try reconnecting your laptop to WiFi. Check the IP address assigned to your laptop.
If the reset does not work, consult your router's manual for more advanced troubleshooting steps.
3. The IP Address Release/Renew Cycle: A Network Refresh
This method forces your laptop to request a new IP address from the router, potentially resolving any IP address conflicts.
Windows:
- Open Command Prompt: Type "cmd" in the Windows search bar, right-click "Command Prompt," and select "Run as administrator."
- Release the IP: Type
ipconfig /releaseand press Enter. This releases your current IP address. - Renew the IP: Type
ipconfig /renewand press Enter. This requests a new IP address from your router. - Check Your Connection: Once the process is complete, check if your laptop is connected to the network.
macOS:
- Open Terminal: Open "Terminal" (found in Applications > Utilities).
- Release and Renew the IP: Type
sudo ipconfig wait(this command may vary slightly depending on your macOS version; check online if you encounter an error). This will release and then renew your IP address. You may be prompted for your administrator password. - Check Your Connection: Once complete, try reconnecting to your WiFi.
4. Driver Updates: Keeping Things Fresh
Outdated or corrupted network adapter drivers can cause all sorts of connectivity issues. Ensuring your drivers are up-to-date is a crucial step.
Windows:
- Open Device Manager: Right-click on the Start button and select "Device Manager."
- Expand Network Adapters: Expand the "Network adapters" category.
- Update the Driver: Right-click on your WiFi adapter (again, likely identified by its name) and select "Update driver."
- Choose Automatic Search: Select "Search automatically for drivers." Windows will search for the latest drivers.
- Manual Update (if automatic fails): If the automatic method does not work, you can visit the manufacturer's website for your laptop or network adapter. Download and install the latest drivers from there.
macOS:
macOS generally handles driver updates automatically through system updates. However, if you have recently upgraded your operating system, it's a good idea to confirm that your WiFi driver is compatible. Visit Apple's support pages or search online to see if there are indications of driver issues and how to resolve them.
5. Third-Party Application Interference: The Culprit Exposed
If you use any network management software, VPNs, or other applications that might be interfering with your network settings, consider temporarily disabling them to see if they are the problem.
- Identify Potential Interfering Software: Think about any software you've installed recently that relates to network management or security.
- Disable or Uninstall: Temporarily disable or uninstall the suspected software.
- Test Your WiFi: Test your WiFi connection after disabling the software to see if the static IP issue is resolved.
- Investigate Alternatives: If the software is necessary, explore its settings to ensure it is not forcing a static IP.
6. Network Troubleshooting Tools: Diagnosing the Deep Issues
Both Windows and macOS offer built-in network troubleshooting tools that can sometimes pinpoint the underlying cause of the problem.
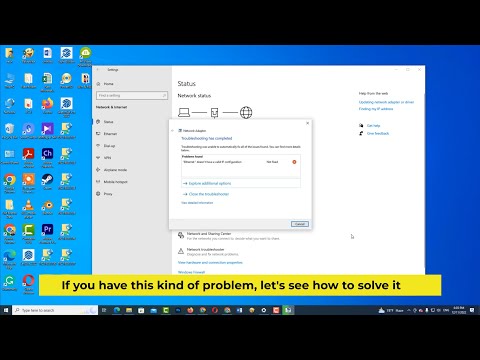
Windows:
- Run the Network Troubleshooter: Right-click on the network icon (system tray) and select "Troubleshoot problems."
- Follow the Prompts: Windows will automatically diagnose the issue and suggest solutions. Often, the network troubleshooter will resolve basic problems.
macOS:
- Use Network Diagnostics: In System Preferences > Network, select your WiFi connection.
- Run Diagnostics: Click the "Assist Me" button and follow the prompts.
Advanced Solutions: When the Basics Aren't Enough
If the above steps don't resolve the static IP issue, more
