hdmi wifi and bluetooth not working on laptop

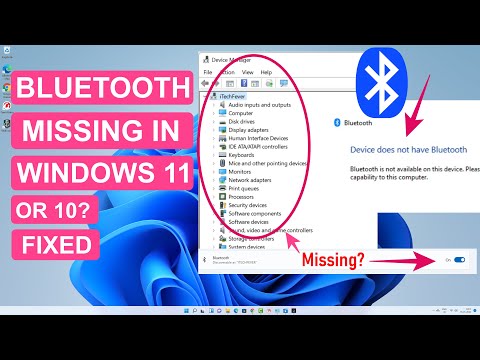
Title: Fix Your Bluetooth Not Working On Windows 10 or 11
Channel: RTC Tutorials
Fix Your Bluetooth Not Working On Windows 10 or 11 by RTC Tutorials
HDMI, WiFi, & Bluetooth DEAD? Laptop Fix SHOCKER!
Laptop Tech Troubles: Is Your Wireless World Crashing Down?
Ever felt that heart-stopping moment? Your laptop screen flickers, the Wi-Fi icon mocks you, and suddenly, the world shrinks. You are no longer connected. Moreover, the HDMI port seems dead. Is this a sign of impending doom for your beloved machine? Well, breathe easy. Consequently, this isn't always a complete system failure. So, let's dissect what might be happening.
The Wireless Web: A Sudden Silent Scream
First things first. Your Wi-Fi is your lifeline. It connects you to the world. When it goes silent, panic often sets in. However, it’s often something relatively simple. Furthermore, consider your router. Is it powered on? Check the lights; ensure everything is working correctly. Indeed, sometimes the most basic solutions are the best. Consider restarting your router, too. That often does the trick.
Alternatively, your laptop itself could be the culprit. Have you accidentally disabled Wi-Fi through a function key? Verify that the wireless adapter is enabled in your network settings. Also, drivers can cause problems. Outdated or corrupted drivers can shut down your wireless connection.
HDMI Hang-Ups: Picture Problems & Possible Fixes
Now, what about that HDMI port? It's essential for connecting to larger screens. After all, you want to watch movies or present your work. A non-functioning HDMI port can be intensely frustrating, and for a good reason. However, don't immediately assume the worst. Therefore, start with the basics.
Are you using the right HDMI cable? Try a different cable. Moreover, ensure the cable is securely connected to both your laptop and the external display. Also, confirm the external display is on. So, check the input settings on your external monitor or TV. Ensure the HDMI input is selected.
Bluetooth Blues: The Unseen Wireless Villain
Bluetooth, seemingly invisible, allows you to connect devices seamlessly. It is essential for your wireless headphones and accessories. A malfunctioning Bluetooth can disrupt your workflow. Is your Bluetooth switched on? Check the settings on your laptop. Furthermore, make sure your desired device is discoverable.
Additionally, similar to Wi-Fi, driver issues can affect Bluetooth. Thus, updating your Bluetooth drivers is a good idea. This could resolve your connection troubles. If nothing works, consider removing and re-pairing the device.
Decoding the Diagnosis: A Step-by-Step Approach
Troubleshooting laptop issues can feel daunting. Hence, following a structured approach can bring clarity. Start by identifying which component is failing. Is it Wi-Fi, HDMI, or Bluetooth? After defining the affected areas, begin with the simplest checks.
Rebooting your laptop is always a good first step. Next, inspect all the physical connections. Furthermore, focus on drivers. Are they up-to-date? However, consider the possibility of hardware failure. For example, a damaged port is rarely repairable.
When to Call for Backup: Seeking Professional Help
While many issues are fixable, some require expert intervention. If you've tried the troubleshooting steps, it might be time to seek professional help. If a port is truly dead, repair services may be necessary. Also, software issues can overwhelm the average user.
Moreover, a technician can diagnose the specific cause. They possess the tools and expertise. They can repair or replace damaged components. They can also provide tailored solutions. Do not hesitate to seek the advice of an expert.
Prevention is Key: Protecting Your Laptop’s Health
Preventative measures can significantly extend the life of your laptop. Therefore, adopt a few simple practices. Firstly, protect your laptop from physical damage. Avoid dropping it, and use a protective case. Secondly, keep your laptop away from liquids.
Also, ensure your laptop has adequate airflow. Don't block the vents. Moreover, regularly update your software and drivers. This maintains optimal performance. Finally, install reliable antivirus software.
The Bottom Line: Staying Connected in a Digital World
Laptop problems are undoubtedly common. Don't panic when faced with apparent tech failures. You can often resolve issues with simple troubleshooting steps. Consequently, embrace the process. Furthermore, remember to stay calm. You can often fix it yourself.
However, don't hesitate to seek help if necessary. Consequently, stay connected. Your laptop is a vital tool for a connected world. So, take care of it. With a little knowledge, you can get back online. You can continue to enjoy your digital life.
HP Laptop WiFi Nightmare? This Adapter's the ONLY Fix!HDMI, WiFi, & Bluetooth DEAD? Laptop Fix SHOCKER!
Alright, tech adventurers, let's dive headfirst into a problem that sends shivers down every laptop owner's spine: a sudden digital blackout. Imagine this – you're ready to stream your favorite show, connect to that crucial presentation, or finally clear your inbox, and BAM! Your HDMI, WiFi, and Bluetooth decide to take a permanent vacation. Sound familiar? If it does, consider this article your ultimate guide to resurrecting your connection-challenged laptop! We're not just talking about the usual suspects here; this is about uncovering the sneaky culprits and, more importantly, getting you back online, fast. Forget the generic troubleshooting guides; we're going deep, offering solutions you won't find elsewhere.
1. The Digital Dark Ages: When Your Laptop Goes Silent
First things first, let's paint a picture. You're staring at a blank screen when you try to project that epic documentary. The WiFi indicator is stubbornly blank, and your headphones refuse to connect. This isn't just a minor inconvenience; it's a digital crisis! This situation, where HDMI, WiFi, and Bluetooth simultaneously fail, is a red flag. It screams of deeper underlying issues that require immediate attention. We need to understand the potential root causes.
2. Common Culprits: The Usual Suspects of Connectivity Chaos
Before you start ripping your hair out, let's identify some of the usual suspects. These are the common demons causing our tech troubles. Think of them as the internet gremlins:
- Driver Issues: Outdated, corrupted, or simply missing drivers. This is the most frequent villain! Imagine drivers as the translators between your laptop's hardware and its software. When the translators go on strike… well, you get the picture.
- Hardware Failures: A damaged HDMI port, a blown WiFi card, or a faulty Bluetooth module. Sometimes, these are physical issues, needing physical solutions.
- Software Conflicts: Conflicts between your operating system and other installed programs. It's like a traffic jam on the information superhighway.
- Operating System Glitches: A corrupted operating system can wreak havoc on your laptop's functions. Imagine your OS as the conductor of an orchestra; if the conductor loses their baton… chaos ensues.
3. Power Cycling: The Digital Restart Button
Before we get surgical, let's start with the basics. Think of power cycling as the digital equivalent of "turning it off and on again." It often works miracles. Here's how:
- Shut Down Completely: Don't just close the lid; perform a full shutdown.
- Unplug Everything: Disconnect the power adapter, any external devices (mouse, keyboard, etc.).
- Hold the Power Button: Press and hold the power button for a full 30 seconds a minute. This empties the residual power in the capacitors.
- Reconnect and Restart: Plug everything back in and fire up your machine.
This simple act can often clear minor glitches and reset the system. Consider this the digital equivalent of taking a deep breath before a stressful situation.
4. Driver Detective Work: Updating and Reinstalling
This is where things get technical, but fear not; we'll keep it simple. Driver issues are extremely common and often the primary cause of our predicament.
- Check Device Manager: Open Device Manager (search for it in the Windows search bar). Look for any devices with a yellow exclamation mark or red X - those are your trouble spots.
- Update Drivers: Right-click on the problematic devices and choose "Update driver." Let Windows search for the latest drivers automatically.
- Reinstall Drivers: If updating doesn't work, try uninstalling the device and then reinstalling it.
- Manufacturer's Website: If Windows can't find the correct drivers, go to the manufacturer's website (e.g., Dell, HP, etc.) and download the drivers for your specific laptop model.
Think of drivers as little instruction manuals for your hardware. Without the correct manual, things may be at a standstill.
5. Hardware Hurdles: Assessing the Physical Damage
If updating drivers doesn’t cut it, we need to consider what is damaged.
- HDMI Port: Use a different HDMI cable and try connecting to a different display. If that doesn't work, the port might be damaged.
- WiFi Card: If the WiFi still doesn’t work, the WiFi network card may have gone defunct.
- Bluetooth Module: similarly, a Bluetooth module may be damaged.
If any hardware components are damaged, this will most likely mean a visit to a repair shop.
6. The WiFi Whisperer: Troubleshooting Wireless Woes
WiFi problems are notoriously tricky. Here's how to get your wireless back on track:
- Check the Physical Switch: Many laptops have a physical switch (often on the side or front) to turn WiFi on/off. Make sure it's on.
- Troubleshoot the Network: Use the Network Troubleshooter built into Windows. It can often identify and resolve common issues.
- Router Reset: Sometimes, the problem isn't your laptop but your router. Restart your router and modem.
- Network Adapter Reset: In Device Manager, uninstall your network adapter, then restart your computer. Windows will reinstall it automatically.
- Check Network Settings: Ensure your WiFi is enabled in your laptop's network settings.
7. Bluetooth Blues: Connecting to the Wireless World
Bluetooth is the unsung hero of connectivity until it ceases to function. Here’s the checklist:
- Ensure Bluetooth is Enabled: Activate Bluetooth in your laptop's settings.
- Pairing Mode: Put your device (headphones, speakers, etc.) in pairing mode.
- Check for Interference: Bluetooth signals can be disrupted by other devices. Try moving your laptop and the Bluetooth device closer to each other.
- Remove and Re-Pair: Delete the device from your Bluetooth settings and re-pair it.
8. Software Showdowns: Identifying and Resolving Conflicts
Software conflicts can be a major pain. Let's address them:
- Recent Installations: Did the problem start after you installed a new program? Uninstall it.
- Startup Programs: Too many startup programs can slow down your system and cause conflicts. Use the Task Manager to disable unnecessary startup items.
9. Operating System Overhaul: The Nuclear Option (Use with Caution)
Sometimes, it's the operating system itself that's the problem.
- System Restore: If the problem started recently, try using System Restore to revert your computer to a previous state.
- Factory Reset: As a last resort, you may need to perform a factory reset. Warning: This will erase all your data, so back everything up first!
10. The Heat Is On! Overheating as a Cause
Laptops are notorious for overheating. Prolonged heat exposure can damage components:
- Check Ventilation: Make sure the vents on your laptop aren't blocked.
- Clean Fans: Dust can accumulate and block the fans. Consider cleaning them (carefully!).
- External Cooler: If you use your laptop for heavy-duty tasks, consider using an external cooling pad.
11. HDMI Hijinks: Displaying Your Data
Many people rely on HDMI. Here are a few things you can try.
- Check the Cables: Swap out your HDMI cables to ensure the cable is working and is not defective.
- Check the Display: Try connecting to a different display to ensure the display itself is working.
- Port Damage: Physical damage to the HDMI port on your laptop is a common occurrence.
12. BIOS Blues: A Deep Dive into Your Hardware (Advanced Users Only)
Accessing your BIOS is an advanced approach.
- Restart and Enter BIOS: Restart your laptop and access BIOS during startup.
- Check Settings: In the BIOS, check for settings related to your onboard hardware.
- Factory Default: As a final resort, revert to the default BIOS settings.
13. When to Call the Tech Cavalry: Seeking Professional Help
Sometimes, the problem is beyond our DIY capabilities.
- No Progress: If you've tried everything and still have problems, it's time to call in the experts.
- Hardware Damage: If you're certain your hardware is damaged, don't risk further damage.
- Data Loss Prevention: If you have important data, bring it to a professional so they can extract the data before working.
14. Preventing Future Headaches: Proactive Maintenance
Preventing problems is always better than fixing them.
- Regular Updates: Keep your drivers and operating system up-to-date.
- Clean Regularly: Keep your laptop clean to prevent overheating.
- Safe Usage: Use your laptop in a well-ventilated area and avoid extreme temperatures.
15. From Digital Blackout to Bright Screen: Reclaiming Your Connectivity
We've covered a lot of ground! From simple restarts to detailed driver troubleshooting, we've armed you with the knowledge to tackle those frustrating connectivity issues. Remember, patience, and a methodical approach are your best allies. Don't be afraid to experiment but always back up your data! Get back online,
Lenovo WiFi OFF: The Easiest Trick EVER!Fix Bluetooth Not Showing In Device Manager On Windows 11 & 10 - Get Missing BT
By Sandeep Singh Fix Bluetooth Not Showing In Device Manager On Windows 11 & 10 - Get Missing BT by Sandeep Singh
Bluetooth is Not Working Connecting to MobileHeadphoneSpeaker - How to Solve Bluetooth Issues

By FIXsage Bluetooth is Not Working Connecting to MobileHeadphoneSpeaker - How to Solve Bluetooth Issues by FIXsage
How to Fix Bluetooth Not Showing or Working or Couldn't Connect in Windows 10 or 11

By RTC Tutorials How to Fix Bluetooth Not Showing or Working or Couldn't Connect in Windows 10 or 11 by RTC Tutorials
Title: PC BLUETOOTH NOT WORKING pcrepair pc gamingpc pcgaming egirl gamerguy howtotech
Channel: GamerTechToronto
PC BLUETOOTH NOT WORKING pcrepair pc gamingpc pcgaming egirl gamerguy howtotech by GamerTechToronto
Wifi Not Found
The title I have chosen for the article is : "Unleash Your Inner Artist: Mastering Oil Painting Techniques for Beginners"
Unleash Your Inner Artist: Mastering Oil Painting Techniques for Beginners
The allure of oil painting is timeless. The depth of color, the subtle gradations of light and shadow, the ability to blend and manipulate paint over extended periods – these qualities have captivated artists for centuries. If you harbor a desire to create, to translate the world around you onto a canvas, then oil painting offers a rich and rewarding journey. This guide provides a comprehensive roadmap for beginners, equipping you with the foundational knowledge and techniques to embark on your artistic exploration. Forget intimidation; embrace the process, and watch your skills blossom.
Essential Materials: Your Toolkit for Success
Before you even think about touching a brush to canvas, you must gather the right tools. The quality of your materials directly impacts the outcome of your work. Skimping on these essentials will inevitably lead to frustration and subpar results. Consider these items as investments in your artistic future.
Oil Paints: Begin with a limited palette. Cadmium Red, Alizarin Crimson, Ultramarine Blue, Cerulean Blue, Cadmium Yellow, Yellow Ochre, Titanium White, and Ivory Black provide a solid base for mixing a vast range of colors. Opt for student-grade paints initially; they’re more affordable and offer good performance. As you gain experience, you can explore artist-grade paints for their higher pigment concentration and richness. Familiarize yourself with the properties of each pigment. For example, Cadmium colors are opaque and vibrant, while Alizarin Crimson is transparent and ideal for glazing techniques.
Brushes: A variety of brush shapes and sizes is crucial. Round brushes are excellent for detail work and creating fine lines. Filbert brushes offer a combination of control and blending capabilities. Flat brushes are perfect for broad strokes, blocking in areas of color, and creating crisp edges. Consider purchasing a mix of synthetic and natural-hair brushes. Synthetics are durable and easy to clean and suited for acrylics, while natural hairs (such as sable or hog bristle) excel when used with oils. Maintain your brushes diligently; clean them thoroughly after each painting session with solvent and brush cleaner to prevent paint buildup.
Canvases or Painting Surfaces: Choose a primed canvas, canvas board, or panel. Consider the size and shape appropriate for your paintings. For beginners, smaller canvases are more manageable. Gesso-primed surfaces provide an excellent ground for oil paints. Experiment with different textures; a smoother surface is great for detail work, while a textured surface can add visual interest. Ensure your canvas is stretched tautly, or your panel is rigid and warp-resistant.
Solvents and Mediums: Turpentine or odorless mineral spirits (OMS) are used for thinning paint and cleaning brushes. OMS is preferred because of its lower toxicity and is the recommended solvent. Linseed oil is a common medium that enhances gloss, increases the flow of paint, and slows drying time. Stand oil provides a more viscous consistency and can also increase gloss and leveling of the paint. Use both solvents and mediums in moderation.
Palette: A disposable palette, such as a tear-off paper palette, simplifies cleanup. Glass palettes are easy to clean and reuse, but you must thoroughly remove dried paint. Consider a palette knife for mixing, and for applying thick layers of paint (impasto).
Easel: A sturdy easel is essential. An adjustable easel allows you to work at different angles, and an upright easel will reduce eye strain.
Other Essential Supplies: Rags or paper towels for wiping brushes and cleaning your palette. A palette knife for mixing and applying paint. A pencil for sketching your initial composition. A container for your solvent and a separate container for your medium.
Understanding the Fundamentals: Color Theory and Composition
Before you apply paint to the canvas, a solid grasp of color theory and composition is crucial. These are the building blocks of a successful painting.
Color Theory: The color wheel is your guide. Learn about primary colors (red, yellow, blue), secondary colors (orange, green, violet), and tertiary colors (combinations of primary and secondary colors). Understand the concepts of color temperature (warm and cool colors), complementary colors (colors opposite each other on the color wheel), and analogous colors (colors adjacent to each other). Experiment with mixing colors to achieve various shades and tones. Learn about hue, value (lightness and darkness), and chroma (intensity). Practice mixing colors to match specific references.
Composition: Composition refers to how you arrange the elements within your painting to create a visually pleasing and balanced image. Consider these basic principles:
Rule of Thirds: Divide your canvas into nine equal parts using two equally spaced horizontal and two equally spaced vertical lines. Place key elements of your composition along these lines or at their intersections for a more dynamic and engaging image.
Leading Lines: Use lines (real or implied) to guide the viewer's eye through the painting.
Balance: Create a sense of equilibrium within your painting. This can be symmetrical, asymmetrical, or radial.
Contrast: Use contrast (light vs. dark, warm vs. cool colors, large vs. small shapes) to create visual interest and emphasize focal points.
Perspective: Understand linear perspective (creating the illusion of depth using converging lines) and atmospheric perspective (using color and value to create the illusion of distance)
Mastering Oil Painting Techniques: Step-by-Step Guide
Now that you have assembled your materials and learned the fundamentals, it’s time to put paint to canvas. Start with these essential techniques:
Sketching and Underpainting: Before applying paint, sketch your composition lightly onto the canvas using a pencil. This gives you a roadmap for your painting. A monochrome underpainting (typically in a neutral color like burnt sienna or raw umber) can help establish values and composition before applying color. This initial layer also helps to block in the shadows and lights. The underpainting acts as a crucial foundation for subsequent layers of color.
Blocking In: After sketching and underpainting, block in the large shapes and areas of color. Use thin layers of paint (thinned with solvent) to establish the basic color relationships and values. Don’t worry about detail at this stage; focus on the overall composition.
Layering (Glazing and Impasto): Oil painting thrives on layering. Build up your painting gradually by applying multiple layers of paint.
Glazing: Apply thin, transparent layers of paint over a dried underlayer. Glazes modify the color and create depth and luminosity. Allow each layer to dry completely before applying the next.
Impasto: Apply thick layers of paint for a textured effect. This technique adds visual interest and a sense of physicality to your painting. The paint is applied directly from the tube or with a palette knife. The texture adds depth and creates highlights.
Blending: Oil paints blend seamlessly, which allows for subtle transitions in color and value. Use a soft brush and gentle strokes to blend colors together. Consider blending wet-into-wet, while the paint is still drying, or wait for the underlying layer to dry before blending on top.
Details and Finishing Touches: Refine your details once the foundational layers have dried. Add highlights, shadows, and small details to bring your painting to life. Consider the overall visual balance and make any necessary adjustments. Evaluate the light and shadow, refine edges, and address any areas that need more attention.
Troubleshooting Common Challenges: Tips and Tricks
Even experienced artists encounter challenges. Here are some solutions to common problems:
Paint Too Thick: Thin your paint with solvent or medium to improve its flow and make it easier to blend.
Paint Too Thin: Use a thicker medium to increase the viscosity of your paint. Avoid applying too much solvent, which can weaken the paint film.
Uneven Surface: Ensure your canvas is properly primed and stretched. If necessary, apply multiple thin layers of paint, allowing sufficient drying time between each.
Colors Look Muddy: Avoid overmixing colors. Clean your brushes frequently. Be mindful of color temperature and value relationships. Ensure that the underlying layers of paint have dried completely to avoid mixing colors that cause a muddy appearance.
Paint Smearing: Wait for the paint to dry or use a workable fixative.
Brushstrokes Too Visible: Experiment with different brush types, sizes, and stroke techniques. Vary the pressure applied to the brush. Blend wet-into-wet to soften brushstrokes.
Practice and Patience: The Keys to Mastery
Oil painting is a journey, not a destination. The more you practice, the better you’ll become. Embrace the process, experiment with different techniques, and don’t be afraid to make mistakes.
Practice Regularly: Consistency is key. Dedicate time each week to paint.
Study the Masters: Analyze the work of renowned oil painters. Observe how they used color, composition, and technique.
Paint from Life: Painting from life (real objects and landscapes) is an excellent way to develop your observational skills.
Experiment: Don’t be afraid to try different techniques and styles.
Seek Feedback: Share your work with other artists. Get constructive criticism.
Learn from Your Mistakes: Analyze your work and identify areas for improvement. Learn from each painting and strive to exceed your own expectations. Keep a journal to analyze progress.
Embrace the "Happy Accidents": Unexpected results or errors can often lead to great discoveries.
Oil
