laptop wifi antenna repair

Title: Laptop wifi antenna repair Perth
Channel: cirrus Link Repair
Laptop wifi antenna repair Perth by cirrus Link Repair
laptop wifi antenna repair, laptop wifi antenna replacement, laptop wifi antenna broken, laptop wifi antenna cable repair, laptop wifi antenna connector broken, dell laptop wifi antenna replacement, hp laptop wifi antenna replacement, do laptop wifi antennas work, how to fix wifi antenna on laptop
Laptop WiFi Antenna: DEAD? FIX IT YOURSELF! (Easy Guide)
Laptop WiFi Woes: Conquer That Dead Antenna!
Ah, the dreaded dead Wi-Fi! That feeling when your laptop stubbornly refuses to connect is frustrating, isn't it? You're itching to get online, but the signal is nowhere to be found. The good news? Often, that stubborn Wi-Fi dropout isn’t a death sentence. Instead, you can often fix it yourself. So, let’s dive in and resurrect your laptop's wireless connection.
Is Your WiFi Actually Dead? The Initial Checkup.
Before you dismantle anything, first, confirm the problem. Check that WiFi is even enabled on your laptop. Look for the little WiFi icon in your system tray. Is it grayed out or showing a red ‘X’? If so, ensure the WiFi switch on your laptop is flipped on. That tiny switch on the side or front might be the culprit too! Sometimes, a simple restart can work wonders. So, give your laptop a reboot. This process often resolves minor glitches.
Digging Deeper: Diagnosing the Antenna Dilemma
If a restart didn’t do the trick, then we need to troubleshoot. Next, it’s time to consider your laptop’s internal components. The Wi-Fi antenna, the often overlooked hero, might be the issue. But how can you tell? Here’s where a little detective work comes in.
First, consider your location. Are you far from your router? Walls and other obstructions reduce the signal strength. Consequently, try moving closer to the router. Then, check other devices. Do other devices in your home connect seamlessly to the internet? If so, the issue is likely specific to your laptop.
The Hardware Hustle: A Look Inside Your Laptop
Okay, let's get hands-on. Don't panic! This isn't as scary as it sounds. The key here is to proceed with caution. Ensure your laptop is powered off and unplugged from the charger. Now, locate the service panel. This is usually a small panel on the bottom of your laptop. It’s secured by screws. Use a small screwdriver to remove these screws. Then, carefully remove the panel.
Unleashing the Antenna's Potential: What to Look For
Now that you have the service panel open, you'll likely see the Wi-Fi card. It's a small circuit board, usually located near the edge of your laptop. In fact, the antenna wires connect to this card. These are delicate wires, and they might be loose.
Carefully inspect the connections. Look for any loose wires or disconnected connectors. If you find a loose connection, gently reseat it. Make sure it's firmly in place. Sometimes, simply wiggling the wires back into position solves the problem miraculously!
Antenna Alternatives: Exploring External Options
What if the internal fix doesn’t work? What if the antenna issues persist? Don't despair. Consider external options. A USB Wi-Fi adapter is a simple solution. It plugs directly into a USB port. These are inexpensive and often provide significant signal boosts.
Some adapters also offer enhanced features. For example, they may support newer Wi-Fi standards. Also, consider a range extender. It's designed to amplify the signal. This extends the reach of your Wi-Fi network, thereby improving connectivity.
Software Solutions: Optimizing Your Connection
Sometimes, the problem is not hardware-related. Driver issues or software conflicts can hinder your connection. Therefore, it is crucial to troubleshoot software too.
First, update your Wi-Fi drivers. Go to your laptop manufacturer's website. Then, download the latest drivers for your model. Install them, and restart your laptop. Moreover, run a network troubleshooter. Windows and macOS have built-in troubleshooters. These automatically detect and fix common connection problems. Then, a system reset can also resolve software conflicts. However, backup your data before attempting a reset.
Preventative Measures: Keeping Your Wi-Fi Happy
Want to avoid future Wi-Fi woes? You can take preventative measures.
Keep your laptop clean. Dust buildup can impede Wi-Fi performance. Periodically clean the vents. This allows for better heat dissipation. Position your laptop strategically. Avoid placing it near metal objects. Metal interferes with radio signals. Furthermore, secure your Wi-Fi network. Use a strong password and encryption to prevent unauthorized access.
Final Thoughts: Reclaiming Your Wireless Freedom
So there you have it! You've got several strategies to try. From simple checks to hands-on repairs, solutions exist! It can seem daunting. But you can often fix that dead laptop antenna yourself. Following these steps boosts your chances of success. Therefore, grab your screwdriver, and prepare to reclaim your wireless freedom. Your laptop (and your sanity) will thank you! Good luck.
WiFi Nightmare! I Accidentally Turned Off My Laptop's Internet!Laptop WiFi Antenna: DEAD? FIX IT YOURSELF! (Easy Guide)
Hey tech-savvy friends! Ever stared at your laptop screen, gnawing at your nails because your WiFi just vanished? One minute you're streaming your favorite show, the next – poof – no internet. The dreaded 'no internet connection' message pops up, and you're stranded. Before you resign yourself to a tech support call or, gasp, buying a whole new laptop, let's talk about a common culprit: the laptop WiFi antenna. It might be dead, but often, we can bring it back to life! This isn't rocket science, I promise.
1. The WiFi Woes: When Your Internet Goes AWOL
We've all been there. That moment of panic when you realize you're disconnected from the digital world. Maybe your WiFi icon has a little red X through it, or perhaps the available networks simply aren't there. Before you blame your ISP or your router, let's consider the unsung hero behind your internet connection: your laptop's WiFi antenna. Think of it as the ears of your laptop, listening for the signals that bring the internet to you. If those ears aren't working, well, silence.
2. Understanding the Enemy: What Exactly IS a Laptop WiFi Antenna?
Imagine a tiny, sensitive antenna nestled inside your laptop's lid and/or base, tirelessly working to pick up those precious WiFi signals. It’s like a radio receiver, tuning into the right frequency. Some laptops have a single antenna; others, like my own, have multiple to improve range and speed. These antennas are typically connected to the WiFi card through tiny, delicate wires. Like any electronic component, they can fail. They can break, become disconnected, or simply get overwhelmed by interference.
3. Diagnosis 101: Spotting the Symptoms of a Dead Antenna
Before diving into the repair, we need to confirm the diagnosis. Is it really your WiFi antenna? Let's run through some common symptoms.
- No WiFi Signals Detected: This is the most obvious sign. Your laptop simply can’t see any available WiFi networks. It's like being in a room full of people chatting, but you can't hear a word.
- Weak or Intermittent Connection: If you do occasionally connect, but the signal is weak, drops frequently, or the speeds are agonizingly slow, your antenna might be struggling. Think of it as a struggling lighthouse, barely able to shine its light through the fog.
- Constant Dropping of Connection: Are you getting kicked off the internet every few minutes, even when you're close to the router? The antenna could be intermittently failing.
- Error Messages: Sometimes, your laptop will helpfully display an error message related to network connectivity, indicating a problem.
4. The First Line of Defense: Quick Checks and Troubleshooting
Hold up! Before you start tearing things apart, let's try some simple fixes. Sometimes, the solution’s as easy as a nudge in the right direction. We've all been there, haven't we?
- Restart Your Laptop: This can clear up all sorts of weird glitches. It’s like hitting the "reset" button for your laptop's brain.
- Check the WiFi Switch: Some laptops have a physical switch to enable or disable WiFi. Make sure it's on. This is usually a small switch on the side or front of the laptop. Feel pretty embarrassed when this happens to me!
- Run the Windows Troubleshooter: Windows has a built-in troubleshooter for network problems. Right-click the WiFi icon in the system tray (bottom right corner of your screen) and select "Troubleshoot problems." It might just magically fix the issue.
- Restart Your Router and Modem: Similar to restarting your laptop, this can clear up network congestion and refresh the connection. Turn both devices off, wait a minute, and then turn the modem on first, followed by the router.
- Update Your WiFi Drivers: Outdated drivers can cause all sorts of problems. Go to your device manager, find your network adapter, and update the drivers. It's like giving your laptop's ears a hearing test!
5. Diving Deeper: Opening Up Your Laptop (Proceed with Caution!)
If the quick fixes don't work, it's time to go deeper. Disclaimer: Opening your laptop can void your warranty. Proceed at your own risk. But hey, we're here to help, eh?
- Gather Your Tools: You’ll need a small Phillips head screwdriver, maybe a plastic pry tool and, possibly, a set of anti-static wrist straps. And a clean, well-lit workspace. A magnetic mat can be super helpful for keeping track of screws.
- Power Down and Disconnect: Completely power down your laptop and unplug it from the power source. Remove the battery if possible. Safety first!
- Find the Access Panel: The specific location of the antenna varies by laptop model. Google your model number + "WiFi antenna replacement" to see if there are any helpful videos!
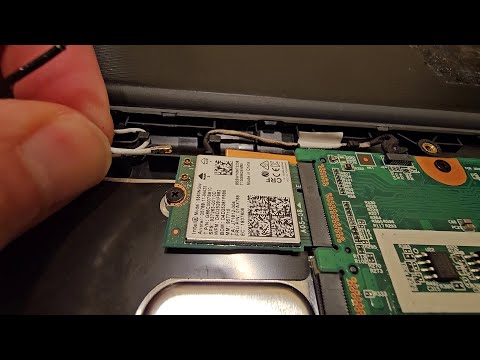
6. Exposing the Culprit: Locating the WiFi Antenna
Once you've removed the access panel (or, on some laptops, the entire bottom panel), gently look for the WiFi card. It's usually a small, rectangular card that's held in place by a screw or clip. The antenna wires will connect to this card.
- Where to Look: The antenna wires usually run from the WiFi card to the edges of the laptop screen or around the base of the laptop. They are often embedded within the display bezel or attached to the plastic frame around the screen.
- Identify the Wires: The wires are very thin and delicate, usually with tiny connectors that snap onto the WiFi card. They're often black and white, or sometimes in shades of gray.
7. The Wire Whisperer: Checking the Antenna Connections
Carefully inspect where the antenna wires connect to the WiFi card. Make sure they are securely connected. If they are loose, gently snap them back into place. They are often marked with labels such as "MAIN," "AUX," or "ANT." Ensure they are in the correct ports.
8. Inspecting the Wires: Looking for Damage or Disconnection
Follow the antenna wires as far as you can, looking for any signs of damage. Are they pinched, frayed, or broken? Are the connectors at the end still attached properly to the antenna itself?
- Look for Pinching: Examine the wires where they pass through hinges or tight spaces. They might be pinched or crushed.
- Check the Connectors: Gently wiggle the connectors where the wires attach to the antenna, to make sure they're secure.
9. The Antenna Itself: Physical Inspection
The antenna might be integrated within the screen bezel, around the laptop's edges, or have a separate small module. Inspect them for damage. Are they intact? No cracks, breaks, or other physical defects?
10. Reconnecting and Reassembly: Putting Everything Back Together
If you found and fixed any loose connections or damaged wires, carefully reassemble your laptop. This is essentially the reverse of the disassembly process.
- Secure the WiFi Card: Replace any screws or clips that held the WiFi card in place.
- Route the Cables Correctly: Ensure the antenna wires are routed properly, avoiding any pinch points.
- Close Up the Access Panel: Carefully replace the access panel or bottom cover, making sure all screws are in place.
11. Power Up and Test: The Moment of Truth!
Plug the power back in and power on your laptop. Cross your fingers!
- Check the WiFi Icon: Does the WiFi icon look happy again, without a red X?
- Connect to Your Network: Select your WiFi network and enter your password.
- Test the Connection: Browse the internet, stream a video, or download a file. Are the speeds good? Success!
12. When DIY Isn't Enough: Considering Professional Help
If, after all this, your WiFi antenna still refuses to cooperate, it might be time to call in the experts.
- A More Complex Problem: The issue could be with the WiFi card itself, the motherboard, or another component.
- Professional Repair: A qualified computer repair technician can diagnose and fix more complex issues. They have the tools and expertise to deal with intricate components.
13. Antenna Replacement: A Last Resort Fix
If the antenna is indeed damaged, you can replace it. This generally involves buying a replacement antenna and carefully connecting it to the wires. Again, I recommend searching for videos specific to your laptop model.
14. Keeping It Healthy: Preventing Future WiFi Woes
Once your WiFi is up and running, let's prevent this from happening again.
- Avoid Physical Damage: Be careful when opening and closing your laptop lid. Don't drop it!
- Keep it Clean: Dust and debris can affect performance. Clean your laptop's vents regularly.
- Minimize Interference: Keep your laptop away from other electronic devices that could interfere with the WiFi signal.
15. The Bottom Line: Empowering Yourself!
Fixing a dead laptop WiFi antenna can seem daunting, but it’s often a straightforward process. By following these steps, you can troubleshoot the problem, diagnose the issue, and
Unleash Your Laptop's Wi-Fi Speed: The BEST Intel Card (2024)Penghapusan Antena Nirkabel Seri Lenovo G50 Z50 - Penggantian

By Lenovo ideapad Penghapusan Antena Nirkabel Seri Lenovo G50 Z50 - Penggantian by Lenovo ideapad
How to remove and reattach WiFi antenna cables
By James Has Answers How to remove and reattach WiFi antenna cables by James Has Answers
Wifi antenna cable connector repair Kablosuz anten kablosu konnektr onarm

By Merakl Bilgisayarc Wifi antenna cable connector repair Kablosuz anten kablosu konnektr onarm by Merakl Bilgisayarc

Title: Peningkatan Antena Laptop 49
Channel: andrew mcneil
Peningkatan Antena Laptop 49 by andrew mcneil
Wifi On Laptop Phone
Let's get to it.
The Art of Crafting Authentic Handcrafted Leather Goods: A Timeless Legacy
The supple touch of premium leather, the satisfying scent of aged wood, and the quiet hum of focused craftsmanship – these are the hallmarks of a tradition that spans centuries. We, at [Your Brand Name, if applicable, otherwise, a hypothetical name representing quality], are deeply passionate about perpetuating this legacy. We believe in creating enduring pieces, not disposable products. Our approach is rooted in a profound respect for the materials, the techniques, and the individuals who dedicate their lives to perfecting their craft. This is not just about creating leather goods; it's about weaving stories into every stitch and building heirlooms designed to be cherished for generations.
Sourcing the Finest Materials: The Cornerstone of Quality
The journey of a handcrafted leather piece begins, of course, with the raw materials. We start by meticulously selecting the finest full-grain leather available. Full-grain leather, unlike its processed counterparts, retains the natural grain of the hide. This means it possesses superior strength, durability, and a unique character that evolves beautifully with age. The scratches, wrinkles, and variations in texture are not imperfections; they are testaments to the animal's life and add to the narrative of each finished product.
Our sourcing practices are rigorous and emphasize sustainability. We partner with tanneries that adhere to strict environmental standards, prioritizing ethical practices throughout the entire process. This includes responsibly managing water usage, minimizing chemical treatments, and ensuring humane animal treatment. We believe that a commitment to quality extends beyond the finished product, encompassing the entire life cycle of the materials. We meticulously examine each hide, selecting only the portions that meet our uncompromising standards. This often means that a significant portion of the leather we receive is deemed unsuitable, further emphasizing our commitment to excellence and reducing waste. Every piece of leather tells a story and so must be treated with utmost respect.
The Time-Honored Techniques of Handcrafting Leather
The creation of fine leather goods is a dance between skill and precision, a ballet performed with the hands and a deep understanding of the intricate relationship between material and design. We eschew mass-production methods, instead, we rely on time-honored techniques that have been refined over generations. Each step is carefully considered, from the initial pattern-making to the final finishing touches.
Our artisans employ a variety of essential techniques, each crucial in realizing our vision.
- Cutting: The process begins with the precise cutting of leather. We utilize a combination of hand tools, including sharp knives and specialized punches, to carefully separate the pattern pieces from the hide. This stage demands meticulous attention to detail, as the accuracy of the cut directly impacts the overall fit and form of the finished product. Waste is minimized through careful pattern placement, ensuring the most effective use of the material.
- Skiving: Skiving is a process that involves thinning the edges of the leather, especially where pieces overlap or join. This is crucial for streamlining the product, reducing bulk, and creating a more refined appearance. Skilled skiving requires a steady hand and a keen understanding of the leather's properties.
- Hand Stitching: Hand stitching is the cornerstone of our craftsmanship. Unlike machine stitching, hand stitching provides superior durability, flexibility, and a unique aesthetic appeal. We use the saddle stitch, a technique renowned for its resilience. This technique involves two needles weaving through the same hole in opposite directions, creating a lock stitch that is virtually unbreakable. The process is labor-intensive, requiring patience and precision, but the resulting strength and beauty are unmatched. We often use linen thread, waxed to protect against abrasive damage.
- Edge Finishing: The edges of our leather goods are meticulously finished to protect from damage and enhance their aesthetic appeal. We employ a multi-step process that includes sanding, burnishing, and the application of edge paint. This creates smooth, durable edges that are resistant to wear and tear and add a touch of sophistication to each piece. This often involves the application of a beeswax-based finish providing further moisture resistance.
- Hardware Selection and Attachment: The selection of hardware is as critical as the choice of leather. We carefully select the finest quality zippers, buckles, and rivets, ensuring they complement the overall design and contribute to the product's longevity. The attachment of hardware is also performed with meticulous care, using hand tools to ensure each piece is securely fastened.
The Evolution of Each Piece: The Beauty of Patina
One of the most alluring aspects of handcrafted leather goods is their ability to improve with age. Over time, the leather develops a rich patina, a unique surface character that reflects its history and the experiences of its owner. The patina is not simply a sign of wear; it is a testament to the leather's durability and the quality of the craftsmanship.
As the leather is exposed to sunlight, handling, and the ambient environment, it gradually accumulates oils and waxes. The natural oils in the leather migrate to the surface, creating a deeper, richer color. Scratches and imperfections become part of the story, adding depth and character to the piece. The leather softens and molds to the individual's touch, making each item uniquely personal.
We encourage our customers to embrace the natural aging process of their leather goods. Regular cleaning and conditioning can help maintain the leather's suppleness and integrity, but the patina is something to be cherished. It is a tangible reflection of the memories, adventures, and everyday use that make each piece truly unique.
The Design Philosophy: Functionality, Aesthetics, and Enduring Style
Our design philosophy is predicated on the principles of functionality, aesthetics, and enduring style. We believe that a well-designed leather product should be both beautiful and practical, serving its intended purpose while also providing a timeless elegance.
We take inspiration from classic designs, combining traditional techniques with modern sensibilities. We are constantly researching new designs and concepts. We strive to create products that will stand the test of time, both in terms of their durability and their aesthetic appeal. We eschew fleeting trends in favor of designs that are inherently elegant and versatile.
Our focus on functionality is paramount. We carefully consider the intended use of each product, designing it to meet the specific needs of our customers. This includes paying close attention to details like pocket placement, strap lengths, and closure mechanisms. We use prototypes to rigorously test and refine our designs, ensuring that each product is as practical as it is beautiful.
Caring for Your Handcrafted Leather Goods: Preserving the Legacy
With proper care, your handcrafted leather goods can provide you with years of enjoyment. We provide detailed care instructions with each item, outlining the best practices for cleaning, conditioning, and storage. Here are some general guidelines:
- Cleaning: Regularly wipe your leather goods with a soft, dry cloth to remove dust and dirt. For more stubborn stains, use a mild leather cleaner and a damp cloth. Always test the cleaner in an inconspicuous area first.
- Conditioning: Apply a high-quality leather conditioner periodically to nourish the leather and prevent it from drying out. The frequency of conditioning depends on the type of leather and the climate, but generally, every six months is a good starting point.
- Storage: Store your leather goods in a cool, dry place away from direct sunlight. Avoid storing them in plastic bags, as this can trap moisture. Instead, use a breathable dust bag or a cloth cover.
- Avoid Extreme Temperatures: Direct heat can damage the leather permanently. Avoid exposing your leather goods to extreme heat, such as leaving them in a hot car.
The Value of Handcrafted Goods: Investment in Quality, Not Just a Purchase
Investing in a handcrafted leather good is not just about acquiring a product; it's about investing in a legacy. It's an investment in quality, craftsmanship, and enduring style. It's an investment in a piece that will stand the test of time, both in terms of its durability and its aesthetic appeal.
When you purchase one of our leather goods, you are supporting a tradition of craftsmanship and a commitment to ethical and sustainable practices. You are investing in a piece that has been made with care, attention to detail, and a deep respect for the materials. You are investing in more than just an item; you are investing in a story, a legacy, and a connection to the past.
We invite you to explore our collection and experience the timeless elegance of handcrafted leather goods. We are confident that you will appreciate the quality, the craftsmanship, and the enduring beauty of our products. We hope that our goods will be a source of pleasure and pride for years to come.
