laptop wifi antenna connector type

Title: The Power of USB Wifi Adapter
Channel: Teacher Kevin PH
The Power of USB Wifi Adapter by Teacher Kevin PH
laptop wifi antenna connector types, wifi antenna connector types, do laptops have wifi antenna, what is a wifi antenna for pc
Laptop WiFi Antenna Connector: The SHOCKING Truth You NEED to Know!
Unmasking the WiFi Witchcraft: The Laptop Antenna Connector Revelation!
Have you ever been plagued by the WiFi woes of a sluggish laptop? You’re not alone. Many users experience frustrating connectivity issues. The culprit might be hiding in plain sight. It could be the often-overlooked WiFi antenna connector. Prepare to have your perceptions reshaped. I’m here to unveil some startling truths. This critical component is more pivotal than you might realize.
The Silent Guardian: Unveiling the Antenna Connector's Role
Your laptop's WiFi antenna connector is a tiny hero. It plays a monumental role in your connectivity. This tiny piece is responsible for a seamless online experience. Think of it as the liaison between your laptop and the digital world. It broadcasts and receives those essential WiFi signals. It's the unsung champion in the battle against buffering. Therefore, a healthy connector is essential.
The Sneaky Saboteurs: Common Connector Complications
Several factors can sabotage your WiFi performance. First, physical damage can be a major issue. Imagine a jostled laptop. Then, the connector could be compromised. Dust and debris are also significant threats. These microscopic invaders can interfere with signal transmission. Similarly, loose connections are problematic. They create an intermittent signal. Finally, wear and tear over time can cause degradation. Subsequently, understanding these enemies is vital.
Diagnosing the Dilemma: Spotting WiFi Connector Troubles
Recognizing a faulty connector is crucial. Begin by noting the symptoms. Common problems include weak WiFi signals. Also, frequent disconnections are a major red flag. Slower browsing speeds are another telltale sign. Sometimes, you might not connect at all. Therefore, these indicators demand investigation.
Troubleshooting Tactics: Quick Fixes and Savvy Solutions
Before panicking, consider some initial fixes. Check your drivers first. Outdated drivers often cause issues. Restarting your laptop is a simple first step. Next, inspect the antenna connector. Carefully examine it for any visible damage. Cleaning the connector might also help. Use compressed air to remove dust. If problems persist, consider more advanced steps.
Connector Construction: Dissecting the Anatomy of Connectivity
The antenna connector is intricate. It's usually a small, delicate piece. These connectors come in various designs. They often employ push-on, or screw-on mechanisms. The construction material influences performance. High-quality materials ensure reliable signal transmission. In essence, understanding the connector's build is fundamental.
The DIY Dilemma: When to Repair & When to Replace?
Should you attempt a DIY repair? This depends on your skill level. Replacing a connector can be challenging. It may require technical expertise. However, minor issues can be addressed. For example, cleaning a loose connection might be manageable. But, if the damage is severe, professional help is best. Sometimes, replacing the entire WiFi card is needed. Therefore, evaluate the severity of the problem.
Professional Intervention: Seeking Expert Assistance
When in doubt, call a professional. A qualified technician possesses the tools and knowledge. They can diagnose and fix the problem accurately. They can also prevent further damage. Often, they can provide a warranty on the work. Similarly, seeking professional help saves you time and headaches. Remember, a specialist can pinpoint the exact cause.
Preventative Measures: Shielding Your Connector's Longevity
Proactive measures can extend your connector's life. First, handle your laptop with care. Avoid dropping it or exposing it to extreme conditions. Moreover, regularly clean your laptop. This prevents the buildup of dust and debris. Finally, ensure proper ventilation. Excessive heat can damage the internal components. Consequently, these precautions offer lasting benefits.
The WiFi Connector's Future: Advancements and Innovations
The WiFi landscape is constantly evolving. Expect new advancements in connector technology. These innovations will improve signal strength and reliability. Furthermore, the future promises faster speeds. Research and development continue. Therefore, the importance of the antenna connector persists.
Conclusion: Embracing a Seamless Online Experience
The WiFi antenna connector is an essential component. Now, you know its significance. You’re equipped to troubleshoot common issues. You understand the importance of proper maintenance. Moreover, you should have the knowledge to enjoy a reliable online experience. So, take action and safeguard your connection. A smooth, uninterrupted WiFi is within reach. Now, go forth and conquer those connectivity challenges!
Laptop WiFi Nightmare? Solved! (Guaranteed!)Laptop WiFi Antenna Connector: The SHOCKING Truth You NEED to Know!
Okay, folks, let's dive headfirst into a tech mystery that's plagued us all at some point: that frustratingly unreliable WiFi connection on your laptop. We've all been there, right? Typing a crucial email, streaming that must-see TV show, or simply trying to browse the web, and BOOM! the connection drops. You're left staring at a spinning circle of doom, or worse, an infuriating "no internet" message. Often, the culprit isn't your internet provider, your router, or even the weather (though, let's be honest, sometimes it feels like it!). The silent villain? The laptop WiFi antenna connector.
1. The WiFi Woes: A Common Tech Complaint Unveiled
Let's kick things off by acknowledging the elephant in the room. WiFi issues are everywhere. From the bustling coffee shop where you're trying to finish a project, to your home office, where you’re fighting with the kids for bandwidth, a shaky WiFi connection can be a major source of frustration. We've all cursed under our breath when that Zoom call freezes mid-sentence, or that gaming session lags at the crucial moment. But a lot of the time, the focus is on the exterior: the router, the internet speed, the signal strength. Rarely do we consider the internal mechanics of our laptops and specifically, that little connection that's the lifeline of our wireless freedom: the WiFi antenna connector. Think of it like the heart of your laptop's WiFi capabilities. If it's not functioning correctly, everything else crumbles.
2. What Is a Laptop WiFi Antenna Connector, Anyway? The Tech Explained (Simplified!)
Imagine your laptop as a radio receiver. The WiFi antenna connector is like the plug that connects the internal antenna (the bit that "listens" for the WiFi signal) to the WiFi card (the little computer chip that handles the signal). It's a tiny piece of hardware, often ridiculously small, but it's critical. Without a solid, secure connection, the antenna can't properly pick up or transmit the WiFi signal. Think of it like a loose wire in a lamp – the light flickers, or worse, doesn't turn on at all! This connection is usually made via a small, delicate coaxial cable that snaps onto the WiFi card. There might be one, two, or even three of these connectors, depending on your laptop's design.
3. The Silent Culprit: Why This Connector Fails
Here's where things get interesting, and frankly, a little annoying. This connector isn't built like a tank. It's delicate. It's prone to problems. Here are some of the most common reasons why your laptop WiFi antenna connector might be giving you grief:
- Physical Damage: Dropping your laptop, slamming the lid too hard, or even just jostling it around in a bag can put stress on the connector. It can come loose, bend, or even break. I've seen it happen more times than I can count!
- Manufacturing Defects: Sometimes, the connector wasn't assembled perfectly in the first place. This is less common, but it does happen.
- Age & Wear: Over time, the constant connecting and disconnecting (if you’ve ever opened your laptop for repairs) can wear down the connector. The connections can weaken.
- Heat Buildup: Laptop components generate heat, and excessive heat can degrade the materials used in the connector. Especially if you play a lot of graphically intense games.
4. Symptoms: How to Spot a Faulty Connector
The symptoms of a bad WiFi antenna connector can be a real pain, and sometimes they mimic other problems. Learn to recognize these signs:
- Weak or Unstable Signal: Your WiFi signal strength appears to fluctuate wildly. You might see full bars one minute, and then a single bar the next, or constant drops.
- Slow Download/Upload Speeds: Everything takes forever to load. Webpages crawl, videos buffer endlessly, and file transfers are incredibly slow.
- Frequent Disconnections: Your laptop randomly disconnects from the WiFi network, requiring you to reconnect repeatedly.
- Inability to Connect: You can't connect to a WiFi network at all, even though you can see the networks listed.
- Error Messages: You might see error messages related to the WiFi adapter, the antenna, or the network card.
5. Troubleshooting 101: Simple Fixes Before You Panic
Before you assume the worst, let's try a few basic troubleshooting steps. It’s tempting to jump to conclusions (like burning your laptop in a fit of rage!), but let's be patient.
- Restart Your Laptop: Sounds simple, but it works surprisingly often! It can clear temporary glitches that are masking the real issue.
- Restart Your Router: Another oldie but goodie. It can refresh the connection on the router's end and potentially solve the problem.
- Check Your Router Placement: Make sure your laptop is within a reasonable range of your router and that there aren't any major obstructions (walls, microwaves, etc.) interfering with the signal.
- Update Your WiFi Drivers: Outdated drivers can cause compatibility issues. Visit your laptop manufacturer's website and download the latest drivers for your WiFi adapter.
6. The Deep Dive: Opening Up Your Laptop (If You Dare!)
Okay, this is where things get a little more… involved. This step isn’t for everyone. Disclaimer: Opening your laptop can void your warranty, and it's best to know what you're doing. If you're not comfortable with this, skip to Section 7. If you're feeling brave and have some technical knowledge, you can try to visually inspect the WiFi antenna connector.
- Gather Your Tools: You'll need a small Phillips head screwdriver (often a #00 size), a plastic opening tool or spudger, and possibly a pair of tweezers.
- Power Down and Unplug: Turn off your laptop completely and unplug the power adapter.
- Find the Right Guide: Search online for a disassembly guide specific to your laptop model (e.g., "Dell XPS 13 disassembly"). YouTube is your friend!
- Remove the Back Panel: Carefully unscrew and remove the back panel of your laptop.
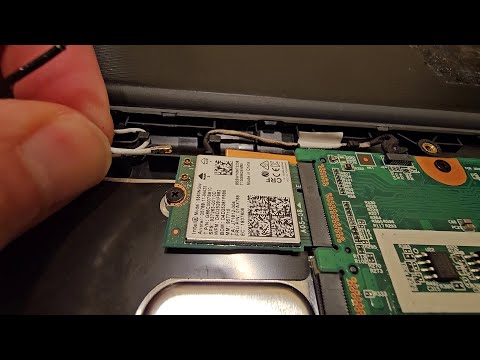
- Locate the WiFi Card: The WiFi card is usually a small circuit board with a few wires attached. Look for the antenna connectors.
- Inspect the Connectors: Carefully check the connectors to see if they're loose, damaged, or disconnected. Gently reseat them and make sure they click into place (you might need tweezers).
- Reassemble and Test: Replace the back panel, screw it back in, and power on your laptop. See if the WiFi is working better.
7. When to Call in the Professionals: Knowing Your Limits
Sometimes a DIY approach isn't enough. Here's when to consider getting professional help:
- You're Not Comfortable Opening Your Laptop: This is totally okay! The risk of causing more damage outweighs the potential reward.
- The Damage is Obvious: If you see a broken connector, a burnt component, or any other significant damage, professional repair is necessary.
- Troubleshooting Fails: If you've tried the basic troubleshooting steps and they haven't solved the problem, something more complex is likely going on.
- You Value Your Time: Laptop repair can be time-consuming, and sometimes it’s worth it to have an expert handle it.
8. The Repair Options: What to Expect
Okay, so you’ve decided you need a repair. What are your options?
- Local Computer Repair Shops: These can be a great choice! They often offer quick turnaround times and personalized service.
- Laptop Manufacturers' Repair Services: This is a more expensive option, but it ensures that your laptop is repaired with genuine parts and that the repair is covered by a warranty.
- Mail-in Repair Services: If you don't have local options, you can mail your laptop to a repair service. Just be sure to research the company thoroughly.
9. The Cost of Repair: Budgeting for the Unexpected
The cost of repairing a WiFi antenna connector can vary significantly depending on the extent of the damage and the repair service you choose. Expect to pay anywhere from $50 to over $200. If it's just a connector replacement, it will likely be on the lower end of the spectrum. More complex repairs or those involving parts replacement can be more expensive.
10. Preventative Measures: Protecting Your Connector
Prevention is key! Here are some simple things you can do to reduce the risk of future WiFi antenna connector problems:
- Handle Your Laptop with Care: Avoid dropping it, slamming the lid, or rough handling.
- Use a Protective Sleeve or Case: This adds an extra layer of protection against bumps and impacts.
- Avoid Extreme Temperatures: Don't leave your laptop in direct sunlight or exposed to extreme heat or cold.
- Clean Your Laptop Regularly:
How to remove and reattach WiFi antenna cables
By James Has Answers How to remove and reattach WiFi antenna cables by James Has Answers
Wifi antenna cable connector repair Kablosuz anten kablosu konnektr onarm

By Merakl Bilgisayarc Wifi antenna cable connector repair Kablosuz anten kablosu konnektr onarm by Merakl Bilgisayarc
Replace the Wireless Antenna Cables HP Pavilion Gaming Notebook HP Support

By HP Support Replace the Wireless Antenna Cables HP Pavilion Gaming Notebook HP Support by HP Support

Title: How to reattach broken Macbook wifi antenna connector
Channel: Louis Rossmann
How to reattach broken Macbook wifi antenna connector by Louis Rossmann
Laptop Wifi Hotspot
Here's the title for your article: "The Ultimate Guide to Crafting a Perfect Espresso: From Bean to Cup"
The Ultimate Guide to Crafting a Perfect Espresso: From Bean to Cup
The allure of espresso, that intensely concentrated coffee elixir, lies in its captivating complexity. A perfect shot, a symphony of flavor, is more than just a morning ritual; it's a testament to precision, patience, and a deep understanding of the process. This guide will delve into the intricacies of crafting espresso, offering a comprehensive roadmap from the selection of the perfect bean to the final, exquisite sip. We'll navigate the nuances of equipment, technique, and tasting, empowering you to consistently produce espresso that rivals the best cafes.
Selecting the Premier Espresso Bean: The Foundation of Excellence
The cornerstone of exceptional espresso resides in the bean itself. Not all coffee is created equal, and certain varieties are inherently better suited for espresso extraction. Arabica beans generally reign supreme, offering a wider spectrum of flavor profiles compared to Robusta, which, while containing more caffeine, often results in a harsher, less nuanced shot.
When choosing your beans, consider the roast level. Darker roasts tend to produce a bolder, more chocolatey espresso, while lighter roasts offer brighter acidity and more complex fruit notes. The ideal roast level depends on your personal preferences and the specific bean. It's crucial to experiment until you discover what suits your palate.
Origin plays a significant role. Ethiopian Yirgacheffe, renowned for its floral and citrusy characteristics, provides a vibrant, refreshing espresso. Sumatran Mandheling, on the other hand, offers earthy, full-bodied flavors. Consider exploring single-origin beans to discover a new favourite.
Freshness is paramount. Always purchase whole beans, and grind them immediately before brewing. Stale beans yield flat, lifeless espresso. Ideally, use beans roasted within the past 2-3 weeks, storing them in an airtight container, away from light, heat, and moisture. The best way to preserve flavor is, of course, to grind beans yourself and to use them within a few days of grinding.
The Alchemy of Grinding: Precision is Key
The grind, the size of the ground coffee particles, is the most critical factor in the espresso-making process, rivaling the importance of the bean itself. The goal is to achieve a consistent, fine, and uniform grind. A burr grinder, rather than a blade grinder, is essential. Burr grinders crush the beans into a uniform size, ensuring even extraction. Blade grinders chop the beans, which leads to uneven extraction and unpredictable results.
The grind size dictates the extraction time. Too coarse, and the water will flow through the coffee too quickly, producing a sour, under-extracted shot. Too fine, and the water will struggle to pass through, resulting in a bitter, over-extracted shot. Finding the "sweet spot" requires careful experimentation.
Start by adjusting the grind setting to the finest setting on your grinder and slowly increasing the coarseness until you achieve the desired extraction time of 25-30 seconds for a double shot. Each bean will have its ideal grind setting, so you'll need to adjust the setting for each new bag of coffee. Pay close attention to the flow of the espresso as it emerges from the portafilter. A slow, steady stream indicates a properly extracted shot.
Mastering the Art of Tamping: Creating the Perfect Puck
Tamping is the process of compressing the ground coffee in the portafilter basket, creating a dense, even “puck” that the water will flow through. Proper tamping ensures uniform extraction and prevents channeling, where the water finds a path of least resistance, bypassing portions of the ground coffee and creating an uneven, sour or weak shot.
Use a calibrated tamper that fits snugly into the portafilter basket. You want a tamper that enables you to apply consistent pressure every time. This pressure should be between 30 and 40 pounds, though some experts disagree on exactly how much pressure is optimal. Practice on a scale to get a feel for the correct pressure.
Level the grounds in the portafilter basket before tamping. This ensures an even distribution and prevents uneven extraction. Tamp with consistent pressure, using a level surface and a single, downward motion. Avoid twisting the tamper, as this can create an uneven puck. Focus on a level, flat surface.
The Espressomachine: Choosing Your Brewing Ally
The espresso machine is the heart of the operation, delivering the pressure required to extract the espresso. Machines vary greatly in price and functionality, from entry-level models to professional-grade equipment.
Pump Espresso Machines: The most common type, these machines utilize a pump to generate the necessary pressure (typically 9 bars). They come in a range of styles, from manual lever machines, which require the user to control the pressure, to automatic machines, which automate most of the brewing process.
Automatic Espresso Machines: These machines simplify the process, often with integrated grinders and automatic tamping. They are convenient but may offer less control over the brewing parameters.
Consider the features:
- Pressure Gauge: Allows you to monitor the brewing pressure.
- PID Controller: Provides precise temperature control, which is critical for consistent extraction.
- Steam Wand: Essential for frothing milk for lattes and cappuccinos.
- Portafilter Size: Affects the size of the shots you will be able to brew.
Investing in a good quality espresso machine, even a simple one, will pay dividends in the quality of your espresso.
Understanding Extraction: The Essence of Flavor
Extraction is the process of dissolving the soluble compounds from the ground coffee into the water. The goal is to extract the desirable flavors while avoiding the undesirable ones.
Under-extraction: Occurs when the water flows through the coffee too quickly. Results: sour, acidic, and underdeveloped flavor. The body will be thin, and there will be a lack of complexity.
Over-extraction: Occurs when the water is in contact with the coffee for too long. Results: bitter, ashy, and astringent flavor. The body will be heavy and harsh.
The ideal extraction yields a balanced espresso, with sweetness, acidity, and bitterness in harmony. The "sweet spot" is achieved by adjusting the grind size, the tamping pressure, and the brewing time.
Brewing the Perfect Shot: A Step-by-Step Guide
- Preheat. Turn on your espresso machine and allow it to warm up for at least 20-30 minutes. This ensures a stable temperature for the brewing process. Purge the group head to get the temperature right.
- Grind. Grind the beans to the appropriate fineness.
- Dose & Distribute. Dose the ground coffee into the portafilter basket and distribute it evenly.
- Tamp. Tamp the grounds with even pressure and a level surface.
- Insert Portafilter. Lock the portafilter into the group head of your machine.
- Brew. Start the brewing process and let the espresso flow into your cup. Aim for a 25-30 second extraction time for a double shot.
- Observe and Adjust. Watch the flow of the espresso. Adjust the grind setting as needed for future shots.
- Taste and Enjoy. Savor the results of your labor and expertise.
Dialing in the Shot: The Quest for Perfection
“Dialing in” refers to the process of making small adjustments to the grind size to achieve the optimal extraction and flavor profile. Remember, the perfect parameters will vary depending on the bean. This requires patience and a willingness to experiment.
- Start with the Basics. Follow the initial recommendations for grind size and brewing time.
- Evaluate the Taste. Taste the espresso. Is it sour (under-extracted) or bitter (over-extracted)?
- Adjust the Grind. If it’s sour, make the grind finer. If it’s bitter, make the grind coarser. Make small, incremental adjustments.
- Repeat. Brew and taste again. Continue to make adjustments until the espresso tastes balanced and delicious.
- Record. Keep track of your settings for each bean so you can recreate your results easily.
Beyond the Shot: Milk and Beyond
While this guide focuses on espresso itself, mastering the perfect shot is the foundation for creating lattes, cappuccinos, macchiatos, and other espresso-based beverages.
Steaming Milk: Learn the art of steaming milk to achieve velvety microfoam for your lattes and cappuccinos. Practice getting the right texture.
Milk Alternatives: Experiment with non-dairy milk alternatives like oat milk, almond milk, or soy milk.
Mastering espresso is a journey of discovery, a commitment to refinement. Through practice, patience, and a passion for coffee, you can consistently produce espresso that elevates your coffee experience, cup after exquisite cup.
