asus laptop create wifi hotspot

Title: Asus X450C Series Laptop Wifi Ethernet Internet Not Working Problemmacniteshkeyboardtricks2025
Channel: Mac Nitesh
Asus X450C Series Laptop Wifi Ethernet Internet Not Working Problemmacniteshkeyboardtricks2025 by Mac Nitesh
Turn Your ASUS Laptop into a WiFi Hotspot: The Ultimate Guide (Secret Tricks Inside!)
Unleash Your ASUS: Turning Your Laptop into a WiFi Powerhouse! (Secret Hacks Revealed!)
Ever wished your ASUS laptop could do a little more? Well, prepare to be amazed! Your trusty companion holds a hidden talent. It's time to learn how to transform it into a powerful WiFi hotspot. This guide breaks down the process. It also spills some secret tricks!
Setting the Stage: Why Turn Your ASUS into a Hotspot?
Think about it: you're on the go. Your phone needs internet. Your tablet is begging for connection. But a strong WiFi signal is nowhere in sight. Here's where your ASUS laptop swoops in to save the day! It creates its own private, portable network. It's like having a personal WiFi router. Plus, it offers flexibility. You get to share your internet connection with multiple devices. This happens directly. Moreover, it’s a cost-effective solution. You avoid the need for extra hardware.
Before You Begin: Essential Preparations
First, you need an ASUS laptop. Preferably, it runs Windows 10 or 11. Next, ensure your laptop has a working internet connection. This is from either an Ethernet cable or a pre-existing WiFi network. Finally, keep your laptop’s battery charged. Or, plug it into a power outlet. You'll want to maintain a steadfast connection for your other devices. These preparations ensure a smooth experience. Now, let’s dive into the simple steps.
Method 1: The Built-in WiFi Hotspot (The Easy Way!)
Windows makes this super simple. We'll begin by accessing “Settings.” Head to your Start menu. Click on the gear icon (Settings). Alternatively, press the Windows key + I. Then, select “Network & Internet.” Find "Mobile hotspot". Click on it to open the controls. Next, switch on the “Mobile hotspot” toggle. You can adjust the settings now. Click “Edit” to customize the network name (SSID). Also, choose a secure password. This is vital for protecting your data. Then, set the "Internet connection to share from". Select the source. This can be your Ethernet or existing WiFi. Afterward, save your changes. Finally, connect your other devices. Search for the network name. Enter your password. Voila! Instant WiFi connectivity. The process is quick and user-friendly. The results are a personal hotspot.
Method 2: Using the Command Prompt (For the Tech-Savvy!)
Are you a bit more adventurous? Here's an alternative. Open the Command Prompt as an administrator. You can search for "cmd" in the Start menu. Right-click on "Command Prompt". Choose “Run as administrator”. This elevates your privileges. Now, it's time to type some commands. First, create your hotspot. Type: netsh wlan set hostednetwork mode=allow ssid="YourHotspotName" key="YourPassword" Replace "YourHotspotName" and "YourPassword" with your preferred details. Don't forget the quotation marks. Then, type: netsh wlan start hostednetwork to launch your hotspot. Next, share your internet connection. In Windows, go to "Network Connections". Right-click on the connection you use for internet. Then select "Properties". Click the "Sharing" tab. Check the box that says "Allow other network users to connect through this computer's Internet connection". Select your hosted network from the dropdown menu. Click "OK" to save the settings. Finally, connect your devices. They should find the hotspot. Enter your password. This method offers more control. However, it’s slightly more complex.
Secret Trick #1: Bandwidth Blitz - Optimizing Your Connection
Do you want to squeeze every last drop of speed? You can. Navigate to "Device Manager" in Windows. Search for it in the Start menu. Expand “Network Adapters”. Right-click on your wireless network adapter. Select "Properties." Go to the "Advanced" tab. Look for settings like “802.11n/ac/ax Wireless Mode” or similar. Select the highest available mode. Consider other settings such as “Transmit Power”. Maximize it. Be mindful of regulations. These tweaks can boost your hotspot’s performance. They require careful configuration.
Secret Trick #2: Extended Range – Amplifying the Signal
Want to increase the reach of your hotspot? One simple trick is physical placement. Place your laptop in a central, elevated location. Keep it away from metal objects. Those objects interfere with the signal. Another tip is to change your WiFi channel. This can reduce interference from other networks. Open the Command Prompt (as administrator). Type netsh wlan show drivers. Find your "Radio types supported". Choose a less congested channel. This step enhances your signal.
Troubleshooting Common Headaches
Having trouble connecting? Here are some quick fixes. Double-check your password. Confirm that the hotspot is enabled. Restart your ASUS laptop. Update your network drivers. Go to Device Manager. Right-click your network adapters. Choose "Update driver". Search automatically for drivers. Sometimes, a simple restart solves the issue. Driver updates often fix connectivity glitches.
Wrapping Up: Your ASUS, Now a WiFi Wonder!
Congratulations! You've unlocked your ASUS laptop's hidden potential. You've learned how to create a WiFi hotspot. You now possess secret tricks for optimization. Now, you can share your internet connection. You can do it anywhere. Embrace the freedom and convenience. Enjoy your newfound WiFi superpowers!
Laptop WiFi Hotspot: The Secret Trick Google Doesn't Want You to Know!Turn Your ASUS Laptop into a WiFi Hotspot: The Ultimate Guide (Secret Tricks Inside!)
Hey there, tech adventurers! Ever been stranded in a digital desert, yearning for a connection? Maybe you’re stuck in a hotel with pricey Wi-Fi, or perhaps your phone’s data plan is crying out for mercy. Fear not, because we're about to unlock a superpower: turning your trusty ASUS laptop into a personal Wi-Fi hotspot! Think of it like a magic portal to the internet, conjured right from your laptop. And believe me, this isn’t just about the basics; we're diving deep into the secret tricks that'll make you a Wi-Fi wizard!
1. Why Become a Wi-Fi Whisperer? The Perks of Sharing Your Connection
Before we dive into the nitty-gritty, let's talk about why this matters. We live in an age where connectivity is king. From streaming your favorite shows to answering urgent emails, a solid internet connection is crucial. Turning your ASUS into a hotspot offers some incredible advantages:
- Savings, Sweet Savings: Avoid expensive Wi-Fi fees in hotels or cafes.
- Share the Love: Easily connect multiple devices – your phone, tablet, gaming console, you name it!
- Emergency Savior: When your primary internet goes down, your laptop can act as a lifeline.
- Data Plan Guardian: Conserve your phone’s precious data by offloading heavy downloads.
- Tech Mastery: It’s just plain cool to know how to do this!
It’s like having a personal Wi-Fi router tucked inside your laptop. Pretty amazing, right?
2. Prerequisites: What You'll Need to Get Started
Before we wave our magic wand, let’s make sure we have all the ingredients. Here's what you'll need:
- An ASUS Laptop: Specifically, one running Windows (we'll focus on Windows here, but the principles translate).
- An Active Internet Connection: This could be Wi-Fi, Ethernet (wired), or even a mobile data connection.
- A Few Minutes of Your Time: This process is easier than baking a cake (and way less messy!).
- Patience: (Just in case, things don’t always go the way we expect!)
If you have all these, you’re ready to transform your ASUS into a Wi-Fi powerhouse!
3. The Built-In Method: Using Windows' Mobile Hotspot Feature
Windows has a built-in mobile hotspot feature that makes this incredibly easy. It's like having a secret tool right at your fingertips! Here's how it works:
- Open Settings: Click on the Start button (the Windows logo) and then click on the gear icon (Settings). You can also press the Windows key + I.
- Network & Internet: Click on "Network & Internet."
- Mobile Hotspot: Select "Mobile hotspot" from the left-hand menu.
- Share Your Internet Connection: Under "Share my Internet connection from," choose how your laptop is currently connected to the internet (Wi-Fi, Ethernet, etc.).
- Edit the Hotspot Details: Click "Edit" to change the network name (SSID) and password. Choose a strong password! You want a network that is secure.
- Turn It On: Toggle the "Mobile hotspot" switch to "On."
And voila! Your ASUS laptop is now broadcasting its own Wi-Fi network. It's that simple. As easy as ordering a pizza, right? (Only, instead of pizza, you get the internet!)
4. Fine-Tuning Your Hotspot: Customization Options
Now that you’ve got the basics down, let’s make your hotspot even better. You can customize several aspects:
- Network Name (SSID): Give your hotspot a memorable and recognizable name. Something fun, like "MyAwesomeHotspot" or "TechGuru'sNetwork."
- Password: Never skip setting a strong password! This is your digital gatekeeper. Use a mix of uppercase and lowercase letters, numbers, and symbols. Think of it as your personal Fort Knox.
- Band Selection (Advanced): Some ASUS laptops (and Windows versions) allow you to choose between the 2.4 GHz or 5 GHz band. 5 GHz offers faster speeds (if the connected devices support it) but has a shorter range. 2.4 GHz has a wider range but slower speeds.
- Maximum Connections: Limit the number of devices that can connect to your hotspot. This helps maintain speed and stability.
These tweaks allow you to control who connects and how well your hotspot works.
5. Secret Trick 1: The Command Prompt Power Move (For More Control!)
Alright, time for some secret tricks! Want even more control? We'll use the Command Prompt. It sounds intimidating, but trust me, it's not that scary.
Open Command Prompt as Administrator: Type "cmd" in the Windows search bar, right-click "Command Prompt," and select "Run as administrator."
Check Network Adapter: Type
netsh wlan show driversto see if your Wi-Fi adapter supports hosted networks. Look for “Hosted network supported: Yes.” If it's "No," then this method won't work.Set Up the Hotspot: Type the following commands, replacing
<your_network_name>and<your_password>with your desired values:netsh wlan set hostednetwork mode=allow ssid=<your_network_name> key=<your_password>netsh wlan start hostednetwork
Share Your Internet: Go to "Network Connections" (search for it in the Windows search bar), right-click your active internet connection (Wi-Fi or Ethernet), select "Properties," go to the "Sharing" tab, and check "Allow other network users to connect through this computer's Internet connection."
This gets you more granular control and might be necessary if the built-in feature isn't functioning correctly.
6. Secret Trick 2: Troubleshoot Like a Pro! Common Problems and Solutions
Sometimes, things don't go as planned. Here's how to troubleshoot:
- Can't Find the Hotspot: Double-check that the hotspot is turned on and that the network name is correct. Make sure your laptop isn't in airplane mode.
- Slow Speeds: Too many devices connected? Try limiting the number of connections. Move closer to your laptop. Ensure your internet connection is up to par.
- Can't Connect: Verify the password is correct. Restart your laptop. Update your network adapter drivers.
- Hotspot Keeps Turning Off: Check your power settings. Make sure your laptop isn’t set to turn off Wi-Fi to save battery.
Think of troubleshooting as detective work, but for your laptop. Finding the clues to solve the mystery!
7. Understanding the Performance: Speed, Range, and Limitations
Let’s be realistic. Your laptop’s hotspot won't outperform a dedicated Wi-Fi router. Here’s what to expect:
- Speed: The speed of your hotspot depends on your internet connection speed, the number of connected devices, and the capabilities of your laptop’s Wi-Fi adapter.
- Range: The range is typically limited to a few meters, similar to a standard Wi-Fi router. Walls and obstructions can further reduce the range.
- Limitations: Using your laptop as a hotspot can drain battery life quickly. It also ties up your laptop, which can become a problem if you need to use it for other tasks.
Knowing these limitations allows you to manage expectations.
8. Data Consumption Considerations: Monitoring Your Usage
Be mindful of your data usage, especially if you're using a mobile data connection.
- Monitor Your Data: Check your data plan allowance and how much data each device is using.
- Limit Data Usage: Close unnecessary apps, reduce video streaming quality, and disable automatic updates.
- Consider a Data Cap: Set a limit on the amount of data your hotspot can use to avoid unexpected charges.
Awareness is key to avoiding a nasty surprise on your bill!
9. Security Best Practices: Keeping Your Hotspot Safe
Security is paramount!
- Use a Strong Password: We can't stress this enough!
- Change Your Password Regularly: Just to be extra secure.
- Monitor Connected Devices: Keep an eye on who's connected to your hotspot.
- Disable Hotspot When Not in Use: Protect your connection from unauthorized access.
Think of your Wi-Fi hotspot as a virtual house. You wouldn’t leave the door unlocked, would you?
10. Optimizing for Battery Life: Making Your Hotspot Sustainable
Using a hotspot drains battery life. Here's how to make it last longer:
- Plug In: Connect your laptop to a power source whenever possible.
- Reduce Screen Brightness: Saves power.
- Turn Off Unnecessary Apps: Saves processing power.
- Disable Background Tasks: Prevent apps from running unnecessary processes.
Every little bit helps to keep your hotspot up and running longer.
Laptop WiFi Nightmare: Why Won't It Connect?!How to Create Wifi Hotspot in Windows 10 Tutorial

By MDTechVideos How to Create Wifi Hotspot in Windows 10 Tutorial by MDTechVideos
We Can't setup Mobile Hotspot Windows 10 SOLVED

By Nam Anh Cap We Can't setup Mobile Hotspot Windows 10 SOLVED by Nam Anh Cap
How To Connect ASUS Laptop To Mobile Hotspot

By Tothepoint Tutorials2 How To Connect ASUS Laptop To Mobile Hotspot by Tothepoint Tutorials2
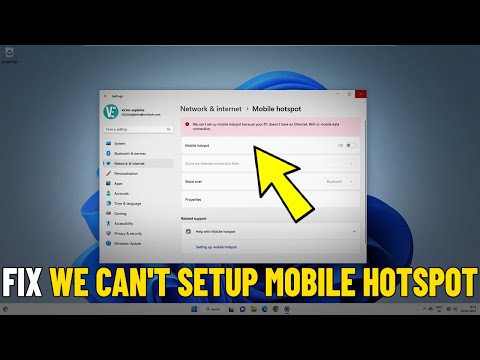
Title: Fix We Can't Setup Mobile Hotspot Because Your PC Doesn't Have an Ethernet WiFi - Mobile Mobile Data
Channel: Victor Explains
Fix We Can't Setup Mobile Hotspot Because Your PC Doesn't Have an Ethernet WiFi - Mobile Mobile Data by Victor Explains
Wifi Not Found
Here's an example of what the final result should look like:
The Extraordinary Journey of the Hummingbird
The hummingbird, a jewel of the avian world, captivates with its iridescent plumage and unmatched aerial agility. This tiny creature, a blur of wings and vibrant color, embarks on a life filled with astonishing feats of endurance and a singular relationship with the world of flowers.
(…)
A Symphony of Flight: Mastering the Art of Hovering
The hummingbird’s most recognizable trait is its ability to hover in mid-air, a skill unmatched by any other bird species. This mastery of flight is made possible by a unique skeletal structure.
(…)
Title: The Ultimate Guide to Choosing the Perfect DSLR Camera in 2024
Unveiling the World Through a Lens: Your Definitive Guide to DSLR Cameras
The year is 2024, and the art of photography continues its relentless evolution. Digital Single-Lens Reflex (DSLR) cameras remain a cornerstone for both budding enthusiasts and seasoned professionals, offering unparalleled control and image quality. This guide serves as your comprehensive roadmap to navigate the vast landscape of DSLR technology, ensuring you select the camera that perfectly aligns with your creative vision. We’ll delve into the core components, weigh the pros and cons, and provide insights to empower you to make an informed decision, unlocking your photographic potential.
Understanding the DNA of a DSLR: Core Components Explained
At the heart of any DSLR lies a complex interplay of technological marvels. Understanding these core components is the first step towards mastering your photographic journey.
The Image Sensor: Capturing Light's Symphony: The image sensor is the digital heart, meticulously converting light into the captivating visuals you see. These sensors come in varying sizes, the most common being APS-C and Full-Frame. APS-C sensors, often found in entry-level and mid-range models, offer a crop factor, effectively "zooming" the image in slightly. Full-Frame sensors, mirroring the size of a 35mm film frame, capture a wider field of view, excel in low-light conditions, and offer superior dynamic range, allowing for more nuanced tones and detail.
The Processor: The Brains Behind the Beauty: The image processor acts as the brain, converting the raw data captured by the sensor into a polished image. It dictates processing speed, noise reduction capabilities, and overall image quality. Newer processors often boast improved performance, enabling faster continuous shooting speeds, enhanced low-light performance, and sophisticated features like in-camera HDR (High Dynamic Range) and creative filters.
The Lens Mount: The Gateway to Creative Expression: The lens mount is the crucial interface that connects your chosen lens to the camera body. Different manufacturers utilize distinct lens mount systems, meaning lenses from one brand typically won’t be compatible with bodies from another. Researching available lenses and the manufacturer's lens ecosystem is key. A diverse selection of lenses will empower you to explore a wide array of photographic styles, from breathtaking landscapes to intimate portraits.
The Viewfinder: Connecting with Your Subject: The viewfinder provides a direct view of the scene through the lens. DSLRs typically offer an optical viewfinder, providing an unobstructed real-time view. It helps you frame your shots effectively, allowing you to compose your images with remarkable precision.
LCD Screen: Reviewing and Refining: The LCD screen, located on the back of the camera, allows for reviewing captured images, adjusting settings, and navigating the camera's menu. High-resolution LCDs with touch screen functionality are now commonplace, simplifying the operation and offering superior image quality.
Weighing Pros and Cons: A Balanced Perspective on DSLR Technology
Before committing to a DSLR, consider the benefits and drawbacks to ensure it aligns perfectly with your photographic aspirations.
Advantages of DSLR Cameras:
- Superior Image Quality: DSLRs consistently deliver exceptional image quality, particularly in low-light situations. This is due to the superior sensor size found in many models. These sensors capture a wider range of tones and details, leading to images that are richer in color and definition.
- Unmatched Lens Selection: The extensive lens ecosystem is a major advantage of DSLRs. The ability to swap lenses allows you to adapt to various shooting scenarios, from wide-angle landscapes to telephoto wildlife shots and everything in between.
- Precise Manual Control: DSLRs offer complete control over exposure settings, including aperture, shutter speed, and ISO. This enables photographers to craft their images with precision, allowing for creativity and experimentation.
- Exceptional Battery Life: DSLRs generally have a longer battery life than mirrorless counterparts, facilitating extended shooting sessions.
- Optical Viewfinder Accuracy: The optical viewfinder gives a direct, undiluted view of the subject, without any lag or battery drain.
Disadvantages of DSLR Cameras:
- Bulk and Weight: DSLRs, with their lenses, can be heavier and bulkier than mirrorless cameras, putting excess pressure on users during prolonged periods of usage.
- Mechanical Complexity: The mechanical components in a DSLR, while contributing to image quality, can be more susceptible to wear and tear over time.
- Live View Autofocus Performance: While improving, live view autofocus on some DSLRs may be slower than the performance offered by many mirrorless cameras.
- Startup Time: DSLRs can take slightly longer to turn on and be ready to shoot compared to some mirrorless models.
Key Features to Consider: Navigating the Specs Sheet with Confidence
Beyond the core components, a range of features are vital to consider during your decision process.
- Megapixels: Striking the Balance: Megapixels represent the resolution of the image sensor. While higher megapixels translate to larger images and greater cropping flexibility, more megapixels aren’t always better. In essence, it's only useful if you plan to print very large images. Consider the intended use for your pictures and the required resolution. A balance between resolution, sensor size, and image quality is crucial.
- ISO Range: Conquering Low-Light Challenges: The ISO setting controls the sensor's sensitivity to light. A wider ISO range indicates better performance in low-light environments. Examine the camera’s low-light performance. This is a critical factor for capturing images in dimly lit situations.
- Continuous Shooting Speed: Seizing the Moment: Continuous shooting speed, measured in frames per second (fps), determines how quickly the camera can capture a sequence of images. If you’re interested in sports, action photography, or wildlife photography, a faster shooting speed is a must. A higher fps can help you seize fleeting moments and capture images with more impact.
- Autofocus System: Achieving Sharpness: The autofocus system is crucial for achieving sharp images. Look for a camera with a comprehensive autofocus system, including multiple focus points. The focus points should be evenly distributed throughout the frame. This will allow you to track moving subjects. Consider the speed and accuracy of the autofocus system, especially if you primarily shoot fast-paced subjects.
- Video Capabilities: Expanding Your Creative Horizon: Many DSLRs now offer impressive video capabilities. Consider the camera's video resolution, frame rates, and available features, such as external microphone inputs. If video recording is a priority, ensure the camera meets your needs.
- Connectivity: Seamless Integration. The camera’s Wi-Fi and Bluetooth capabilities allow for seamless image transfer to your smartphone or tablet. This simplifies the process, allowing you to immediately share your images on social media.
- Build Quality: Ensuring Durability: A well-built DSLR will withstand the rigors of regular use. Consider the materials used, the weather sealing, and the overall construction to ensure longevity and reliability.
Top DSLR Camera Recommendations for 2024: A Tailored Selection
Finding the perfect DSLR is a highly individual endeavor. Here are some recommendations, categorized by user type and intended use:
- For Beginners: Entry-level DSLRs from brands such as Canon and Nikon offer ease of use, intuitive controls, and excellent image quality right from the start. A kit lens package is an ideal starting point. The Canon EOS Rebel series and Nikon D3000 series are excellent choices.
- For Enthusiasts: Mid-range DSLRs provide a significant upgrade in sensor performance, features, and build quality. The Canon EOS 90D and Nikon D7000 series offer improved resolution, faster continuous shooting, and more advanced autofocus.
- For Professionals: Professional-grade DSLRs such as the Canon EOS 5D Mark IV, Canon EOS 6D Mark II and Nikon D850 deliver unmatched image quality, robust construction, and comprehensive features.
- For Videographers: Select DSLRs, such as the Canon EOS 5D Mark IV and Nikon D850, possess excellent video capabilities. They offer features such as 4K recording, external microphone inputs, and advanced video codecs.
Lens Selection: Crafting Your Vision with Precision
The lens is the most critical component when it comes to shaping your images. Selecting the right lenses is essential to achieving your artistic vision.
- Prime Lenses: Unleashing Creativity: Prime lenses have a fixed focal length and are known for their superior image quality, wide apertures, and shallow depth of field. Popular choices are the 35mm lens, ideal for street photography and general use; the 50mm lens; a versatile "nifty fifty" for portraits and everyday shooting; and the 85mm lens, the go-to for professional portrait photography.
- **Zoom Lenses: Versatility at Your Fing
