how to reset wifi password in laptop

Title: How to View Forget Wi-Fi Password in Laptop & PC Easy
Channel: MJ Tube
How to View Forget Wi-Fi Password in Laptop & PC Easy by MJ Tube
how to reset wifi password in laptop, how to change wifi password in laptop, how to change wifi password in laptop windows 11, how to change wifi password in laptop windows 10, how to change wifi password in laptop windows 7, how to update wifi password in laptop, how to change wifi password in laptop windows 8, how to change airtel wifi password in laptop, how to change wifi password in dell laptop, how to change wifi password in hp laptop
Laptop WiFi Password Reset: The SHOCKINGLY Easy Method!
Unlocking Your Digital Castle: A Surprisingly Simple WiFi Password Reset
Have you ever felt locked out of your own kingdom? You know, that digital realm where Wi-Fi reigns supreme? I'm talking about the frustrating moment when your laptop stubbornly refuses to connect. More often than not, the culprit is a forgotten Wi-Fi password. But fear not, intrepid traveler of the internet, because the solution is far easier than you might imagine. In fact, it's shockingly simple!
The Password Puzzle: Initial Troubleshooting Steps
Before we dive into the real magic, let's quickly address the basics. Firstly, ensure your Wi-Fi adapter is enabled. Secondly, double-check that you are indeed connected to the correct network. Furthermore, verify your Caps Lock isn't on. Finally, try restarting your laptop. Obviously, these initial steps can often resolve the issue. However, if those basics fail, prepare for the next stage.
Unveiling the Hidden Gems: Exploring Operating System Specifics
The precise method for resetting a forgotten Wi-Fi password hinges on your operating system. Fortunately, the process is remarkably similar across the board. Nevertheless, let’s explore the specifics.
Windows Wizards: Your WiFi Recovery Checklist
For Windows users, the solution is usually nestled within the network settings. Specifically, here's how to navigate:
- Access the Control Panel: Type "Control Panel" into the search bar and open it.
- Navigate to Network and Sharing Center: Locate this option.
- Click on "Change adapter settings": This opens a window displaying your network connections.
- Right-click on your Wi-Fi adapter: Choose "Status."
- Click "Wireless Properties": This opens a new window with further options.
- Go to the "Security" tab: Consequently, this is where the magic unfolds.
- Check the "Show characters" box: This is your password reveal button.
Provided you have administrative privileges on your laptop, this should unveil your password. Subsequently, make a note of it, and be ready to reconnect!
Apple Mavericks: Decoding the Password Mysteries
Apple users usually find the process intuitive. Therefore, let's highlight the key steps:
- Open "Keychain Access": Found in your Utilities folder (Applications > Utilities).
- Search for your Wi-Fi network name: The search bar is your ally.
- Double-click your network name: This opens a new window.
- Check "Show Password": You'll need your administrator password.
- Voila! Your Wi-Fi password appears.
Indeed, Apple streamlines the process. Moreover, it offers a visually pleasing interface.
Beyond the Basics: When Standard Techniques Falter
Sometimes, the standard methods won't cut it. Perhaps your account lacks administrative privileges. Or potentially your laptop stores the credentials differently. In this instance, don't get disheartened! There are alternative pathways you can utilize.
The Command Prompt Crusaders: A More Technical Approach (Windows)
For Windows users, the Command Prompt remains a handy tool. Consequently, you can use it to retrieve your Wi-Fi password. Follow these steps:
- Open Command Prompt as an Administrator: Right-click the Start button and select "Command Prompt (Admin)" or the equivalent.
- Type the following command and press Enter:
netsh wlan show profile name="Your Network Name" key=clear. (Replace "Your Network Name" with your actual network name). - Look for the "Key Content" line: This displays your Wi-Fi password.
Undoubtedly, this method can be more complex. Therefore, it's recommended that you carefully execute the command.
The Router Revelation: An Alternate Route
If all else fails, consider resetting your router. Certainly, this is a drastic measure, so consider other options first. Nevertheless, it resets the Wi-Fi password to the default.
- Find your router's default login details: This is usually on a sticker beneath the router.
- Access your router's configuration page: Enter your router's IP address (usually 192.168.1.1 or 192.168.0.1) into your web browser.
- Log in with the default credentials: This varies depending on your router model.
- Navigate to the Wi-Fi settings: Locate the section for changing your password.
- Change the Wi-Fi password: Afterward, save your new settings.
- Reconnect your devices: Subsequently, you'll be prompted for your new password.
Indeed, this process can vary. Ultimately, consult your router's manual for specific instructions.
Security Sensibilities: Best Practices for Password Management
Once you've regained access, take a moment to fortify your digital defenses. First, create a strong, unique password. Second, consider using a password manager. Thirdly, regularly change your password. Finally, avoid sharing your password with anyone. Given these points, you can safeguard your personal information.
The Final Frontier: Celebrating Your Success
Ultimately, unlocking your Wi-Fi password can be surprisingly effortless. Subsequently, try these methods. Also, remember to practice safe password management. Now, celebrate your newfound freedom! Thus, you can return to browsing and streaming. In conclusion, enjoy your seamless internet experience!
Laptop WiFi Nightmare: Limited Access? FIX IT NOW!Laptop WiFi Password Reset: The SHOCKINGLY Easy Method!
Let's face it, forgetting your Wi-Fi password is like losing your keys in your own home. You're right there, inches from the internet's glorious embrace, yet locked out. And the frustration? Oh, the frustration! But fear not, fellow digital wanderers! We've all been there, staring at that cryptic string of characters, wondering how on earth the router even remembers it. Today, we're diving into the surprisingly simple ways to reset your laptop's Wi-Fi password, getting you back online faster than you can say "bandwidth."
1. The Awkward Truth: You Forgot Your Password. Now What?
Admit it. We've all been there. You just want to check your emails, stream your favorite show, or, you know, work. But the dreaded "Incorrect Password" message pops up, and suddenly, you're staring into the abyss of a password-less existence. Don't panic! It happens to the best of us. Think of it as a mini-adventure, a quest to reclaim your rightful place amongst the connected!
2. Unveiling the Mystery: Where is My Saved Wi-Fi Password Hidden?
Your laptop, particularly if it runs Windows, is often a secret keeper of your Wi-Fi passwords. It stores them! Like a digital librarian. So, how do we unlock this vault? Well, we're going to explore a few options, starting with the most straightforward – checking Windows settings. We will also touch on other possibilities, like checking your router's documentation or using specific software.
3. Windows to the Rescue: The Easiest Way to Find Your Wi-Fi Key
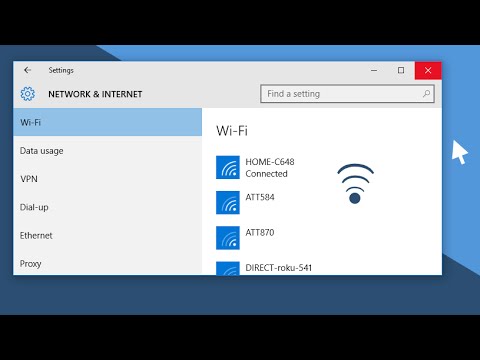
For Windows users, this is your bread and butter. This is the “easy button” equivalent. Here's the step-by-step guide:
- Step 1: Head to the Control Panel (or Settings). Depending on your Windows version, you can access this through the Start menu or by searching "Control Panel" or "Settings."
- Step 2: Navigate to "Network and Internet". Click on this option.
- Step 3: Open "Network and Sharing Center".
- Step 4: Click on the Name of Your Wi-Fi Network. This will usually be a blue link.
- Step 5: Select "Wireless Properties". A new window pops up.
- Step 6: Click the "Security" Tab.
- Step 7: Check the box next to "Show characters". Your Wi-Fi password will magically appear!
It's like finding the hidden treasure in a pirate map! Simple, right?
4. Mac Mavericks: Uncovering Your Wi-Fi Password on macOS
Mac users, we haven't forgotten about you! Finding your Wi-Fi password on a Mac is slightly different but just as manageable. The key lies within the Keychain Access application (think of it as your digital security guard).
- Step 1: Open Keychain Access. You can find this in your Applications > Utilities folder or by using Spotlight search (Command + Spacebar).
- Step 2: Search for Your Wi-Fi Network's Name. Type the network name into the search bar.
- Step 3: Double-click on Your Network's Entry. This will open a new window with the details.
- Step 4: Check the "Show Password" Box. You'll be prompted to enter your administrator password. Once you do, your Wi-Fi password will be revealed!
5. The Router's Role: Checking Your Router's Settings
Sometimes, your laptop isn't the hero of the story. Your router, the central hub of your Wi-Fi universe, is also a potential source. You can access it by:
- Finding Your Router's IP Address. Usually, this is printed on a sticker on the router itself or can be found in your network settings on your laptop.
- Typing the IP Address into Your Web Browser. This will take you to your router's login page.
- Logging in with Your Router's Credentials. (These are often printed on the router, too, along with the admin password, which you might need to reset if forgotten.)
- Navigating to the Wireless Settings Section. Look for options like "Wireless Security" or "Wi-Fi Password." Your password should be displayed there.
Think of your router as the ultimate gatekeeper – you need the key (login details) to access its secrets!
6. When All Else Fails: Resetting Your Router
Okay, let's say you've tried everything above, and the password remains elusive. It’s time to consider the nuclear option: resetting your router. This will restore it to its factory settings, including its default password (which is often printed on the router itself!).
- Locate the Reset Button on Your Router. It’s usually a small, recessed button that you'll need a paperclip or something similar to press.
- Press and Hold the Reset Button for 10-30 Seconds. The lights on your router will start flashing, indicating a reset.
- Log in to Your Router Using the Default Credentials. (Check the router itself for these.)
- Reconfigure Your Wi-Fi Network (Including Setting a New Password). This might seem daunting, but it's often a straightforward process guided by your router's setup wizard.
This is like hitting the "restart" button. It's a fresh start for your Wi-Fi life!
7. Password Security: Why It Matters (And How to Improve It)
Now that you know how to find your Wi-Fi password, let's talk about keeping it safe. Think of your password as your digital security guard. A weak guard allows intruders to come in. Never use easily guessable passwords, such as birthdays, names, or simple words. Strong passwords are long, complex, and unique to each account.
- Use a strong, unique password. Incorporate a mix of upper and lower case letters, numbers, and symbols. Aim for at least 12 characters.
- Change Your Password Regularly. This is especially important if you suspect your password has been compromised.
- Enable Two-Factor Authentication (2FA). This adds an extra layer of security by requiring a code from your phone or email in addition to your password.
8. Common Pitfalls: Mistakes to Avoid While Resetting
Let me clarify: don't make common mistakes. Avoid these:
- Not saving your settings: Some routers will not save changes unless you select "Save".
- Forgetting the router's credentials: Before you start, write down the credentials.
- Incorrect IP address: Double-check the router's IP address if you cannot log in.
9. Password Managers: Your Digital Memory Helpers
Imagine having a tireless digital butler that remembers all your passwords. That's the beauty of password managers! They securely store your passwords, generate strong ones, and automatically fill in login forms. Popular options include 1Password, LastPass, and Bitwarden.
10. Troubleshooting Troubles: What to Do When Things Go Wrong
Sometimes, even after all the steps above, things still go sideways, and the internet still won't connect.
- Restart Your Laptop and Router. This classic fix often works wonders.
- Check Your Network Adapter Settings. Ensure your Wi-Fi adapter is enabled and configured correctly.
- Contact Your Internet Service Provider (ISP). They can help diagnose network issues.
11. The Importance of Staying Connected
Why is it so paramount to re-establish the link to the digital realm? With the internet at our fingertips, it keeps us connected to the world. Think of it as your link to information, entertainment, and communication.
12. The Future of Wi-Fi Security
As technology progresses, so will our security measures. Wi-Fi 7 is the latest in the wireless world. We’ll witness ever-evolving encryption standards, more secure authentication methods, and the expansion of public Wi-Fi networks, like open-source access points.
13. Avoiding Future Password Headaches: Best Practices
- Store Passwords Securely. Use a password manager or a secure notepad.
- Create A Password Policy.
- Regularly Update Security Software.
14. Wi-Fi in the Real World: Adapting to Different Environments
From the comfort of your home to a public cafe, Wi-Fi is everywhere. Recognizing how to adjust and troubleshoot Wi-Fi issues becomes really valuable.
15. The Easy Way: You Did It!
We’ve walked through the steps, explored the possibilities, and discussed keeping your Wi-Fi secure. The next time you're locked out of your digital world, you'll know exactly what to do.
Closing Words
And there you have it! You've successfully navigated the choppy waters of forgotten Wi-Fi passwords. You're equipped with not just the knowledge to reset them, but also the know-how to keep your connection safe and secure. So, go forth, connect with confidence, and remember – the internet is your oyster!
**1) Principal Keywords: Wi-Fi Password
**HCL ME Laptop 38 WiFi Driver: Download & Fix Your Connection NOW!**How To Change your Wi-Fi password.

By DiscoverFlow How To Change your Wi-Fi password. by DiscoverFlow
Forget or Remove a Wireless Network on Windows 10 How-To
By Windows Explained Forget or Remove a Wireless Network on Windows 10 How-To by Windows Explained
Forgot your wifi password WIFI techtips computertips

By Chad Ryan Forgot your wifi password WIFI techtips computertips by Chad Ryan

Title: How to change wifi password in computer windows 10 Change Wi Fi Password
Channel: IG Tech
How to change wifi password in computer windows 10 Change Wi Fi Password by IG Tech
Laptop Working
Here's the title: The Ultimate Guide to Choosing the Perfect Hiking Boots
The Ultimate Guide to Choosing the Perfect Hiking Boots
Venturing into the wilderness, whether a leisurely afternoon stroll or a multi-day expedition, demands careful preparation. Among the most crucial pieces of gear, perhaps the most personal and critical, are your hiking boots. They are the foundation of every stride, the barrier between your feet and the unforgiving trail. Selecting the right pair is not merely a matter of aesthetics; it's an investment in comfort, safety, and the very enjoyment of your outdoor experiences. In this definitive guide, we – fellow enthusiasts who understand the call of the wild – we will navigate the intricacies of choosing the perfect hiking boots, ensuring you traverse the trails with confidence and ease.
Understanding Your Hiking Needs and Foot Type
Before even considering specific brands or models, a crucial internal conversation must occur: what kind of hiker are you? The answer dictates the type of boot needed. Consider your typical hiking terrain, the weight of your pack, and the duration of your trips.
Defining Your Hiking Style:
- Day Hiking: For shorter outings on well-maintained trails, a lighter-weight hiking shoe or mid-cut boot is often sufficient. These provide excellent mobility and are ideal for covering ground quickly.
- Weekend Backpacking: If you're carrying a moderate load for a couple of days, a mid-weight boot offers a balance of support, durability, and weight. These boots are generally stiffer than day hiking options, providing better stability on uneven terrain.
- Long-Distance Backpacking: For extended trips with heavier packs, a sturdier, heavier boot is essential. These boots provide maximum ankle support, protection, and durability, crucial for navigating challenging landscapes.
- Mountaineering: This specialized niche necessitates rigid, technical boots designed for use with crampons. These are typically very stiff and not intended for everyday hiking.
Assessing Your Foot Type:
- Foot Arch: Is your foot arch flat, neutral, or high? This significantly impacts the type of support you need.
- Flat Feet (Overpronation): Look for boots with pronation control features – denser foam or supportive midsoles – to prevent excessive inward rolling of the ankles.
- Neutral Arch: Most hiking boots will suit you.
- High Arches (Supination): You'll typically need a boot with cushioning and often an insole that offers arch support to prevent your foot from excessively rolling outwards.
- Foot Width: Are your feet narrow, standard, or wide? Consider both the overall width and the width of your forefoot and heel. Many brands offer wide and narrow sizing options.
- Foot Volume: A high-volume foot has more mass, requiring a different fit than a low-volume foot with less mass.
Key Boot Features and Construction
Understanding how hiking boots are constructed significantly aids in the selection process. Knowledge of these elements allows for informed decisions based on your specific needs.
The Upper: The upper is the main part of the boot and dictates its durability, water resistance, and breathability. Common materials include:
- Leather: Offers excellent durability and water resistance, often preferred for heavy-duty backpacking boots. Requires regular maintenance.
- Full-Grain Leather: The highest quality, most durable, but takes longer to break in.
- Split-Grain Leather: More affordable, less durable, and often paired with fabric panels.
- Synthetic Materials (Nylon, Polyester): Lighter, faster-drying, and often more affordable than leather boots. Can be less durable than leather.
- Waterproof Membranes (Gore-Tex, eVent): Provide waterproof protection while allowing some breathability. Keep in mind that breathability always comes at a cost to waterproofing and vice versa.
The Midsole: The midsole provides cushioning and shock absorption, influencing the boot's stiffness and stability. Popular materials include:
- EVA (Ethylene-Vinyl Acetate): A common foam that provides good cushioning and is lightweight.
- Polyurethane (PU): More durable and supportive than EVA but generally heavier. Offers greater longevity.
- Combination: Many boots use a combination of materials to optimize cushioning and support.
The Outsole: The outsole, the bottom of the boot, determines traction. Key factors to consider include:
- Rubber Compound: Different rubber compounds offer varying levels of grip on different surfaces. Softer rubber provides better grip on wet rock, while harder rubber is more durable.
- Lug Pattern: The pattern of the tread influences traction.
- Deep, Aggressive Lugs: Excellent for muddy or loose terrain.
- Shallow Lugs: Suitable for well-maintained trails.
- Lug Directionality: Lugs are often designed with a specific direction to optimize grip during uphill or downhill travel.
The Shank: A rigid layer within the midsole that provides support and stability, particularly under the arch. The rigidity of the shank influences the boot’s suitability for different terrains.
- Full Shank: Most rigid, ideal for extended backpacking and mountaineering.
- ¾ Shank: Provides good support while allowing for some flexibility.
- No Shank: Most flexible, suitable for day hiking and lighter loads.
The Art of Boot Fitting: A Critical Step
Proper boot fitting is arguably the most crucial factor in ensuring a comfortable and enjoyable hiking experience. Ill-fitting boots lead to blisters, pressure points, and potential injuries.
The Importance of Testing:
- Try Boots On at the End of the Day: Your feet swell throughout the day, so fitting boots in the evening will provide a more accurate representation of their size when hiking.
- Wear Appropriate Socks: Always wear the hiking socks you intend to use when trying on boots.
- Lace Up Correctly: Properly laced boots will give a realistic sense of fit and support.
- Walk Around the Store: Test the boots on inclines and declines, if available. Feel for any pressure points or areas of discomfort.
Finding the Right Fit:
- Heel Hold: Your heel should fit snugly within the boot’s heel cup with minimal movement.
- Toe Box: You should have ample room to wiggle your toes. As a general guide, you want about a thumb's width of space between your longest toe and the end of the boot when standing.
- Width: Your foot should not feel squeezed or constricted. The boot should conform to your foot's shape without excessive pressure.
- Ankle Support: The boot’s ankle support should cradle your ankle without inhibiting movement.
Resolving Fit Issues:
- Insoles: Replacing the original insole with an aftermarket insole can often improve fit by providing additional arch support or cushioning.
- Lacing Techniques: Experimenting with different lacing techniques can help fine-tune the fit.
- Boot Stretching: Some boots, especially leather ones, can be stretched for a better fit. Consult a professional for assistance.
Boot Care and Maintenance: Extending Lifespan
Taking care of your hiking boots is not merely a matter of aesthetics; it's crucial for extending their lifespan and maintaining their performance.
Cleaning:
- Brush off Dirt and Debris: After each hike, brush off loose dirt and debris.
- Wash with Mild Soap and Water: Occasionally wash your boots with mild soap and water, avoiding harsh chemicals.
- Remove Insoles: Take out the insoles to dry separately.
Waterproofing and Protection:
- Leather Boots: Regularly apply a leather conditioner to keep the leather supple and prevent cracking. Use a waterproofing product if the water repellency starts to diminish.
- Synthetic Boots: Use a waterproofing spray specifically designed for synthetic materials.
Drying:
- Air Dry: Allow your boots to air dry naturally, away from direct heat or sunlight.
- Stuff with Newspaper: Stuffing the inside of your boots with newspaper helps absorb moisture and maintain the boot’s shape.
Addressing Damage:
- Repair Minor Issues: Seek professional repair for any damage, such as loose stitching or worn soles.
- Replace Worn Soles: Some boots allow for sole replacement, which can significantly extend their lifespan.
Top Hiking Boot Recommendations: Starting Points
While the best boot is the one that fits your foot and needs, some brands consistently receive high praise for their craftsmanship and performance. We offer some popular starting points to explore.
- For Day Hiking: Salomon X Ultra 4 Mid GTX (Versatile and comfortable), Hoka Speedgoat Mid 2 GTX (Lightweight and cushioned).
- For Backpacking: Lowa Renegade GTX Mid (Durable and versatile), Zamberlan Vioz Lux GTX RR (Rugged and supportive).
- For Mountaineering: Scarpa Mont Blanc Pro GTX (Technical and reliable), La Sportiva Nepal EVO GTX (Classic mountaineering boot).
Important Considerations During Purchase:
- Read Reviews: Researching online reviews from other hikers can provide valuable insights. However, remember to take personal experiences into consideration.
- Consult with Experts: Don’t hesitate to seek advice from knowledgeable staff at outdoor retailers.
- Consider a Professional Fitting: Some retailers offer professional boot fitting services to maximize fit accuracy.
