conectare laptop la smart tv prin wifi windows 7

Title: Tutorial Cara Menghubungkan Laptop ke Smart TV Tanpa Kabel & Wifi
Channel: anto gibran
Tutorial Cara Menghubungkan Laptop ke Smart TV Tanpa Kabel & Wifi by anto gibran
conectare laptop la smart tv samsung prin wifi windows 7, laptop wifi connection problem windows 7, why is my windows 7 laptop not connecting to wifi
Windows 7 Laptop to Smart TV WiFi: The SHOCKINGLY Easy Trick!
Connect Your Windows 7 Laptop to Your Smart TV: You Won't Believe How Simple It Is!
Remember those times you were stuck huddled around your laptop, squinting at the screen to watch your favorite movie? Well, those days are OVER. Today, we're diving into a deceptively simple method for streaming content from your Windows 7 laptop to your Smart TV, and trust me, it’s easier than you might think. Forget wrestling with wires or complicated setups. This streamlined process gets you from laptop to big screen in no time, and it's something anyone can do.
Embracing the Wireless Freedom: A Primer
First off, let's talk about the magic ingredient: WiFi. Your Smart TV and your Windows 7 laptop need to be on the same network. This is generally a non-issue, but it’s worth confirming. Ensure your laptop is connected to your home WiFi. Also, double-check that your Smart TV is similarly linked. This shared connection is the backbone of our operation, enabling seamless communication. The good news is, setting this up takes only moments.
The Miraculous Microsoft Method: Using Windows Media Player
Believe it or not, Windows Media Player can be your best friend here. It comes pre-installed on Windows 7, so you're probably already set up. Open Windows Media Player. Then, locate the "Stream" tab at the top. Click on "Turn on media streaming.” A prompt will appear, giving you the chance to name your media library and choose which devices can access it. Choose your Smart TV from the list. Afterward, you will configure to allow other devices. This allows your TV to detect and access your content.
Fine-Tuning Your Setup: Sharing is Caring
Now, you need to ensure the correct settings are enabled within Windows Media Player. Navigate to the "Stream" settings. Click on "More streaming options." This is where you'll fine-tune the devices that can access your content. It is important to check the specific settings related to your Smart TV model. Ensure it is set to "Allowed." Save the changes. Your laptop is now ready to share its media library with your TV.
Delving into the Details: Understanding File Compatibility
Before you get too excited, take a moment to understand file compatibility. Smart TVs, while clever, don't always play every file type. Common formats like MP4, AVI, and MKV are generally supported. However, less common formats may require conversion. Media-playing software on both laptop and Smart TV will generally guide you through the process. You can find several free video converters online if needed. The goal is smooth playback, after all.
Casting Your Content: The Moment of Truth
Okay, now for the fun part: casting your content! Open Windows Media Player. Select the video, picture, or music file you want to watch or listen to. Right-click on the file. You should see an option that says "Play To." Hovering over "Play To" should display your Smart TV's name. Select your TV, and the content should begin playing on your big screen. Isn't that amazing?
Troubleshooting: Common Hiccups and How to Fix Them
Occasionally, you may encounter a few snags. Don't worry; we're here to help. If your TV isn't showing up, double-check the network connection on both devices. Restarting both your laptop and TV can often work wonders. Also, ensure your Windows 7 firewall isn't blocking Windows Media Player. You can adjust firewall settings to allow communication. If the video quality is poor, check your WiFi signal strength.
Alternative Approaches: Exploring Other Options
While Windows Media Player is incredibly convenient, it's not the only way. Consider using a media server application like Plex or Kodi. These offer more features and may provide better compatibility. Furthermore, you can explore the use of a Chromecast device. In addition, some Smart TVs have built-in screen mirroring capabilities. Experiment with these alternatives. The ideal method is whatever works best for you.
Wrapping Up: You're Now the Home Theater Hero!
So there you have it: a surprisingly easy method to connect your Windows 7 laptop to your Smart TV via WiFi. It’s a simple, straightforward process that opens up a world of entertainment possibilities. Now, kick back, relax, and enjoy your favorite movies, TV shows, and photos on the big screen. You deserve it! You're no longer tethered to a small laptop screen.
Final Thoughts: Maximizing Your Viewing Experience
Remember to keep your software up to date for the best experience. Regularly update Windows Media Player and your Smart TV's firmware. Consider optimizing your WiFi router settings for better streaming performance. With a few simple tweaks, you can transform your living room into a home theater. Embrace the freedom and enjoy the convenience. Now, go forth and stream!
WiFi Nightmare? Fix Your Laptop's Dropped Connection NOW!Windows 7 Laptop to Smart TV WiFi: The SHOCKINGLY Easy Trick!
Hey there, tech adventurers! Ever dreamt of transforming your trusty Windows 7 laptop into your own personal entertainment hub, beaming videos and pictures directly onto your Smart TV screen? We're talking about ditching the tiny laptop display and enjoying everything on the big screen. Sounds complicated, right? Well, prepare to be amazed, because what we’re about to uncover will redefine your definition of "easy." We’re diving headfirst into the surprisingly simple world of connecting your Windows 7 laptop to your Smart TV via WiFi. Let's get started!
Unleashing the Power: Why Connect Your Windows 7 Laptop to Your Smart TV?
Before we get into the nitty-gritty, let's talk about why you'd even bother. Think of it as upgrading from a compact car to a luxury SUV. Your laptop is the compact car – perfectly capable, but a little… cramped. Your Smart TV? That’s the SUV – spacious, luxurious, and perfect for showing off those vacation photos or binge-watching your favorite shows. Think of it like this: a movie night on your laptop screen versus a movie night on a 55-inch Smart TV. No contest, right? We’re talking about a better viewing experience, sharing memories with the whole family, and finally getting that large screen you've always wanted.
Prepping Your Battlefield: What You'll Need (Spoiler Alert: It's Easy!)
This isn't a mission requiring a team of engineers or a toolbox overflowing with gadgets. The beauty of this trick lies in its simplicity. You’ll need just a few things:
- Your Windows 7 Laptop: The star of the show!
- A Smart TV: Duh! It needs to be able to connect to your Wi-Fi network.
- Your Home Wi-Fi Network: This is the invisible bridge connecting your laptop and TV.
- (Optional, but helpful): Comfort food and a cozy blanket. Because, you know, movie night!
The Invisible Bridge: Ensuring Your Devices Are on the Same Network
This is the foundational step, the bedrock upon which our digital castle is built. Both your laptop and your Smart TV must be connected to the same Wi-Fi network. Think of it like this: they need to be speaking the same language, sharing the same invisible airwaves. Double-check that both devices are connected to your home Wi-Fi. If you're having trouble, check the settings on both devices or consult your TV's manual.
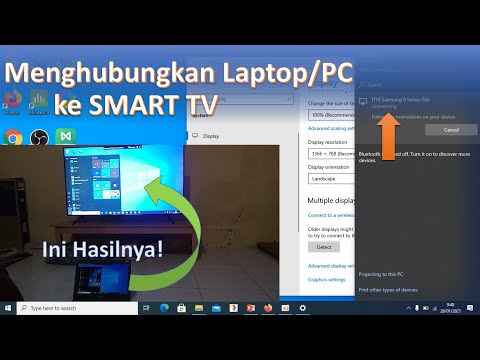
The Magic Button: Using the Windows 7 "Connect to a Projector" Feature
Here's where the magic happens. Windows 7, bless its heart, actually has a built-in feature that makes this process incredibly simple. We’re going to use the "Connect to a Projector" feature, which, despite its name, works perfectly for connecting to your Smart TV.
- Click the "Start" button (the Windows logo, usually in the bottom left corner of your screen).
- Type "Connect to a Projector" in the search bar and press Enter. Alternatively, for a quick shortcut, press the "Windows key" + "P" on your keyboard.
- Select Your Smart TV: A sidebar should appear, displaying a list of available devices. Your Smart TV should be listed here, assuming it's on the same Wi-Fi network. If you don't see it, click "Detect" to search again.
- Choose Your Display Mode: You'll have a few options:
- Computer Only: Displays on your laptop screen.
- Duplicate: Shows the exact same content on both your laptop and your TV. This is perfect for mirroring your screen.
- Extend: Uses your TV as a second screen, allowing you to drag and drop content between the two displays. (Think of it as having two monitors.)
- Projector Only: Displays only on your TV screen. This is good if you don't want the laptop screen on.
- Enjoy the Show! Select your desired display mode, and voila! Your laptop's screen should now be mirrored or extended on your Smart TV.
Troubleshooting Troubles: Solving Common Connection Issues
Sometimes, things don't go quite as planned. Don't worry; it happens to the best of us. Here are a few common issues and how to fix them:
- TV Not Appearing: Double check that both your laptop and Smart TV are connected to the same Wi-Fi network. Restart both devices. Make sure your TV's "Network" setting is turned on.
- Connection Issues: Ensure your Wi-Fi signal is strong. Move your laptop closer to your router or TV. Try restarting your router.
- Poor Video Quality: This often stems from a slow Wi-Fi connection. Try moving your devices closer to the router or reducing the streaming quality.
- Sound Problems: Make sure your TV’s sound settings are correct and that the audio output is set to your TV.
Going Beyond the Basics: Advanced Tips and Tricks
Ready to level up your Smart TV game? Here are some extra tips to maximize your enjoyment:
- Optimize Your Settings: Go into your display settings (right-click on your desktop and select "Screen Resolution" or "Display settings") and customize your resolution and display settings for the best viewing experience.
- Streaming Services: Use your Smart TV's built-in apps or stream using a web browser on your laptop.
- File Sharing: Easily access and show your photos, videos, and music stored on your laptop.
- Keep Your Drivers Updated: Ensure that your graphics card, and Wi-Fi card drivers are up to date.
The Golden Rule: Regular Updates and Maintenance
Keeping your Windows 7 laptop updated might seem like an afterthought these days, but it’s crucial for optimal performance. While Windows 7 is past its prime, keep your drivers updated. This will help in maintaining a stable connection and avoiding any unforeseen glitches. It's like giving your car a regular tune-up – it keeps everything running smoothly.
From Windows 7 to the Big Screen: Making it a Habit
Once you get the hang of it, connecting your Windows 7 laptop to your Smart TV will become second nature. It’s now a routine, much like brushing your teeth.
Beyond the Movie Night: Other Uses
This trick isn't just for movie nights. Think about the possibilities:
- Work Presentations: Deliver presentations on a larger screen.
- Gaming: Play games on your TV.
- Photo/Video Sharing: Show off family photos and videos
- Web Browsing: Browse the internet on a large screen for the ultimate comfort.
The Future is Now: Embracing the Power of Connectivity
So, there you have it! The shockingly easy trick to connecting your Windows 7 laptop to your Smart TV via WiFi. It may seem complex, but once you get the hang of it, you'll be amazed at how simple it is. With a few simple steps and a little bit of troubleshooting, you can transform your laptop into a powerful entertainment hub and enjoy the benefits of a large-screen experience.
The Simple Truth: It's Easier Than You Think!
Don't let the technology intimidate you. We have a guide, and it's straightforward. The truth is, it’s far easier than you probably imagined. Now go forth, connect, and enjoy!
Closing Thoughts: You've Got This!
We've covered everything from the basics to some nifty advanced tricks. Remember, it’s all about connecting the dots. Don't be afraid to experiment and have fun. You’ve got this! Now go forth and enjoy your expanded viewing experience!
FAQs (Frequently Asked Questions)
1. My Smart TV isn't showing up when I search for devices. What should I do?
* First, make sure both your laptop and Smart TV are connected to the same Wi-Fi network. Restart both devices. Check your TV's settings to ensure network discovery is enabled. Check your TV's user manual for network setup guidelines.
2. The video quality is poor, and it's lagging. How can I improve it?
* The problem is likely a slow Wi-Fi connection. Move your laptop and TV closer to your router. If possible, connect your TV directly to your router using an ethernet cable. Reduce the streaming quality on your laptop.
3. Can I still use my laptop while mirroring the screen on my TV?
* Yes! Select the "Duplicate" display mode to mirror the screen. In the "Extend" mode, you can use your laptop display independently. This is like having two monitors at the same time.
4. Is it secure to connect my laptop to my Smart TV over WiFi?
* Yes, as long as your Wi-Fi network is secured with a strong password. Avoid connecting to public or untrusted Wi-Fi networks.
5. Is this method compatible with any Windows 7 laptop and Smart TV?
* Generally, yes. This method relies on the Smart TV's ability to connect to a Wi-Fi network. It works with most laptops and TVs that have Wi-Fi capabilities, as long as Windows 7 is installed on the laptop.
**
WiFi Vanished! Windows 11 Emergency Fix (NOW!)Cara Menghubungkan LaptopPC ke SMART TV dengan WiFi
By Eko Zulkaryanto Cara Menghubungkan LaptopPC ke SMART TV dengan WiFi by Eko Zulkaryanto
CARA MUDAH MENGHUBUNGKAN LAPTOP KE SMART TV TANPA KABEL
By Azwar Tutorial CARA MUDAH MENGHUBUNGKAN LAPTOP KE SMART TV TANPA KABEL by Azwar Tutorial
Hubungkan Komputer Anda ke Smart TV secara nirkabel cast nirkabel teknologi tips

By Marlon Wireless Hubungkan Komputer Anda ke Smart TV secara nirkabel cast nirkabel teknologi tips by Marlon Wireless

Title: Cara Menghubungkan & Mencerminkan Layar Laptop di Smart TV Apa Pun Secara Nirkabel Tanpa Aplikasi
Channel: MJ Tube
Cara Menghubungkan & Mencerminkan Layar Laptop di Smart TV Apa Pun Secara Nirkabel Tanpa Aplikasi by MJ Tube
Change Wifi Settings
Windows 7 Laptop to Smart TV WiFi: Unlock Seamless Streaming
Are you yearning to experience the vibrant visuals and immersive audio of your favorite movies, TV shows, and even that meticulously crafted PowerPoint presentation on your sleek, modern smart TV? Do you find yourself wrestling with tangled cables and outdated connection methods, longing for a streamlined solution that effortlessly bridges the gap between your trusty Windows 7 laptop and your dazzling display? We understand the frustration. We've all been there, staring at those stubborn ports and wrestling with technical jargon. That's why we've crafted a guide that demystifies the process, breaking down the steps into an easily digestible format. Prepare to be amazed at how straightforward it truly is! Forget complex setups and complicated configurations; we're about to reveal a surprisingly simple trick that unlocks a world of wireless streaming possibilities.
Understanding the Foundation: Your Network and Your Devices
Before we dive into the practical steps, let’s establish a foundational understanding. The key to success lies in your home network. Your Windows 7 laptop and your smart TV must be connected to the same Wi-Fi network. This is the digital pathway through which your laptop will transmit the content to your television. Ensure your laptop is currently connected to your Wi-Fi. You can typically verify this by checking the system tray in the bottom right corner of your screen, where you'll see a Wi-Fi icon. If you are not connected to a network, it is time to connect to the appropriate network. Next, ascertain that your smart TV is equally connected to the same Wi-Fi network. Typically, you can find the network settings within your TV’s setup or settings menu. Check your TV’s manual if you are unsure where to find the Wi-Fi settings. Verify the network connection status; it should indicate a successful connection to your home Wi-Fi network.
The Miraculous Method: Utilizing Windows 7's Built-in Capabilities (and a Little Magic)
Windows 7, despite its age, is surprisingly adept at sharing content. We will delve into two primary methods; the first leverages Windows Media Player, while the second utilizes Windows' built-in sharing features. Windows Media Player, a stalwart of the Windows operating system, often offers a simple yet effective way to stream your media. Navigate to the "Library" section within Windows Media Player. From there, you'll find options to organize your music, videos, and pictures. To make your media accessible to your smart TV, click on "Stream" then choose "Turn on media streaming." This prompts a new window to appear, revealing a list of devices on your network.
Select your smart TV from this list. A prompt will usually appear on your TV, asking for permission to access your computer’s shared media. Accept the prompt on your TV. After this initial setup, your smart TV should now be able to browse and play your media files directly from your Windows 7 laptop. Now, in Windows Media Player, right-click on the specific media file (video, music, or photo) you wish to stream, and select "Play to." Your list of available devices (your smart TV, in this case) should appear. Select your TV to play the file directly.
Diving Deeper: Advanced Sharing Options for Enhanced Flexibility
If the Windows Media Player method doesn’t quite meet your needs, or if you're seeking more control over what gets shared, consider the more comprehensive, yet straightforward, built-in sharing features of Windows 7. Right-click on the specific folder on your laptop that contains the media files you wish to share (videos, music, or pictures). From the context menu, select "Properties." In the “Properties” window, navigate to the "Sharing" tab. Click “Advanced Sharing.” At this point, a new dialogue box appears.
Select "Share this folder." This will activate the sharing feature. You can then click the "Permissions" button, which opens another dialogue box. Here, you can specify which user accounts on your network have access to the shared folder and their respective permissions (read, change, etc.). For the easiest setup, consider granting "Everyone" (or the specific user account you are using on your smart TV) read access. Apply these permission settings. Ensure that all settings are configured correctly, and click "OK."
The Crucial Step: Troubleshooting Common Issues
Not everything will go smoothly. Encountering a few minor hiccups is perfectly normal. Let's anticipate some potential issues and discuss troubleshooting techniques. Is your smart TV not showing up in Windows Media Player or the sharing options? First, verify again that both your laptop and your smart TV are indeed connected to the same Wi-Fi network. Double-check the network name (SSID) and password. If that checks out, restart both your laptop and your smart TV. Sometimes, a simple reboot can resolve communication problems. Review your firewall settings on your Windows 7 laptop. Windows Firewall, by default, might be blocking network sharing.
To adjust the settings, navigate to the Windows Control Panel, then "System and Security," and then "Windows Firewall." After clicking "Allow an app or feature through Windows Firewall," ensure that "Media Streaming" or "Network Discovery" is enabled for both "Private" and “Public” network locations. For advanced users, consider temporarily disabling your firewall as a test (always re-enable it after testing). If you are still unable to get streaming, make sure that network discovery is turned on within Windows. Go to "Network and Sharing Center" in the Control Panel, go to "Change advanced sharing settings" on the left-hand side, and ensure that "Turn on network discovery" is selected. Also, verify that your laptop and your smart TV support the necessary media file formats.
Beyond the Basics: Refining Your Streaming Experience
Once you've achieved the initial connection, you might want to refine your streaming experience. Consider using a media server application, such as Plex or Emby, for enhanced organization and transcoding capabilities. These applications are installed on your laptop and act as a central hub for your media library. They offer advanced features such as automatic metadata downloads for your movies and TV shows, customizable playlists, and the ability to transcode media on the fly (convert the file format to one that your TV can handle), if necessary. This can be especially useful if your smart TV struggles with certain file types.
The selection of a suitable media server application depends on your preference, both Plex and Emby have free and paid versions. Both offer user-friendly interfaces and a plethora of customization options. Once the media server software is set up on your laptop, you install the corresponding app on your smart TV and subsequently access your media library.
Casting to your Smart TV: A Modern Alternative
While we focused on direct sharing, consider casting. If you have a compatible smart TV or a streaming device (like a Chromecast), casting allows you to wirelessly send content from your laptop's web browser or certain applications directly to your TV. In your Chrome browser, for instance, you can right-click anywhere on a webpage and select "Cast." Your smart TV or connected streaming device will appear.
Click on it to start mirroring the contents of your browser tab. Keep in mind that casting depends on the capabilities of your TV or streaming device. This is an easy method for sharing content.
The Grand Finale: Your Wireless Viewing is Ready
Congratulations! You've successfully navigated the seemingly complex landscape of wireless streaming, transforming your Windows 7 laptop into a central hub for entertainment. You have the tools and knowledge to seamlessly connect your laptop to your smart TV via your home Wi-Fi network. Whether you choose the elegant simplicity of Windows Media Player or the more control-oriented features of Windows sharing, the core principle remains the same: effortlessly enjoy your favorite content on a larger, more immersive screen. The joy of wireless home entertainment is now within your grasp. Embrace the freedom, relax, and enjoy the show!
