configure laptop as a wifi router windows 7
Title: Tutorial - How to make your laptop as a wireless router.. Windows 7 and Vista
Channel: q8ieng
Tutorial - How to make your laptop as a wireless router.. Windows 7 and Vista by q8ieng
Turn Your Windows 7 Laptop into a WiFi Hotspot in 60 Seconds!
Unleash Your Laptop's Inner WiFi Wizard: A Speedy Guide
Ever found yourself in a WiFi wasteland? Perhaps your phone’s data is dwindling, or a tablet craves connectivity. Fear not, fellow tech traveler! Your trusty Windows 7 laptop holds the key to wireless freedom. It is also easier than you think. You can easily turn it into a WiFi hotspot in a flash. Getting online doesn't need to be a struggle. This guide unlocks the secrets to bridging that digital divide.
Creating Your Virtual Access Point: The Simple Steps
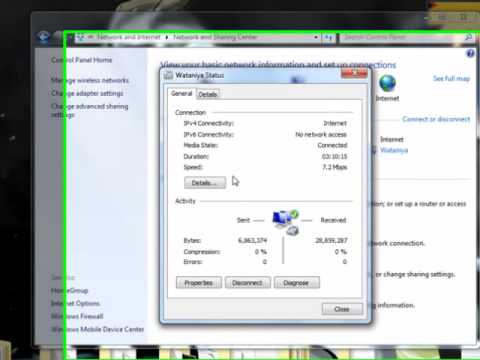
First, consider this a public service announcement. Preparing your laptop is paramount. You'll need a working internet connection. This can be through Ethernet or another WiFi network. Ensure your Windows 7 laptop has a wireless network adapter. This is usually already included. Next, navigate to the "Network and Sharing Center." You can find this in your Control Panel.
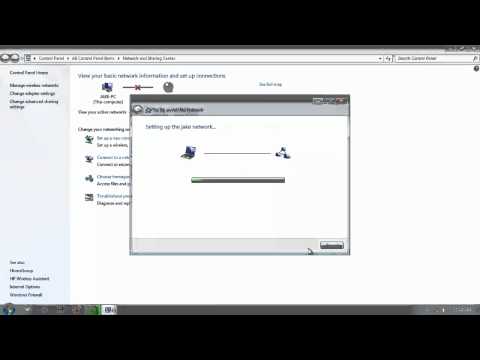
Now, initiate the hotspot setup. Locate "Change adapter settings." Right-click on the network adapter connected to your primary internet connection. Choose "Properties." Select the "Sharing" tab. Check the box next to "Allow other network users to connect through this computer's Internet connection".
Do this to enable the sharing feature. Choose the wireless network adapter from the dropdown menu. Click "OK" to save your settings. Now, it's time to set up your mobile hotspot.
Crafting Your Custom WiFi Network: Security First!
Open Command Prompt as an administrator. Type "netsh wlan set hostednetwork mode=allow ssid=[YourNetworkName] key=[YourPassword]" then hit enter. Replace "[YourNetworkName]" with the name you want for your network. Replace "[YourPassword]" with a strong, 8-character password. Make sure it is something you will not forget. This creates your secure network.
Now, launch the hosted network. Enter "netsh wlan start hostednetwork" in the Command Prompt. Watch it come to life. You will then see your network actively broadcasting. To stop the network, use "netsh wlan stop hostednetwork".
Troubleshooting the WiFi Hotspot: Quick Fixes
Sometimes, things go awry. If your hotspot fails, don't panic. Ensure your internet connection functions correctly. Double check that the network adapters are enabled. Restarting your laptop can often resolve minor glitches. Verify the spelling of the network name and password. These are common issues.
If your devices cannot connect, ensure they are within range. Also, check the password. A weak password can be a security risk. Make sure your firewall isn't blocking the connection. Finally, update your network drivers. These simple steps often fix the issues.
Optimizing Your Hotspot: Performance Tips
To enhance your hotspot performance, consider these points. Firstly, position your laptop in a central location. This provides better signal coverage. Secondly, minimize the number of connected devices. Too many users can slow things down. Close any bandwidth-intensive applications on your laptop. These include streaming videos.
Finally, periodically restart your hotspot. This refreshes the connection. It can also solve any potential bottlenecks. Keep these tips in mind for a smoother experience.
Beyond the Basics: Advanced Considerations
Beyond the basic setup, consider these advanced features. You can customize your hotspot's settings. You can do this in your network adapter properties. These settings do offer more control. You can limit bandwidth usage. This helps prevent excessive data consumption.
Regularly check your network security. Change your password regularly. This protects your data. Keeping your operating system and drivers updated is also essential. This can also assist with security. Explore these advanced options for added functionality.
The Benefits of Laptop Hotspotting: Convenience and Connection
The advantages of using your laptop as a hotspot are clear. It offers immense convenience. You create a wireless network wherever you go. This is perfect for travel or remote work. It provides a reliable internet connection. It can also save you money.
You can bypass the need for a separate hotspot device. It's a cost-effective solution. You also gain flexibility. Connect multiple devices easily. Your laptop truly becomes a connectivity hub.
Conclusion: Your Laptop's WiFi Power Unveiled
So, now you have the knowledge. You have also learned how to turn your Windows 7 laptop into a WiFi hotspot. In a matter of seconds, you have unlocked a new level of connectivity. You can effortlessly share your internet connection. You are now equipped to overcome WiFi challenges. Embrace the freedom. Embrace the power of your laptop. Go forth and connect!
Laptop WiFi Upgrade: The 5 Modules That'll Blow Your Mind!Turn Your Windows 7 Laptop into a WiFi Hotspot in 60 Seconds!
Hey tech enthusiasts, fellow travellers, and anyone who's ever wrestled with a flaky internet connection! We've all been there, haven't we? Stranded in a Wi-Fi wilderness, desperately craving a signal. Whether you’re on a road trip, trying to share your internet with a friend, or just need to connect your tablet when a dedicated Wi-Fi network is unavailable, the ability to transform your Windows 7 laptop into a hotspot is a lifesaver. And the best part? It takes less time than brewing a cup of coffee!
1. Ditching the Despair: Why You Need a Laptop Hotspot
Think about it: you're on a train and your phone's data is running low. Or maybe you're visiting family and their Wi-Fi is as reliable as a politician's promise. A laptop hotspot is your secret weapon, a digital Swiss Army knife that keeps you connected. It’s like having a mini-router that you can take anywhere. It’s the difference between being bored and connected, between scrolling through your phone and actually doing something productive. We're talking about accessing emails, streaming movies, or even just sharing your connection with a friend or family member.
2. Windows 7: The Unsung Hero of Portable Wi-Fi
While newer operating systems might boast fancier features, Windows 7 is a champion in simplicity. Its built-in functionality for creating hotspots is incredibly straightforward. It’s like that reliable old car that always starts, even after years of service. No complicated installations, no expensive software – just a few clicks, and you're good to go.
3. Prepping Your Arsenal: What You'll Need
Before we jump into the magic, let's gather our supplies. This is going to be a quick journey so there aren’t any complicated steps, just the following:
- A Windows 7 Laptop: Obvious, right? Make sure it's fully charged or plugged in – you wouldn't want to run out of juice mid-stream!
- An Active Internet Connection: This is the fuel for our Wi-Fi fire. This could be a wired Ethernet connection or a Wi-Fi connection (if the laptop is also the internet source).
- A Few Minutes of Your Time: Seriously, we’re talking less than a minute.
4. The Secret Sauce: Unveiling the Command Prompt Magic!
Here's where the magic happens. We'll be using the Command Prompt. Don't worry, it’s easier than it sounds. Think of it as a secret portal to your laptop's Wi-Fi settings.
Step 1: Open Command Prompt as Administrator. Click on the Start button, type “cmd” in the search bar, right-click "Command Prompt" and select “Run as administrator”. This gives us the necessary permissions to wield the power.
Step 2: The First Incantation – Setting up the Virtual Hosted Network. Type the following command and hit Enter:
netsh wlan set hostednetwork mode=allow ssid="YourHotspotName" key="YourPassword"- Replace "YourHotspotName” with the name you want for your Wi-Fi network. Be creative! Something fun or easily recognizable is best.
- Replace "YourPassword" with a strong password. Think of a password as your personal security gatekeeper, keeping unwanted visitors out.
Step 3: The Second Incantation – Starting the Hosted Network. Time to turn on the Wi-Fi. Again, in the Command Prompt (and still running as administrator), type and press Enter:
netsh wlan start hostednetwork
5. Sharing the Love: Enabling Internet Connection Sharing
Now that we've created the hotspot, we need to make sure it shares its internet connection. It’s like giving your laptop the ability to share its food with the other kids at the table.
- Step 1: Open Network Connections. You can find this by clicking the Start button and typing "Network and Sharing Center," and then clicking on the "Change adapter settings" link on the left side.
- Step 2: Find Your Active Internet Connection. This is the connection your laptop is using to get the internet (like your Ethernet connection or the Wi-Fi it’s connected to).
- Step 3: Open Properties. Right-click on your active internet connection and select “Properties”.
- Step 4: Enable Sharing. Click the “Sharing” tab. Check the box that says “Allow other network users to connect through this computer's internet connection.”
- Step 5: Select the Hosted Network. In the "Home networking connection" dropdown, select the name of the virtual Wi-Fi network you just created (e.g., "YourHotspotName").
- Step 6: Click OK.
6. Checking Your Work: Is It Working?
Now it’s time to test the waters. On another device (phone, tablet, another laptop), search for Wi-Fi networks. You should see the name you gave your hotspot. Connect to it using the password you set. If you can access the internet, congratulations! You've successfully turned your Windows 7 laptop into a Wi-Fi hotspot!
7. Troubleshooting Tip: The Common Pitfalls and How to Avoid Them
Sometimes, things don’t go according to plan. Here are some common issues and how to fix them:
- "The hosted network couldn't be started." This usually means a driver issue. Try updating your Wi-Fi adapter drivers. You can find these on the manufacturer's website.
- No Internet Access on Connected Devices. Double-check your internet connection sharing in step 5 of above. Make sure the "Home networking connection" is properly selected.
- Password Issues: Double-check the password you entered when connecting.
8. The Power of Customization: Tweaking Your Hotspot
Want to take things a step further? You can customize your hotspot’s settings. You can revisit the Command Prompt, and use the following commands:
- To Stop Hosted Network:
netsh wlan stop hostednetwork - To View Hosted Network Status:
netsh wlan show hostednetworkThis helps you to check your hotspot settings and even view the connected devices.
9. Security First: Protecting Your Digital Fortress
Always use a strong password for your hotspot. Avoid easily guessable passwords, such as birthdays or pet names. Treat it like a virtual bank vault! Also, it's a good practice to monitor the connected devices.
10. The Pros: Why This is a Game Changer
Creating a hotspot has many benefits.
- Convenience: Connect multiple devices to the internet without needing a dedicated router.
- Cost-Effective: It’s a free solution for Wi-Fi access.
- Portability: You can take your hotspot anywhere with your laptop.
- Emergency Connectivity: A lifeline when you don't have any other internet options.
11. The Cons: Be Aware of the Drawbacks
No solution is perfect. Be aware of the following:
- Battery Drain: Running a hotspot consumes battery power, so keep your laptop charged.
- Limited Range: The Wi-Fi signal isn’t as strong as a dedicated router. Think of it like a smaller, more concentrated beam of connectivity.
- Data Usage: Sharing your internet connection consumes data. Be mindful of your data plan.
12. Beyond Wi-Fi: Alternative Internet Sharing
For those times when Wi-Fi isn't an option, there are other ways to share your mobile internet connection:
- USB tethering: Connecting your phone directly to your laptop with a USB cable can provide an internet connection.
- Bluetooth tethering: While slower than Wi-Fi, Bluetooth can be used for a wireless connection in some situations.
13. Hotspot Etiquette: Sharing Responsibly
Be mindful of others when sharing your hotspot. Don't hog the connection, and consider the impact on your data usage. Make sure you've considered bandwidth limits. Think of it like sharing a pizza – everyone gets a slice!
14. The Future of Connectivity: What's Next?
Technology is always evolving. We can expect even more seamless and intuitive ways to share our internet connections in the future. However, the fundamental steps of creating a hotspot will likely stay the same, just refined and streamlined.
15. Mastering the Art: Turning Your Windows 7 Laptop into a Wi-Fi Hotspot
I hope the previous sections clarified the process for you. Now, you can transform your laptop into a Wi-Fi hotspot in seconds. It's a skill that empowers you to stay connected, productive, and entertained, no matter where your journey takes you. And it all begins with a few simple commands.
Closing Thoughts: Unlock Your Digital Freedom
So there you have it! You can now access and create a Wi-Fi hotspot from your Windows 7 laptop. It’s a skill that has many advantages. Don’t be afraid to experiment, explore, and embrace the power of connectivity. Now go forth, and share the digital love!
FAQs: Your Burning Questions Answered
**1. Is it safe to create a
Laptop to WiFi Hotspot: The SHOCKINGLY Easy Trick You NEED to Know!Windows was unable to connect wifi windows 7 Laptop and Desktop

By IT Magics Windows was unable to connect wifi windows 7 Laptop and Desktop by IT Magics
How to enable your network connection in Windows 7

By MHELP2U How to enable your network connection in Windows 7 by MHELP2U
Create a laptop WiFi hotspot in under 30 seconds Windows 7
By jacobspeeds Create a laptop WiFi hotspot in under 30 seconds Windows 7 by jacobspeeds

Title: How To Enable WiFi Internet Connection In Windows 7
Channel: MDTechVideos International
How To Enable WiFi Internet Connection In Windows 7 by MDTechVideos International
Change Wifi Settings
Turn Your Windows 7 Laptop into a WiFi Hotspot in 60 Seconds! (Yes, Really!)
We've all been there: stuck in a situation where a reliable internet connection is a lifeline, but the only access point is miles away. Perhaps you're on the road, working remotely from a coffee shop with spotty WiFi, or simply in a dead zone at home. Thankfully, if you have a Windows 7 laptop, you possess a powerful, often overlooked tool: the ability to transform your laptop into a fully functional WiFi hotspot in a matter of moments. Forget fiddling with complicated router setups or searching for public networks with dubious security. We'll guide you through the process, step-by-step, ensuring you're connected in under a minute.
Understanding the Power Within: The HostedNetwork Capability
Windows 7, despite its age, remains a robust operating system, brimming with features. One of the most relevant for our purposes is the HostedNetwork capability. This hidden gem allows your laptop's wireless adapter to function as both a receiver (connecting to an existing WiFi network) and a transmitter (broadcasting its own WiFi signal). Think of it as a miniature, contained router residing within your laptop. The beauty of this system is its simplicity and efficiency. Once configured, your laptop acts as a conduit, sharing its internet connection with other devices in the vicinity. This is achieved without installing third-party software, leveraging the built-in functionality that is often overlooked.
Step-by-Step Guide: Setting Up Your WiFi Hotspot
Let's get down to business and unlock this functionality. You need only a few steps to achieve a functional WiFi hotspot. This guide assumes you have a working internet connection on your Windows 7 laptop, either through a wired Ethernet connection or an existing WiFi network.
1. Accessing the Command Prompt with Administrator Privileges
The first step is to open the Command Prompt. This is where we'll execute the commands that will configure the HostedNetwork. Click the Start button, and in the search box, type "cmd." Crucially, right-click on "cmd" in the search results and select "Run as administrator." This grants the Command Prompt the necessary permissions to modify your network settings. Without administrator privileges, the commands will not work.
2. Unleashing the HostedNetwork: The Magic Commands
In the elevated Command Prompt window, we will enter and execute a couple key commands. Input the following commands precisely, and press Enter after each one:
*   `netsh wlan set hostednetwork mode=allow ssid="YourHotspotName" key="YourPassword"`

 *Replace "YourHotspotName" with the name you want your hotspot to broadcast (e.g., "MyLaptopHotspot,", "RoadTripWiFi"), and replace "YourPassword" with a strong password of at least eight characters. This password is essential for securing your hotspot and preventing unauthorized access.*

*   `netsh wlan start hostednetwork`

*Be patient, as the first command sets up the configuration, and the second command activates the hotspot. If the setup is successful, you should see a message like "The hosted network started."*
We've now established the framework for your hotspot; the next step is to enable internet sharing.
3. Enabling Internet Connection Sharing: The Final Piece of the Puzzle
Although the hotspot is activated, it won't share the internet connection. We need to configure internet connection sharing to complete the process.
Open the Network and Sharing Center. You can usually access this by right-clicking the network icon in your system tray (the area near your clock) and selecting “Open Network and Sharing Center.”
Click on “Change adapter settings” on the left-hand side of the Network and Sharing Center window. This displays a list of your network connections.
Identify the network adapter currently connected to the internet. This will either be your Ethernet connection (if connected via cable) or your existing WiFi adapter (if connected to a different WiFi network).
Right-click on the adapter that has the internet connection and select “Properties.”
In the Properties window, navigate to the “Sharing” tab.
Check the box labeled “Allow other network users to connect through this computer’s Internet connection.”
In the “Home network connection” dropdown, select “Microsoft Virtual WiFi Miniport Adapter” or a similar entry. This represents the virtual adapter created by the HostedNetwork.
Click “OK” to save the changes.
Congratulations: You've now configured your Windows 7 laptop to act as a WiFi hotspot, sharing your internet connection with other devices.
4. Testing and Troubleshooting: Ensuring a Seamless Connection
Before celebrating, it's advisable to test your newly created hotspot. On another device (a smartphone, tablet, or another laptop), scan for available WiFi networks and look for the hotspot name you designated in step 2. Connect to it using the password you created. Once connected, try browsing the internet on the connected device. If everything is configured correctly, you should be browsing without issue.
If you encounter any problems, don't panic. Common issues include incorrect password entry, issues with the network sharing settings or driver incompatibilities. Here are a few quick troubleshooting steps:
- Double-check your password: Ensure you are entering the correct password for your hotspot.
- Restart the HostedNetwork: In the Command Prompt (run as administrator), type
netsh wlan stop hostednetworkand thennetsh wlan start hostednetwork. This can often reset the connection. - Update Network Drivers: Outdated or corrupted network drivers can sometimes cause problems. Open the Device Manager (search for it in the Start Menu), expand “Network adapters,” right-click on your wireless adapter, and select “Update driver.”
- Firewall Interference: Occasionally, firewalls can block the sharing of the internet connection. Temporarily disable your firewall (for testing purposes only) and see if that resolves the issue. Remember to re-enable your firewall once you have confirmed the hotspot works.
- Reboot Your Laptop: A simple reboot can often clear up minor glitches and ensure all services are running correctly.
Security Considerations: Protecting Your Hotspot and Data
While setting up a WiFi hotspot is easy, it's crucial to understand and implement security measures to protect your data and the devices connected to your hotspot. Never use a weak or easily guessable password. A password of at least eight characters, using a combination of uppercase and lowercase letters, numbers, and symbols, is highly recommended. Consider using WPA2-Personal encryption for stronger security. Also, be mindful of the data you're sharing. Avoid accessing sensitive information or making financial transactions over an unsecured network. Keep your laptop's operating system and security software up-to-date to patch any vulnerabilities.
Additionally, you can limit the number of devices that can connect to your hotspot. While not directly configurable through the commands we've used, you can achieve this implicitly by setting a complex password and not sharing it widely. Always monitor the connected devices and disconnect any that look suspicious.
Beyond the Basics: Advanced Customization
For those who wish to go beyond the basic setup, there are advanced customization options available, though they require further command-line expertise.
Changing the Channel: By default, the hosted network uses an automatically selected WiFi channel. For better performance, you might want to change the channel to avoid interference from other nearby WiFi networks. This can be achieved with the
netsh wlan set hostednetwork channel=<channel_number>command, where<channel_number>is a value between 1 and 11. To find the least congested channel, use a WiFi analyzer app on your smartphone or other device.Setting the Maximum Number of Clients: You can adjust the maximum number of devices that can connect to your hotspot using the
netsh wlan set hostednetwork maxclient=<number>command. Replace<number>with the desired limit (e.g., 5 for five devices).
Conclusion: Your Portable Internet Hub
Turning your Windows 7 laptop into a WiFi hotspot offers a convenient solution for internet connectivity on the go. With the steps outlined in this comprehensive guide, you can create a secure and reliable hotspot in a matter of seconds, transforming your laptop into a portable internet hub. Embrace the simplicity and efficiency of the HostedNetwork feature, and say goodbye to frustrating connectivity issues. The power to connect is now at your fingertips.
