dell 2002 laptop how to turn on wifi

Title: How to Turn On Wifi Dell Laptop how to manually turn on WIFI on dell laptop
Channel: Ybal Tech
How to Turn On Wifi Dell Laptop how to manually turn on WIFI on dell laptop by Ybal Tech
Dell 2002 Laptop WiFi? This Trick Will SHOCK You!
Blast From the Past: Getting Your Ancient Dell Laptop Online (You Won't Believe This!)
Remember those clunky, gray Dell laptops from the early 2000s? They were the workhorses of a bygone era. Internet connectivity was a different beast back then. However, believe it or not, breathing new life into those relics is possible. This guide provides a surprising solution. It will help you connect your old Dell laptop to the glorious world wide web. Prepare to be amazed!
The Wireless Wilderness and Your Antique Dell
Back in 2002, WiFi wasn't ubiquitous. Routers were less common. Built-in wireless cards weren't standard features on every laptop. Consequently, connecting your Dell to the internet could prove difficult. However, don’t despair just yet. Fortunately, several workarounds exist. They actually allow you to bring your old laptop back online.
Unveiling the Secret Weapon: The USB Wireless Adapter
The most straightforward solution is surprisingly simple. It's the USB wireless adapter. This little device is remarkably effective. Essentially, it acts as an external wireless card. Hence, it allows your ancient Dell to connect to modern WiFi networks. Consequently, it’s a game-changer!
So, how does it work? First, you will need to obtain a USB wireless adapter. You can find them affordably online. Second, plug the adapter into a free USB port on your Dell. Third, install the necessary drivers. Typically, the adapter comes with a driver CD. Afterwards, you can download the driver from the manufacturer’s website. Finally, configure the adapter to connect to your WiFi network. It's really that simple.
Step-by-Step: Bringing Your Dell Back to Life
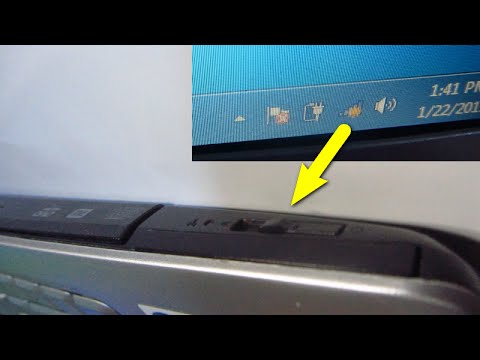
Let's break down the process into easily digestible steps. Because the process seems daunting at first, follow these instructions. First, locate a USB wireless adapter. Ensure it's compatible with older operating systems. Windows XP is likely what you have on your laptop. Second, carefully insert the adapter into a USB port. Third, install the drivers. This often involves inserting the provided CD. Next, browse the CD for the driver files. Finally, install the drivers. Restart your computer when prompted. After that, once your computer restarts, you should see a new network icon. This icon shows up in the system tray. Click on it to find available WiFi networks. Select your network, enter your password, and voila! Your ancient Dell should now be online.
Troubleshooting Tips: Because Things Aren't Always Smooth Sailing
Sometimes, things don't work perfectly. Therefore, some common issues might arise during the setup process. Here are some troubleshooting tips to try:
- Driver Issues: The dreaded driver problem. Make sure you download the correct driver. Ensure you're installing the version for your specific operating system.
- Signal Strength: Old laptops can struggle with weak WiFi signals. Position your laptop closer to your router. Consider using a WiFi extender if needed.
- Compatibility: While rare, some adapters might not be fully compatible with older systems. Check the adapter's compatibility specifications.
Beyond the Basics: Exploring Further Possibilities
Once you have WiFi working, the possibilities are endless. Surf the web. Check your email. If you’re feeling adventurous, explore some old online communities. However, remember your antique laptop is limited. Avoid modern, resource-intensive websites. Because modern websites require more resources, stick to simpler browsing. However, the biggest enjoyment is achieving the impossible.
A Nostalgic Journey: The Value of Recycling and Revival
Reviving an old Dell laptop is a worthwhile endeavor. It's a fun project. Moreover, it reduces e-waste. By repurposing old technology, you also contribute to sustainability. It’s a rewarding experience. It's like taking a trip back in time.
Final Thoughts: Don't Give Up On Your Old Friend
Don't give up on your old Dell. With a USB wireless adapter, you can easily connect it to the internet. It's a simple process that offers surprisingly satisfying results. So, embrace the challenge. Get your old Dell back online. You’ll have a great time. You might just be surprised at what you can accomplish. Now go forth and get connected!
Laptop WiFi Nightmare? This Adapter's the FIX!Here's that article you requested!
Dell 2002 Laptop WiFi? This Trick Will SHOCK You!
Hey tech adventurers! Remember those clunky, beige behemoths that used to be our pride and joy? I'm talking about the early 2000s Dell laptops – the ones that felt like you were carrying a small, slightly warm brick around. Good times, right? But there's a burning question that often surfaces when reminiscing about these relics: How in the world did we connect to the internet with those things? WiFi wasn't quite the everywhere-you-go convenience it is today. And what if you're dusting off that old Dell Inspiron 2600 (or similar) for a bit of retro surfing? We've got you covered. Get ready, because this isn't your average tech tutorial. This is about resurrecting a piece of history!
1. The WiFi Wasteland: Exploring the Year 2002's Wireless World
Back in 2002, WiFi was like a mythical beast. The technology existed, but it wasn't universally adopted. Imagine a world where finding a free WiFi hotspot was akin to finding a unicorn wearing a tiny top hat. Most of us were tethered to the internet via Ethernet cables, dial-up modems, or perhaps, if we were lucky, a burgeoning home wireless network. Remember those clunky PCMCIA (remember those?!) wireless cards? They were the cutting-edge of wireless connectivity, often more trouble than they were worth.
Think about it. We were living in a world of limited bandwidth, slow speeds, and the constant fear of getting kicked offline mid-email. The internet landscape was a vast, untamed wilderness compared to today's sprawling, interconnected metropolis.
2. Dell's Dilemma: What Did These Laptops Actually Offer?
So, what were Dell's intentions in 2002 with regards to WiFi on their laptops? Well, the answer isn’t as straightforward as you'd think. Many models, like the Inspiron series, could be equipped with wireless capabilities, but it wasn't always standard. It was an optional extra, like a fancy new graphics card or a built-in CD-RW drive. This often meant you needed to purchase a separate wireless card – usually a PCMCIA card – to achieve WiFi connectivity.
Let's be honest, the experience was more "hit or miss" than "plug and play." Drivers, compatibility, and network security protocols could be a minefield of technical troubles.
3. Unearthing the Truth: Was Your Dell 2002 WiFi-Ready?
This is where the detective work begins. Let's determine if your specific Dell laptop from 2002 was even capable of WiFi. Here's how to find out:
- Inspect the PCMCIA Slot: Look for a slot, usually on the side of the laptop. This is where a wireless card would be inserted. If the slot is there, the potential is there!
- Check the Manual (If you have it): The manual is your best friend. It will clearly state whether your model offered WiFi as an option.
- Examine the System Specifications Online: Search online for your specific Dell model (e.g., "Dell Inspiron 2600 specifications") to see if it included wireless options. Websites like CNET or PCMag were great resources back in the day.
- Physically Examine the Laptop: If you don’t have the manual, look for stickers identifying the networking components.
4. Encountering the PCMCIA Card: The Wireless Gateway (Sometimes)
Ah, the PCMCIA card. It was the technological equivalent of a Swiss Army knife for your laptop. It could do a lot of things, including giving your old Dell WiFi functionality. Assuming your laptop had a PCMCIA slot and if you were fortunate enough to have purchased the wireless card, you might actually be able to connect to a network. Think of it as the WiFi portal.
However, these cards were not always the most reliable. Driver issues, limited range, and the occasional dropped connection was a common occurrence.
5. The Shocking Trick: Adapting to Modern WiFi
Here's the secret sauce, the pièce de résistance: You can still connect that old Dell to modern WiFi! But it requires some clever thinking. See, those older laptops often don't support the newer WiFi security protocols (like WPA2 or WPA3) that are used by most modern routers.
Here’s where the shock comes:
- Option 1: Lower Your Router's Security (Use with Extreme Caution): You could potentially configure your router to use an older security protocol (like WEP) and make the network easier to access. We strongly advise against this unless you’re using the laptop on an isolated network and understand the risks. WEP is incredibly insecure.
- Option 2: The USB WiFi Adapter Renaissance The most practical (and safest) solution is a USB WiFi adapter. Companies still sell them, and they're designed to be compatible with modern security.
- Why This Is the BEST Choice: USB adapters bypass the PCMCIA card problem entirely. They're usually plug-and-play (relatively speaking), and they support modern security protocols.
- Finding the Right Adapter: Search for "USB WiFi adapter for Windows XP" (or your relevant operating system). Make sure it supports WPA2/WPA3.
6. Installing the USB Adapter: A Step-by-Step Revelation
Let's get this show on the road. Here's how to get that USB adapter working:
- Plug it in: Insert the USB WiFi adapter into an available USB port on your Dell laptop.
- Install the Drivers: The adapter should automatically install the drivers, but sometimes you might need to insert the driver CD or download the driver from the manufacturer's website. This can be tricky for older operating systems, so have a separate modern computer ready to download the driver and transfer it.
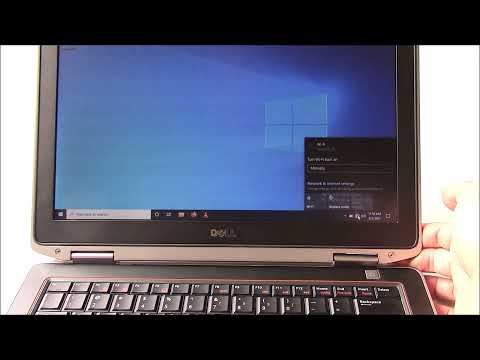
- Find Your Network: Once the drivers are installed, the adapter should detect available WiFi networks.
- Connect and Enter the Password: Select your network and enter the password.
- Surf the Web (Or at Least Try): Congratulations! You're (hopefully) connected to the internet.
7. Troubleshooting: The Trials of Old Tech
Things might not always go smoothly; old tech is like that. If you encounter issues:
- Driver Problems: Make sure you have the right drivers. It's often easiest to find them on the manufacturer’s website. Try downloading them from a modern computer and transferring them.
- Weak Signal: The range on older WiFi adapters might be limited. Try moving closer to your router.
- Slow Speeds: Don't expect lightning-fast speeds from your old Dell!
- Security Issues: If you have configured your router with an outdated security protocol, remember to switch back when you have a modern device connected.
It can be a frustrating endeavor, but the joy of getting your 20-year-old laptop up and running is unmatched.
8. The Windows XP Revival: The Operating System Dilemma
Most of these Dell laptops were running Windows XP. That operating system, while iconic, is very vulnerable to security threats today. Consider this:
- No Security Updates: Microsoft stopped supporting Windows XP years ago. This means no more security patches to fix vulnerabilities.
- Malware Magnet: Your retro laptop is inherently susceptible to viruses and malware.
- Limited Browser Support: Modern websites and applications might not work correctly on XP browsers.
9. Embracing the Retro Experience: What Can You Actually Do?
So, what can you actually do with your resurrected Dell?
- Retro Gaming: Play those classic PC games!
- Word Processing: Write and create on an ad-free environment on that old Word Processor!
- Offline Tasks: Use it for tasks that don’t require an internet connection.
10. Cybersecurity Caveats: Staying Safe in the Modern Age
Protecting your old Dell laptop from the dangers of the internet is essential. Here are some tips:
- Use a Firewall: Make sure a firewall is enabled.
- Install Anti-Virus Software: Even though your operating system is outdated, install a good antivirus program.
- Be Careful What You Download: Avoid downloading anything from untrusted sources!
- Keep it Isolated (Recommended): The safest approach is to create an isolated network for your old Dell to reduce the risk of it infecting your other devices.
11. Alternative Operating Systems: A Fresh Start?
If you're feeling adventurous, consider installing a lightweight Linux distribution, such as Lubuntu, on your Dell. It will give you a more secure and updated operating system while maintaining a familiar environment. This can dramatically improve performance and security.
12. The Battery Blues: Managing Power
Batteries on old laptops degrade over time. You’ll likely need to keep your Dell plugged in most of the time. Consider buying a replacement battery if possible, but don't expect miracles, as they are often tough to acquire.
13. Hardware Hurdles: Beyond WiFi
Besides WiFi, other hardware components could cause issues, such as:
*
Acer WiFi Nightmare? FIX Your Weak Signal NOW!How to turn ON Wi-Fi on Dell Inspiron 1525 Laptop
By furulevi How to turn ON Wi-Fi on Dell Inspiron 1525 Laptop by furulevi
Fix Dell Laptop Wi-Fi is Not Working Problem in Windows 1087 2025

By FIXsage Fix Dell Laptop Wi-Fi is Not Working Problem in Windows 1087 2025 by FIXsage
How to Turn ON WiFi On Dell Laptop With Keyboard itslaptop.com

By itslaptop How to Turn ON WiFi On Dell Laptop With Keyboard itslaptop.com by itslaptop
Title: How To Fix And Turn On No WiFi On A Dell Latitude Laptop Computer
Channel: DIY University
How To Fix And Turn On No WiFi On A Dell Latitude Laptop Computer by DIY University
Laptop Wifi Connect
Title: Unveiling the Secrets of Crafting Exceptional Artisan Bread at Home
We’ve all tasted it: the crusty, chewy, perfectly risen loaf of artisan bread that seems to defy the laws of domestic baking. The tang of the sourdough, the earthy notes of a whole-wheat boule, the delicate crumb of a ciabatta. Creating this magic at home often feels like a skill reserved for the elite. But, armed with the right knowledge and a little patience, anyone can master the art of crafting exceptional artisan bread. Let us embark on a journey into the heart of this craft, revealing the secrets that will transform your kitchen into a bakery.
The Foundation: Understanding Flour Power
The foundation of any great bread lies in its flour. The protein content and type of flour fundamentally impact the bread's structure, texture, and flavor. Forget the all-purpose varieties you might be accustomed to. For artisan bread, you'll want to explore a world of options.
Bread Flour: This is your workhorse, boasting a high protein content (typically 12-14%). This high protein content develops plenty of gluten, which is crucial for creating the structure and chewiness characteristic of artisan loaves. Look for brands milled from hard red spring wheat.
Whole Wheat Flour: Adds a nutty flavor and hearty texture. However, whole wheat flour absorbs more water than bread flour, and the bran can sometimes interfere with gluten development. Adjust your hydration accordingly. Freshly milled whole wheat flour is ideal, but high-quality commercial options will suffice.
Rye Flour: Contributes a distinctive earthy flavor and a slightly sticky texture. Rye flour lacks the gluten-forming proteins of wheat and requires careful handling, often used in a blend with wheat flour. Choose either light, medium, or dark rye based on the desired flavor intensity.
Semolina Flour: Generally used for pasta, some bakers also choose it for a specific texture and chewiness.
Understanding the characteristics of each flour is the first step toward mastery. Experiment with different flour combinations to discover your preferred flavor profiles and textures.
The Cornerstone: The Magic of Water and Hydration
Water is far more than a mere ingredient; it's the lifeblood of bread. It's responsible for hydrating the flour, activating the gluten, and creating the steam necessary for a beautiful oven spring. Hydration, the ratio of water to flour, profoundly impacts the final product.
- High Hydration: Loaves with a high hydration (70% or more) typically result in an open crumb, a delicate texture, and a longer shelf life. They are, however, more challenging to handle.
- Low Hydration: Lower hydration loaves tend to be easier to shape, offering a tighter crumb, and a chewier texture.
The key is to find the right balance. Start with recipes that specify hydration levels to understand how different ratios affect the bread.
The Alchemy: The Role of Yeast and Fermentation
Yeast is the engine that drives bread baking. It converts sugars into carbon dioxide, which leavens the dough, and alcohol, which contributes to the flavor.
- Active Dry Yeast: A common and readily available option. It requires activation in warm water before use.
- Instant Yeast (or Rapid Rise Yeast): Can be added directly to the dry ingredients. It's a convenient choice for beginners.
- Fresh Yeast: Generally produces a subtler flavor and requires careful handling.
The fermentation process, controlled by temperature and time, is where the magic truly happens. Longer fermentation times, often in the refrigerator, develop complex flavors and improve the bread's texture. This slow fermentation is often referred to as a cold proof.
The Artistry: The Science of Mixing and Kneading
Mixing and kneading are critical steps in developing the gluten network, giving the bread its structure.
Autolyse: This is a crucial step. Combine the flour and water and let it rest for 20-60 minutes before adding the yeast and salt. This allows the flour to fully hydrate, making the dough easier to handle and improving the final texture.
Kneading by Hand: Requires patience and attention. Push the dough away from you with the heel of your hand, fold it, and rotate. Repeat this motion for 10-15 minutes until the dough becomes smooth and elastic.
Using a Stand Mixer: The dough hook attachment streamlines the process. Knead on low to medium speed until the dough pulls away from the sides of the bowl and forms a cohesive mass.
The Windowpane Test: Once the dough is kneaded, pick a small portion and gently stretch it. If you can stretch it thin enough to see through (like a windowpane) without tearing, the gluten development is sufficient.
The Ritual: Proofing and Shaping Your Loaf
Proofing is the final rise before baking. The goal is to create air pockets, which will give your bread its texture.
- Bulk Fermentation: The first rise, usually in a bowl. The dough expands during this stage.
- Shaping: This involves gently deflating the dough, folding it, and forming it into the desired shape (round, oblong, batard, etc.).
- Final Proof: The second rise. The dough proofs in a banneton basket or on a floured surface, which helps maintain its shape.
The Transformation: The Secrets of Baking
Baking artisan bread is all about creating steam and achieving a perfect crust.
Preheating: Preheat your oven and baking stone (or Dutch oven) to the temperature specified in the recipe. This is crucial for oven spring.
Creating Steam: Steam is the key to a fantastic crust. Introduce steam into the oven during the first part of the baking process. This can be achieved by:
- Adding ice cubes to a preheated pan at the bottom of the oven.
- Spritzing the oven with water.
- Baking in a Dutch oven (which traps steam).
Scoring: Before baking, score the surface of the loaf with a sharp knife or lame. This controls the expansion of the bread and creates beautiful patterns.
Temperature and Timing: Baking times and temperatures vary depending on the recipe and the oven. Expect your bread to be fully baked when the internal temperature reaches 200-210 degrees Fahrenheit (93-99 degrees Celsius).
The Reward: Troubleshooting and Common Challenges
Baking artisan bread involves a learning curve. Don't be discouraged by the inevitable missteps.
- Dense Loaf: Might be caused by insufficient gluten development, too much flour, or a too-short proofing time.
- Flat Loaf: Often the result of over-proofing or insufficient oven spring.
- Cracked Crust: May be due to the dough being too dry or insufficient scoring.
- Lack of Flavor: Experiment with longer fermentation times, sourdough starters, and different flour combinations.
With each loaf, you’ll refine your technique and deepen your appreciation for this ancient craft. Be patient, and you will eventually create beautiful and flavorful bread.
The Legacy: Expanding Your Artisan Bread Horizons
Once you master the basics, you can explore a world of possibilities.
- Sourdough: Cultivating a sourdough starter opens a whole new dimension of flavor and texture.
- Adding Flavors: Get creative by adding herbs (rosemary, thyme), nuts (walnuts, pecans), seeds (sunflower, sesame), or dried fruit (cranberries, raisins) to your loaves.
- Experimenting with Different Recipes: The art of baking bread can be extended to a wide array of options, such as focaccia, brioche, challah, and bagels.
Baking artisan bread is more than just a hobby; it's a journey of discovery. It's a way to connect with the past, celebrate the present, and share something truly special with those you love. So, gather your ingredients, embrace the process, and prepare to experience the joy of crafting exceptional artisan bread at home.
