cara sharing wifi laptop cmd
Title: Cara Sharing Internet di Laptop dengan CMD
Channel: Ide Rumah Pohon
Cara Sharing Internet di Laptop dengan CMD by Ide Rumah Pohon
Unlock Your Laptop's WiFi Hotspot in SECONDS! (CMD Trick)
Ignite Your Laptop's Instant WiFi Hotspot: A Lightning-Fast CMD Revelation!
So, you’re craving a personal WiFi hotspot but dreading the labyrinthine setup process? Don't fret. You are in the right place. Because today, we’re diving deep into a hidden gem. This is something many overlook. We're talking about unleashing your laptop's WiFi hotspot. It’s a trick using the Command Prompt (CMD). Get ready to say goodbye to complicated configurations. Prepare to say hello to portable internet access in a blink.
Unveiling the Secret: CMD – Your WiFi's Best Friend
Forget wrestling with complicated software. Ignore those clunky interfaces. Here's a different approach. The Command Prompt (CMD) is your secret weapon. It's a powerful tool. It allows you to do much more than you think. It’s the key to a smooth, speedy hotspot creation. But how does it work? In essence, CMD provides a direct line to your laptop's network settings. Consequently, you bypass the usual graphical interfaces. This offers a more direct, and often faster, route.
Step-by-Step Guide: Crafting Your Hotspot Haven
Let’s get started. The process is straightforward. However, it's crucial to follow each step precisely.
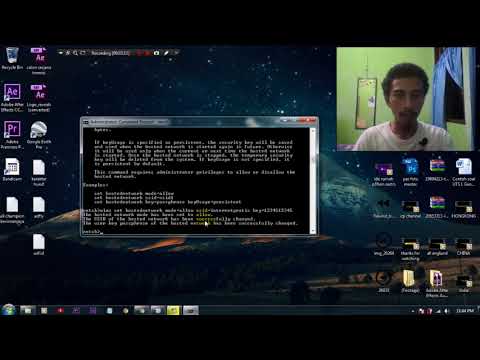
Open CMD as Administrator: First, you need to launch the Command Prompt. But wait! You must do so as an administrator. This grants the necessary permissions. You can find the CMD in your start menu. Then, right-click on it. Select "Run as administrator." This is critical for success.
The Magic Command: Setting the Stage: Now, type the following command exactly as it appears. Make sure there are no typos:
netsh wlan set hostednetwork mode=allow ssid="YourHotspotName" key="YourPassword"Replace "YourHotspotName" with your desired hotspot name. Use a name that you'll easily recognize. Then, replace "YourPassword" with a strong password. Choose a password that is unique. Finally, hit Enter.Activating the Network: You've set the stage. Now, you need to activate the hosted network. Therefore, type the following command:
netsh wlan start hostednetwork. Press Enter again. You should see a confirmation message. It means your WiFi is almost ready.Sharing Your Internet Connection: Your hotspot is almost ready! You need to share your existing internet connection. Go to your Network and Sharing Center. You can find it in your Control Panel. Click on "Change adapter settings." Locate your active internet connection. It could be Ethernet or WiFi. Right-click on it. Choose "Properties." Navigate to the "Sharing" tab. Check the box that says "Allow other network users to connect through this computer's Internet connection." Select your hosted network you created from the dropdown menu. Click "OK."
Verifying the Connection: At this point, your hotspot should be active. Grab another device. Connect to your newly created WiFi network. Enter your password when prompted. You should now have internet access.
Troubleshooting Tango: When Things Go Awry
Sometimes, things don’t go as planned. Don't despair! These are some common issues. Let's explore them.
- "The hosted network couldn't be started" Error: This often means you might not have the correct network drivers installed. First, update your network drivers. Secondly, ensure your wireless adapter supports hosted networks. Check your laptop's specifications.
- No Internet Access: Double-check your internet connection sharing settings. Make sure you've chosen the correct network adapter. Also, ensure that your primary internet connection is active.
- Password Issues: Double-check your password for typos. Also, ensure it is correct. Re-enter it if needed.
Beyond the Basics: Fine-Tuning Your Hotspot
While this CMD trick is quick, you can do more.
- Change the Hotspot Name/Password: These can be changed anytime. Use the same
netsh wlan set hostednetworkcommand. Just change the "ssid" and "key" values. Then, stop and restart the hosted network. - Automate the Process: You can create a batch file (.bat) for one-click hotspot activation. Copy and paste the commands into a text file. Save it with a .bat extension, and you're good to go.
- Monitor Your Data Usage: Be mindful of your data consumption. Especially if you have a limited data plan.
The Aftermath: Enjoying Your Personalized WiFi Bubble
Congratulations! You are now the master of your own portable WiFi domain. You've bypassed the complexity. You've chosen the simple route. Your laptop is now a powerful hotspot. You can share your internet connection. You can do it anytime and anywhere.
Wrapping Up: Embrace the CMD Advantage
This CMD trick offers a phenomenal way to create an instant WiFi hotspot. It's faster than many other methods. It's also reliable. So, ditch the complicated software. Embrace the power of CMD. It's a hidden gem, a productivity booster. Now, go forth and create your personal WiFi cloud.
Hackintosh WiFi Nirvana: The BEST Laptop Card for Your Build!Unlock Your Laptop's WiFi Hotspot in SECONDS! (CMD Trick)
Hey everyone! Ever been caught in that frustrating situation? You're crammed into a busy coffee shop, the public WiFi is slower than a snail in molasses, and you desperately need to connect your tablet or phone. Or maybe you're at a friend's place, and they've got a dodgy connection, and you wish your laptop could just be the hotspot effortlessly. Well, we've all been there, and I'm here to tell you that there's a ridiculously simple, lightning-fast solution – a secret weapon hidden in plain sight: the Command Prompt. Let's dive in!
1. The WiFi Hotspot Headache: A Universal Struggle
Think about it: terrible public WiFi, data limits on your phone, or just needing to share your internet connection with multiple devices. These are common frustrations. Creating a WiFi hotspot is often seen as a complicated process, involving third-party software, endless settings menus, and a whole lot of head-scratching. But what if I told you there's a way to bypass all that? A way to transform your laptop into a wireless router in mere seconds, using a tool you already have?
2. Enter the Command Prompt: Your Secret Weapon
Forget downloading bulky software and wading through complicated interfaces. The Command Prompt (CMD) – that black box of text that often looks intimidating – is actually your best friend in this scenario. It's a powerful tool built right into Windows, and it holds the key to unlocking your laptop's hotspot capabilities. Think of it as the magic wand that turns your laptop into a WiFi conductor, effortlessly distributing its internet signal.
3. Unveiling the Magic: The Step-by-Step Guide
Alright, let’s get down to brass tacks. This is the core of the whole operation. Follow these steps, and you'll be creating your own WiFi hotspot in, well, seconds. I’m talking faster than you can boil an egg!
Step 1: Open the Command Prompt. Click the Windows Start button, type "cmd," and press Enter. Alternatively, you can right-click the Start button and select "Command Prompt" or "Windows Terminal" (depending on your Windows version). It’s like unlocking a hidden door to a world of powerful commands.
Step 2: The First Spell (Setting Up the Virtual Adapter). Type the following command and hit Enter:
netsh wlan set hostednetwork mode=allow ssid=YourHotspotName key=YourPasswordYourHotspotName: Replace this with the name you want your WiFi hotspot to have. Think of it as your network's catchy nickname. Something memorable is ideal.YourPassword: Choose a strong password! This will be the secret key to access your hotspot. Don't make it something easily guessable (or your neighbor will be enjoying your internet!).
Step 3: The Second Spell (Activating the Virtual Adapter). Now, type this command and hit Enter:
netsh wlan start hostednetworkThis magic spell activates your hotspot. Poof! Your laptop just became a WiFi transmitter.Step 4: Sharing the Internet Connection. This final step is crucial.
- Open the "Control Panel" and navigate to "Network and Sharing Center."
- Click on "Change adapter settings" (on the left side of the screen).
- You'll see a list of your network adapters (like your regular WiFi connection and your Ethernet connection if you have one).
- Find your primary internet connection: (e.g., the one you're using to connect to the internet). Right-click on it and select "Properties."
- Click on the "Sharing" tab within the properties window.
- Check the box that says "Allow other network users to connect through this computer's Internet connection."
- In the "Home networking connection" dropdown menu, select the name of the "Microsoft Hosted Network Virtual Adapter" (it will have the name you chose for your hotspot, or something similar, or be called "Local Area Connection*").
- Click "OK."
This sharing part is like giving your new WiFi hotspot the keys to your internet kingdom. It tells your laptop to pass the internet signal through to the new network you just created. It’s as simple as that!
4. Troubleshooting: Because Life Isn’t Always Smooth Sailing
Sometimes, things don’t go exactly as planned. Don’t worry; it’s not the end of the world. Here's what to do:
- Check Your Spelling: Double-check those commands! A tiny misspelling can throw everything off. Seriously, type them carefully (or copy and paste them!).
- Administrator Privileges: Make sure you open the Command Prompt as an administrator. Right-click the Command Prompt shortcut and select "Run as administrator." This gives the CMD the permissions it needs.
- Driver Issues: Check your network adapter drivers. Outdated drivers can sometimes cause problems. You can manually update drivers through the Device Manager.
- Firewall Interference: Your firewall might be blocking the hotspot. Try temporarily disabling it or adding an exception for the hosted network. Be cautious when disabling your firewall.
- Reboot Your Laptop: When in doubt, a simple restart can often work wonders! It clears everything and reloads the system.
5. Fine-Tuning Your Hotspot: Making it Your Own
Once your hotspot is up and running, you can customize it further.
- Change the SSID (Network Name): Need to change the name? Simply repeat the
netsh wlan set hostednetwork mode=allow ssid=YourNewHotspotName key=YourPasswordcommand. - Change the Password: Similarly, change the
YourPasswordin the same command. - View Connected Devices: You can see the devices connected to your hotspot, although this capability can vary depending on your Windows version.
6. The Speedy Advantage : Why Choose the CMD Method?
Why bother with the command prompt when there are plenty of apps that do the same thing? Well, let me tell you:
- It's Fast! This is the main draw. You can set up a hotspot in seconds.
- It's Free: Unlike some third-party software, this method costs you absolutely nothing.
- It’s Efficient: It doesn't hog system resources like some of those other apps. Makes your laptop work smoothly.
- It’s Built-in: No need to download extra software. It's right there, waiting.
7. Limitations and Considerations: Knowing the Fine Print
Even though this CMD trick is fantastic, it's not perfect. There are a few things to be aware of:
- Range: The range of your hotspot will depend on your laptop's WiFi card. Don't expect miracles!
- Battery Life: Sharing your internet connection will consume more battery power. Keep an eye on your battery level!
- Security: Always use a strong password to protect your hotspot from unauthorized access.
- Windows Versions: While this works on most modern Windows versions, some older versions might have slight differences. But, generally, the process is similar.
8. Deactivating Your Hotspot: Shutting it Down
When you're done with your hotspot, you'll want to turn it off to conserve battery and prevent unintended data usage. Here's how:
- The Shutdown Command: In the Command Prompt (as an admin), type
netsh wlan stop hostednetworkand press Enter. This magic immediately turns off your hotspot. Simple and elegant!
9. The Art of the Hotspot: Use Cases and Scenarios
Think about all the times this little trick can come in handy:
- Travel: Share your hotel room's Wi-Fi with all your devices (or share your phone's hotspot with your laptop)
- On the Go: Create a quick hotspot in a pinch, like in a cafe, train, or bus (just make sure you have some data to share)
- Sharing with Friends: Help a friend or family member get connected when you don’t have access to the router.
- Troubleshooting: When your main router is acting up, make the hotspot on your laptop your backup connection.
10. Beyond the Basics: Advanced Customization
While the basic commands are all you need, you can dig deeper for more control:
- Setting a Static IP Address: For advanced networking, you can configure a static IP address for your hotspot.
- Monitoring Data Usage: You can’t directly monitor the data usage within the CMD tool, but you can often see the data bandwidth from within the software, though it’s not usually very detailed.
11. The Power of Prevention: Avoiding Common Pitfalls
Be proactive to avoid common issues:
- Update Your Drivers: Regularly update your network drivers to prevent connectivity problems.
- Secure Your Hotspot: Always choose a strong password.
- Monitor Battery Life: If you’re on battery power, keep an eye on how much energy is being used.
12. The
Asus WiFi Nightmare? Fix Your Windows 10 Connection NOW!Tutorial Cara TetheringShare Wifi Laptop dengan CMD atau Command Prompt

By Reaf Tutorial Cara TetheringShare Wifi Laptop dengan CMD atau Command Prompt by Reaf
Cara mengirim MSG ke siapa pun di WIFI Anda pranks komputer keren prank-komputer info

By Josh Cara mengirim MSG ke siapa pun di WIFI Anda pranks komputer keren prank-komputer info by Josh
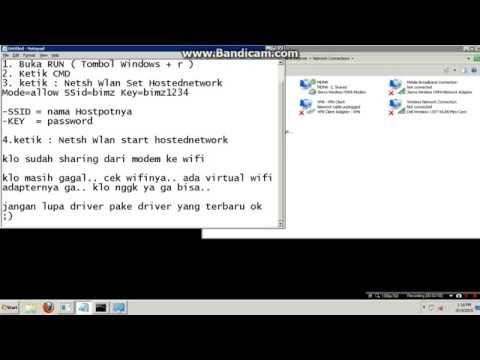
Cara Membuat HotspotWiFi Sendiri di Windows pake CMD aja'

By JuliKoding Cara Membuat HotspotWiFi Sendiri di Windows pake CMD aja' by JuliKoding
Title: Cara Sharing WIFI via CMD
Channel: Wisnu Prasetyo
Cara Sharing WIFI via CMD by Wisnu Prasetyo
Wifi On Laptop
Unlock Your Laptop's WiFi Hotspot in SECONDS! (CMD Trick)
We've all been there: stranded without Wi-Fi, tethering to a phone that's quickly draining its battery, or desperately searching for a public hotspot. But what if we told you there's a remarkably simple, built-in solution to transform your Windows laptop into a fully functional Wi-Fi hotspot in mere seconds? Forget the complex third-party software and clunky interfaces; the power to share your internet connection is already within your grasp, thanks to the often-underestimated Command Prompt (CMD). In this comprehensive guide, we'll unveil the precise, step-by-step process, ensuring you become a Wi-Fi hotspot master, all while bypassing the frustrating complexities of traditional methods.
Understanding the Power of the Command Prompt
Before diving into the specifics, let's clarify the magic behind the Command Prompt. Think of it as a direct line of communication with your operating system. Instead of clicking through endless menus, the CMD allows us to execute specific commands, providing granular control over system functions—including, crucially, the creation and management of virtual Wi-Fi networks. It’s like having a secret key to unlock hidden functionalities within your laptop. This method harnesses the built-in capabilities of Windows to create a software-based access point, allowing other devices to connect to your internet connection through your laptop's Wi-Fi adapter. The beauty lies in its speed and simplicity – once you understand the commands, setting up your hotspot is as quick as typing and pressing Enter.
Step 1: Launching the Command Prompt as Administrator
The first, and arguably most crucial, step requires launching the Command Prompt with administrator privileges. This is because we'll be making system-level changes that your standard user account doesn't have the authority to handle. Here's how to do it:
- Search for "cmd": Type "cmd" (or "Command Prompt") in the Windows search bar located on your taskbar.
- Right-click and "Run as administrator": Right-click on the "Command Prompt" result that appears. From the context menu, select "Run as administrator." You'll likely be prompted to grant permission; click "Yes." This opens the command prompt with the necessary elevated privileges.
Step 2: Creating the Virtual Hosted Network
With the Command Prompt now running in administrator mode, we’re ready to conjure our virtual Wi-Fi hotspot. This process involves a single, yet powerful, command that tells the operating system to configure a virtual network adapter, essentially creating the foundation for our hotspot:
- The Magic Command: Carefully type the following command into the Command Prompt window. Pay close attention to the spaces!
netsh wlan set hostednetwork mode=allow ssid="YourHotspotName" key="YourPassword123"Replace"YourHotspotName"with your desired network name (SSID). This is what other devices will see when they search for available Wi-Fi networks. Replace"YourPassword123"with a strong and secure password. This is critical for protecting your network from unauthorized access. Choose a password that is at least 8 characters long and includes a combination of uppercase and lowercase letters, numbers, and symbols. - Press Enter: After entering the command with your chosen network name and password, press the Enter key. You should see a confirmation message, a good sign that the virtual hosted network has been successfully configured.
Step 3: Starting the Hosted Network
Now that we’ve created the network, we need to activate it. This step actually starts the virtual Wi-Fi hotspot, making it ready for other devices to connect.
- The Start Command: In the same Command Prompt window, type the following command and press Enter:
netsh wlan start hostednetwork - Confirmation and Possible Errors: You should receive a confirmation message indicating that the hosted network has started. However, it is possible that the command will generate an error. If it does, don't panic. It’s mostly likely because your Wi-Fi adapter driver needs updating or your Wi-Fi adapter doesn't support hosted networks. Ensure your wireless adapter driver is up-to-date by checking for updates in the Device Manager.
Step 4: Sharing Your Internet Connection
We have configured and started the Wi-Fi hotspot. However, so far, it's only a software-based access point. It isn't yet connected to the internet. We need to share our existing internet connection (ethernet cable or other WiFi connection) with the newly created hotspot.
- Accessing Network Connections: Open the Network Connections settings. The easiest way is to search for "View network connections" in the Windows search bar.
- Locating Your Internet Connection: Identify the network adapter that is currently providing your internet access. This will usually be labeled "Wi-Fi" or "Ethernet" depending on how you're connected.
- Sharing the Connection: Right-click on your active internet connection adapter (Wi-Fi or Ethernet) and select "Properties".
- Navigate to the Sharing Tab: In the Properties window, click on the "Sharing" tab.
- Enable Internet Connection Sharing: Check the box that says "Allow other network users to connect through this computer's Internet connection."
- Select Your Hosted Network: Under the "Home networking connection" dropdown menu, select the name of your hosted network. (It will be the one you named in Step 2.)
- Apply and Confirm: Click "OK" to save the changes. You should now see the hosted network broadcasting the internet connection.
Step 5: Connecting Devices to Your Hotspot
With everything set up, the final step is to connect your devices to the hotspot you've created.
- Search for Available Networks: On any device (smartphone, tablet, another laptop) with Wi-Fi capabilities, scan for available Wi-Fi networks.
- Select Your Network: Look for the network name (SSID) you specified in Step 2.
- Enter Your Password: When prompted, enter the password you set during the hosted network creation.
- Connect and Enjoy: Within moments, the device should connect to your hotspot and begin accessing the internet.
Troubleshooting Common Issues
While this process is generally straightforward, you may encounter some hiccups. Here's a quick guide to resolving the most common problems:
- "The hosted network couldn't be started": This is commonly due to an outdated or incompatible Wi-Fi adapter driver. Ensure your driver is up-to-date by visiting the manufacturer's website or using Windows Update. Also, it is possible that the Wi-Fi adapter does not support hosted networks.
- "Can't connect to the internet": Double-check that you have correctly shared your internet connection in the Network Connections settings (Step 4). Ensure the correct network adapter is selected for sharing. Restarting your laptop can sometimes resolve connectivity issues.
- Slow speeds: The speed of your hotspot is dependent on the speed of your primary internet connection. Also, consider the number of devices connected and their respective bandwidth usage. Moving closer to your laptop can sometimes improve signal strength.
Stopping the Hosted Network (and Restarting)
Once you finish using your hotspot, there are a couple of important commands for stopping and managing its lifecycle:
Stopping the Hosted Network: To disable the hotspot, use the following command in the Command Prompt:
netsh wlan stop hostednetworkRestarting the Hosted Network: Occasionally, you may need to restart the hotspot. You can do this by first stopping it (as above) and then restarting it using the "netsh wlan start hostednetwork" command from Step 3.
Advanced Customization and Further Exploration
While the basic steps cover the core functionality, the Command Prompt offers more advanced customization options:
- Changing the SSID and Password: At any time, you can modify the network name and password by re-entering the "netsh wlan set hostednetwork" command with your desired new settings. The process is identical to the original configuration in Step 2.
- Viewing Hosted Network Information: To see the status of your hosted network, including its SSID, authentication type, and connected devices, use the following command:
netsh wlan show hostednetworkThis command delivers a wealth of information about your active virtual network.
Security Considerations
While this method is incredibly convenient, always prioritize security:
- Use a Strong Password: Never use easily guessable passwords. Make sure your password is complex and unique.
- Keep Windows Updated: Regularly update your Windows operating system to patch any security vulnerabilities.
- Monitor Connected Devices: If you notice any suspicious activity, immediately change your hotspot password and monitor the devices connected to your network.
By mastering these simple CMD commands, you gain a powerful tool for on-the-go connectivity. You're no longer at the mercy of public Wi-Fi and can effortlessly share your internet connection virtually anywhere. This technique empowers you to take control of your internet access, ensuring that you are connected, informed, and productive, no matter your location. This method is simple, reliable, and highly efficient. Enjoy your new portable Wi-Fi hotspot!
