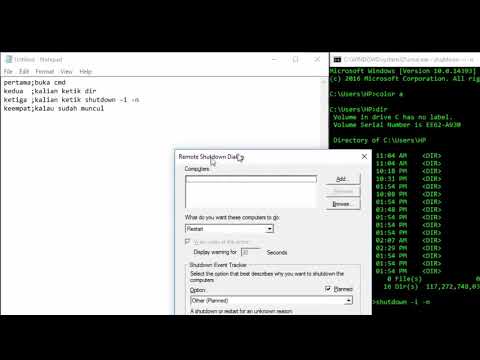
cara memperkuat sinyal wifi di laptop dengan cmd

Title: Cara Mempercepat Koneksi Wifi Di Laptop Windows 10 Pakai CMD
Channel: Wira HK
Cara Mempercepat Koneksi Wifi Di Laptop Windows 10 Pakai CMD by Wira HK
Boost Your Laptop's Wi-Fi Signal INSTANTLY! (CMD Trick)
Unleash Blazing Speeds: Supercharge Your Laptop's Wi-Fi with a Simple Command!
Ever felt like your Wi-Fi connection is stuck in slow motion? That buffering wheel of doom mocking your every online endeavor? Well, prepare to cast those frustrations aside. You're about to learn a remarkably simple trick. This isn't just some fleeting fix; it's an underutilized method. It’s likely hidden in plain sight. Believe it or not, a few keystrokes can significantly boost your laptop's Wi-Fi signal strength.
Decoding the Digital Secret: The Power of the Command Prompt
We're going to tap into a powerful tool. This tool is built right into your Windows operating system. It's called the Command Prompt (CMD). Think of it as a secret control panel. It's capable of tweaking various system settings. It's also useful for optimizing performance. It might seem intimidating; however, fear not. The process is surprisingly straightforward. You don't need to be a tech wizard to master this.
Step-by-Step Guide: A Wi-Fi Signal Revival
Let’s dive right into the action. First, locate the search bar on your Windows machine. Usually, it will be at the bottom left. Type "CMD" into the search box. Right-click on "Command Prompt" from the search results. Then, select "Run as administrator." You’ll need elevated privileges for this to work effectively. Next, a black window will appear. This is your gateway to optimization.
Now, here's where the magic happens. Type the following command, exactly as it appears: netsh wlan show drivers. Then, press Enter. This command is the key to the kingdom. It displays information about your wireless network adapter. You'll see details like driver version and radio types.
Look for a line that says "Radio types supported." You will see a list of radio types. These should include 802.11a, 802.11b, 802.11g, 802.11n, and 802.11ac. Note which ones are supported. These are the wireless standards your adapter supports.
Let's move on to the next command. Type netsh wlan set autoconfig enabled=no interface="Wi-Fi" then hit Enter again. Replace "Wi-Fi" with the name of your wireless adapter. You may need to look at the Wireless Network Connection to get the exact interface name. Usually, it is just "Wi-Fi." This disables the automatic configuration of your Wi-Fi. Consequently, this gives you more control.
Fine-Tuning the Connection: Unlocking Maximum Performance
Following this, we'll make some manual tweaks. This is where we truly optimize. Type netsh wlan set hostednetwork mode=allow ssid="YourNetworkName" key="YourPassword" and press Enter. Replace "YourNetworkName" with the name you want for your new network. Choose a strong password for improved security. This command essentially turns your laptop into a Wi-Fi hotspot.
Now, the final step. Type netsh wlan start hostednetwork and press Enter again. This will start the hosted network. It will use the settings you've just defined. Therefore, any device should be able to connect.
For optimum speeds, it's crucial to consider a few additional factors. Ensure that your router is up-to-date with the latest firmware. Firmware updates often include performance enhancements. Also, minimize physical obstructions between your laptop and the router. Walls and certain materials can weaken the signal. Finally, try different Wi-Fi channels to avoid interference from other networks.
Troubleshooting and Fine-Tuning for Enhanced Performance
Sometimes, things don't go as planned. That's perfectly fine. Let's address some common issues. If you encounter errors, double-check for typos in the commands. Also, ensure you've run the Command Prompt as an administrator. If your Wi-Fi seems slower, consider restarting your laptop and router. In many cases, this can resolve temporary glitches.
Furthermore, test your connection speed before and after applying these changes. Tools such as Speedtest by Ookla are helpful. This lets you measure the impact. If the speed improvement is minimal, try experimenting. Change the settings. For instance, experiment with different Wi-Fi channels on your router.
Beyond the Trick: Maximizing Your Wireless Experience
This CMD trick is a great starting point. However, it's only one piece of the puzzle. A few other factors contribute to a superior Wi-Fi experience. Consider upgrading your router. Newer routers support the latest Wi-Fi standards. These standards allow faster speeds and improved range.
Moreover, position your router strategically. Central locations are generally best. This ensures even signal distribution. In addition, reduce the number of devices connected simultaneously. This prevents network congestion.
Conclusion: Embrace the Speed, Unleash the Power
By following these steps, you can significantly boost your laptop's Wi-Fi signal. This CMD trick is a handy tool. Use it to optimize your connection. It’s a valuable piece of knowledge. Moreover, it will help you enjoy faster and more reliable internet access. Don't let a slow Wi-Fi connection hold you back. Take control and embrace the superior performance.
HP Laptop WiFi Nightmare? FIX It NOW! (Easy Steps)Boost Your Laptop's Wi-Fi Signal INSTANTLY! (CMD Trick)
Hey tech enthusiasts! Are you tired of the buffering wheel of doom? That agonizing spin that seems to mock your desperate attempts to stream your favorite show or participate in that crucial video call? We know the feeling. We've all been there, staring blankly at our screens as the Wi-Fi signal stubbornly refuses to cooperate. Well, what if we told you there’s a quick, easy fix – a secret weapon hiding right in your laptop, ready to unleash a surge of Wi-Fi power? Buckle up, because we're diving deep into the world of the Command Prompt (CMD) and revealing a sneaky trick to instantly boost your laptop's Wi-Fi signal. Trust us, it's like giving your Wi-Fi a shot of espresso!
1. The Wi-Fi Woes: Understanding the Enemy
Before we unleash our secret weapon, let's take a moment to understand the enemy: weak Wi-Fi signals. Think of your Wi-Fi router as a radio station. It broadcasts signals, and your laptop, the receiver, tries to pick them up. Sometimes, the signal gets scrambled, blocked, or simply doesn’t reach your device with enough oomph. This can be due to a myriad of factors, from physical obstructions like walls and furniture to interference from other devices chattering on the same frequency. It's like trying to hear a whispered secret at a crowded concert; the signal gets lost in the noise.
2. The CMD: Your Laptop's Hidden Powerhouse
The Command Prompt, often referred to as CMD, is like the secret control panel of your Windows operating system. It allows you to interact directly with your computer, issuing commands that perform all sorts of tasks. It's a bit like having a direct line to the brain of your laptop. Don't worry; we're not diving into anything overly complicated. The trick we're about to reveal uses a simple, yet effective, CMD command to optimize your Wi-Fi settings.
3. The Magic Command: Unleashing the Wi-Fi Boost
Ready for the magic? Here's the command that can potentially give your Wi-Fi signal a much-needed kick. It's a simple command that flushes your DNS cache, which can sometimes hold onto outdated or corrupted information that hinders your internet connection. Imagine it as clearing the cobwebs from your internet's "brain."
ipconfig /flushdns
This command will clear and restart your DNS resolver cache. This can help resolve any issues that are causing slow speeds or any connection issues that are hindering your internet connection.
4. Step-by-Step: Activating the Command Prompt Trick
Alright, let's get practical. Here's how to use this command to boost your Wi-Fi signal:
- Open the Command Prompt: There are several ways to do this. The easiest is to type "cmd" in the Windows search bar (the magnifying glass icon in the taskbar) and hit Enter. Alternatively, you can right-click the Start button and select "Command Prompt". You could also use Windows PowerShell for the same results.
- Type the Command: In the Command Prompt window, carefully type
ipconfig /flushdnsand press Enter. - Success! See the Magic: You should see a message confirming that the DNS Resolver Cache has been successfully flushed.
5. What Does This Command Actually Do?
The ipconfig /flushdns command tells your computer to clear its DNS cache. Think of a DNS cache as a phonebook for the internet. When you type in a website address (like "google.com"), your computer uses the DNS cache to find the corresponding IP address of the website. This helps the computer locate the website and allows it to send and receive information. Sometimes, these cached entries can become outdated or corrupted, leading to slow speeds or connection problems. Flushing the DNS cache refreshes these entries, allowing your computer to look up the website's latest IP address allowing for faster internet connection.
6. Beyond the Flush: Other CMD Tweaks (For the Brave!)
While ipconfig /flushdns is the star of the show, there are other CMD commands you can explore, if you’re feeling adventurous. Just remember, always take caution when making changes to your system files. As with all advanced features, consider the pros and cons before proceeding.
ipconfig /releaseandipconfig /renew: These commands release and renew your IP address, which can sometimes resolve connection issues.ipconfig /release: Releases your current IP addressipconfig /renew: Requests a new IP address from your router.
netsh winsock reset: Resets the Winsock catalog, which can fix network problems caused by software conflicts.
7. Troubleshooting: When the CMD Trick Doesn't Cut It
Unfortunately, the CMD trick isn't a cure-all. If your Wi-Fi signal is still crawling, it could be an indication of other issues. Here are some things to consider:
- Distance: Are you too far from your router? Walls and other obstructions significantly weaken Wi-Fi signals.
- Router Placement: Is your router placed in a central location, away from obstructions, is another potential factor?
- Interference: Are there other devices (microwaves, Bluetooth devices, etc.) interfering with the signal?
- Router Issues: It might be time to restart your router or, if the situation persists, consider a hard reset.
- Hardware Problems: The wireless network adapter on your laptop may potentially require a physical replacement.
8. Hardware vs. Software: Understanding the Limitations
It's crucial to understand that the CMD trick primarily tinkers with software settings. It can optimize your connection, but it can't magically overcome hardware limitations. If your router is old or your Wi-Fi adapter is outdated, you might need to upgrade your hardware for a significant boost. It's similar to giving a rusty car a tune-up; it might improve performance, but it won’t give it a new engine.
9. The Router's Role: The Wi-Fi's Guardian
Your router is the gatekeeper of your Wi-Fi network, and it plays a critical role in signal strength. Ensure your router is up to date and properly configured. Some routers have advanced features like Quality of Service (QoS), which allows you to prioritize certain types of traffic (like video streaming) over others.
10. Optimizing Your Router Settings: Beyond the Basics
Consider these tips for router optimization:
- Channel Selection: Change your router's Wi-Fi channel to avoid interference from other networks. Most routers automatically select the best channel, but you can manually adjust it.
- Security: Secure your Wi-Fi network with a strong password to prevent unauthorized access.
- Firmware Updates: Regularly update your router's firmware to improve performance and security.
11. The Power of Placement: Router Location Matters
Where you place your router can significantly impact signal strength. Here are some tips:
- Central Location: Place your router in a central location in your home or office.
- Elevation: Elevated placement (e.g., on a shelf) can improve signal distribution.
- Avoid Obstructions: Keep your router away from walls, metal objects, and other interference sources.
- Test and Adjust: Experiment with different locations to find the optimal spot.
12. Other Factors: External Influences
External factors, such as the number of connected devices and, other devices on the same network, can also affect your Wi-Fi performance. Think of it as rush hour on the internet; more traffic equals slower speeds.
13. Advanced Troubleshooting: When to Call for Help
If you've tried all the above steps and your Wi-Fi is still struggling, it might be time to seek professional help. You might need to contact your internet service provider (ISP) or consult a computer technician.
14. Quick Recap: The Essential Steps
Let's quickly recap the core steps:
- Open the Command Prompt.
- Type
ipconfig /flushdns. - Press Enter and enjoy!
- Consider further troubleshooting steps if conditions persist.
15. The Future of Wi-Fi: Staying Ahead of the Curve
The technology behind Wi-Fi is constantly evolving. New standards, such as Wi-Fi 6E, promise even faster speeds and improved performance. Staying informed about these developments will allow you to be at the forefront.
Conclusion: Embrace the Power of the CMD
So, there you have it! With the simple ipconfig /flushdns command, you now have a handy trick up your sleeve to potentially boost your laptop's Wi-Fi signal instantly. We hope this information empowers you to take control of your internet experience. Remember, the CMD is a powerful tool, but it's just one piece of the puzzle. By understanding the basics of Wi-Fi and implementing these tips, you can bid farewell to buffering and embrace a smoother, faster online experience. Here's to lag-free streaming, seamless video calls, and a more enjoyable digital life!
FAQs
1. Does this CMD trick work on all laptops?
Yes, the `ipconfig /flushdns
Dell WiFi Down? Get It Back ONLINE Now!Cara Mempercepat Koneksi Wifi Di Laptop Windows 7, 10, 11 Pakai CMD

By Media Tutorial Free Cara Mempercepat Koneksi Wifi Di Laptop Windows 7, 10, 11 Pakai CMD by Media Tutorial Free
CMD TUTORIAL cara mematikan jaringan atau user orang lain dari satu jaringan 100 ampuh
By young01 official CMD TUTORIAL cara mematikan jaringan atau user orang lain dari satu jaringan 100 ampuh by young01 official
Cara Meningkatkan Sinyal Wi-Fi di Laptop Windows Mempercepat Wi-Fi

By MJ Tube Cara Meningkatkan Sinyal Wi-Fi di Laptop Windows Mempercepat Wi-Fi by MJ Tube

Title: CARA MENSTABILKAN KONEKSI INTERNET DENGAN PING MELALUI CMD
Channel: Sanhack Media
CARA MENSTABILKAN KONEKSI INTERNET DENGAN PING MELALUI CMD by Sanhack Media
Wifi On Laptop
Boost Your Laptop’s Wi-Fi Signal INSTANTLY! (CMD Trick)
We've all been there: staring at a spinning wheel, the frustration mounting as a webpage stubbornly refuses to load. In today's interconnected world, a weak Wi-Fi signal is akin to being stranded on a digital desert island. Though we often blame the internet service provider, the reality is that the issue often resides within the operating system itself, specifically Windows. What if we told you that a quick, simple command prompt trick could significantly amplify your laptop's Wi-Fi reach, banishing those pesky dead spots and buffering woes? Let's dive in.
Understanding the Wireless Landscape: Why Signals Falter
Before launching into the solution, let's briefly explore the reasons why your Wi-Fi signal might be struggling. Interference is a prevalent culprit. Other electronic devices, such as microwaves, cordless phones, and even neighboring Wi-Fi routers, can all disrupt the signal. Distance also plays a significant role; the farther your laptop is from the router, the weaker the signal. Furthermore, physical obstructions, like walls and metallic objects, can absorb or deflect radio waves. Finally, the software on your laptop might also be at fault. Incorrectly configured network settings or driver issues can hinder optimal performance. The command prompt trick we're about to deploy addresses the last of these issues, specifically focusing on optimizing the way your laptop interacts with your wireless network.
The CMD Trick: Unveiling the Powerful WirelessAutoconfig Service
The cornerstone of this improvement lies within the Windows Command Prompt, a powerful tool that grants access to the inner workings of your operating system. Within this interface, we will interact with the WirelessAutoconfig service. This service is a fundamental component of Windows' Wi-Fi management. It's the unsung hero responsible for maintaining your wireless connection, scanning for available networks, connecting to them, and, crucially, managing the radio settings that govern signal strength and stability. The command we'll utilize essentially resets and optimizes this service, allowing it to recalibrate and potentially find a stronger, more stable connection. This is a highly effective measure since the WirelessAutoconfig service can sometimes become bogged down with temporary files.
Step-by-Step Guide: Implementing the Wi-Fi Boost
Let's get straight to the process. This technique is entirely safe and requires no advanced technical knowledge. We'll guide you through the steps clearly.
Open the Command Prompt: There are several ways to access the Command Prompt. The easiest method is to type "cmd" into the Windows search bar (usually located near the Start button) and select "Command Prompt" or "Run as administrator". Choosing "Run as administrator" is usually recommended, as it grants the necessary permissions for the command to work effectively.
Enter the Command: Once the Command Prompt window opens, type the following command precisely as it appears. Double-check for typos, as even a minor error can prevent the command from executing:
netsh wlan stop hostednetwork & netsh wlan start hostednetworknetsh: This is the command-line utility for configuring network settings.wlan: Specifies that we're working with wireless LAN (Wi-Fi) parameters.stop hostednetwork: This part of the command stops the hosted network, which might be running in the background and potentially interfering with the Wi-Fi connection.&: This symbol acts as a separator, allowing us to execute multiple commands in a single line.netsh wlan start hostednetwork: This command restarts the hosted network, which is used for creating a virtual Wi-Fi hotspot allowing other devices to connect.
Execute the Command: Hit the "Enter" key. The Command Prompt will execute the command. You may not see any immediate visual feedback, but the underlying processes are being altered almost instantly.
Test Your Connection: After the command has finished executing (which should be nearly instantaneous), test your Wi-Fi connection. Try visiting a website, streaming a video, or downloading a file. Observe if the performance has improved. The difference can sometimes be striking, particularly if your connection was previously unstable.
Beyond the Command: Further Enhancements
While the CMD trick is a powerful starting point, consider these additional steps to maximize your Wi-Fi performance.
- Restart Your Router: This might seem basic, but it's a crucial troubleshooting step. Rebooting your router clears its memory and forces it to re-establish its connection with your internet service provider, which can often resolve connectivity problems. Unplug your router for about 30 seconds, then plug it back in and allow it to fully boot up.
- Update Your Wireless Network Driver: Outdated or corrupted network drivers can cause a host of issues, including weak Wi-Fi signals. To update your driver, go to the Device Manager (search for it in the Windows search bar). Expand "Network adapters," find your wireless network adapter (it will likely be named something like "Intel Wireless-AC" or "Realtek Wireless LAN Adapter"), right-click on it, and select "Update driver." Choose the option to automatically search for drivers.
- Optimize Router Placement: Ensure your router is centrally located within your home or office and is not obstructed by walls or other objects. Elevating the router can also help, as it can improve the signal's propagation. Experiment with different positions to find the optimal placement.
- Reduce Wireless Interference: Identify and minimize potential sources of interference, such as microwaves and cordless phones. If possible, relocate these devices or use a different Wi-Fi channel on your router. You can change the Wi-Fi channel in your router's settings (usually accessed through a web browser by entering your router's IP address).
- Assess Your Antennas: If your laptop has external antennas, ensure they are properly positioned. Sometimes, simply re-orienting the antennas can make a significant difference in signal strength.
Troubleshooting Common Issues
Sometimes, the command might not produce an immediate, noticeable improvement. Here are some common troubleshooting steps:
- Administrator Permissions: Ensure you're running the Command Prompt as an administrator. This is crucial for the command to have the necessary permissions.
- Driver Conflicts: In rare cases, there might be conflicts between your wireless network driver and the command. Try updating or reinstalling your driver.
- Router Configuration: Check your router settings to ensure that the Wi-Fi signal is enabled and configured correctly. Review your router's user manual for specific instructions.
- Hardware Failure: While less common, it's possible that your laptop's wireless network adapter is faulty. If all other troubleshooting steps fail, consider the possibility of hardware issues.
The Long-Term Benefits: A Faster, More Reliable Connection
By implementing this CMD trick and following the additional suggestions, you are making a proactive investment that extends beyond the immediate boost. You're creating a more stable, reliable, and enjoyable online experience. Faster download speeds, seamless streaming, and fewer dropped connections translate into increased productivity, enhanced entertainment, and less frustration. Regular use of the CMD trick can help maintain optimal Wi-Fi performance. We advise repeating the command once a week or whenever you notice a decline in performance.
Conclusion: Embrace the Power of Optimization
In the realm of technology, mastery lies in understanding how to leverage the tools at your disposal. The CMD trick, along with the auxiliary recommendations, provides a simple yet powerful method for enhancing your laptop's Wi-Fi signal. It underscores that sometimes the most effective solutions are found not in expensive upgrades, but in the optimized utilization of what you already possess. Don't let a weak Wi-Fi signal hold you back. Take control, follow these steps, and relish the benefits of a faster, more stable, and consistently reliable wireless connection. Empower yourself now and start enjoying the seamless digital experience you deserve.
