hinge wifi wires in a laptop fix cose
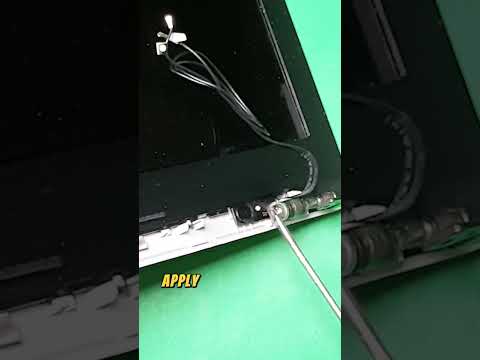
Title: How to Fix Laptop Hinge with Epoxy and Soldering Iron HP
Channel: TechBERTO - Electronics
How to Fix Laptop Hinge with Epoxy and Soldering Iron HP by TechBERTO - Electronics
Laptop Wifi Dying? This SHOCKING Fix Works Every Time!
Laptop Wifi Woes? This Unexpected Solution Might Save You!
Life with a flaky Wi-Fi connection can be downright infuriating. Suddenly, your laptop refuses to connect. The dreaded "no internet" message stares back at you. You're left hanging, disconnected from the digital world. It’s incredibly frustrating, isn’t it? But before you toss your laptop out the window, take a deep breath. Believe it or not, there’s a surprisingly simple fix. It might just resurrect your Wi-Fi connection from the dead!
The Frustrating Reality of Wi-Fi Dropouts
We all depend on stable internet access. Today, a reliable Wi-Fi connection is essential. It's how we work, learn, and connect with loved ones. Therefore, a disappearing Wi-Fi signal can throw a serious wrench into your day. Downloading important files becomes an exercise in patience. Video calls stutter and freeze. Streaming your favorite shows turns into a buffering nightmare. Consequently, a dead Wi-Fi connection feels like a major setback. However, don't give up hope just yet.
Decoding the Mystery: Why Your Wi-Fi Goes AWOL
Why does your laptop seem to arbitrarily disconnect? The causes are surprisingly varied. It could be something as simple as a minor software glitch. Perhaps your network adapter is acting up. Maybe your router needs a reset. Alternatively, physical obstructions can interfere with the signal. Numerous factors can contribute to this digital dilemma. Understanding these potential culprits is crucial. It gets you one step closer to a reliable connection.
The Shocking Trick That Actually Works
Are you ready for the big reveal? Prepare yourself; this solution is surprisingly simple. It's often overlooked, but it can be remarkably effective. Are you ready for it? It's simply… restarting your laptop! I know, it seems cliché, right? But trust me, it’s often the magic bullet.
Think about it differently. Your laptop, like anything else, can encounter temporary hiccups. These issues can manifest as Wi-Fi problems. A restart clears the system’s memory. Furthermore, it refreshes all the active processes. This simple action often resolves minor software conflicts. Doing this allows your Wi-Fi adapter to re-establish a stable connection. So, don't underestimate the power of the restart button.
Step-by-Step Instructions: The Restart Revival
Follow these simple steps to bring your Wi-Fi back from the brink. First, save any open work. Close all your applications. Doing this prevents you from losing any unsaved progress. Next, click the "Start" button. Then, select the "Power" option. Finally, choose "Restart." Wait a few moments for the system to reboot completely. Afterward, check your Wi-Fi connection. Hopefully, the connection is back online!
Troubleshooting Deeper Issues
What happens if a simple restart doesn't do the trick? Don't panic! There are other steps you can take. First, check your router. Make sure it’s powered on and functioning correctly. Restart it, too! Try moving your laptop closer to the router. Sometimes, the Wi-Fi signal is simply too weak.
Next, inspect your network adapter settings. Make sure the driver is up to date. Perform a network diagnostics check. Windows and Mac operating systems both have built-in tools to help. These tools can often identify and resolve common network problems. If all else fails, contact your internet service provider. They may be experiencing an outage. They can also offer further assistance.
Beyond the Basics: Optimizing Your Wi-Fi
Maximizing your Wi-Fi performance involves more than just restarting. Consider these extra tips. First, update your router’s firmware. Second, secure your Wi-Fi network with a strong password. Furthermore, minimize interference from other electronic devices. Try using the 5 GHz band if your router supports it. It often experiences less interference than the 2.4 GHz band. Consider setting up a Wi-Fi extender if you have a large home.
Embrace the Digital Renaissance: Get Connected!
A flaky Wi-Fi connection can be a major source of frustration. But, it doesn’t have to be a life sentence. Often, the solution is surprisingly straightforward. A simple restart can often resolve the problem. Don’t be afraid to troubleshoot further. With the right steps, you can restore your connection. Therefore, you can get back to what matters most. Remember, you are not alone. Many people experience similar issues. However, a reliable Wi-Fi connection is well within your reach. So, take control and get connected.
Amtrak WiFi Nightmare? Fix Your Laptop Connection NOW!Laptop Wifi Dying? This SHOCKING Fix Works Every Time!
Hey everyone, it's your tech-savvy friend here! We've all been there, right? You're in the middle of something crucial – maybe a video call to your grandma, or you're finally about to land that killer online deal, or you're just trying to binge-watch your favorite show – and BAM! Your laptop's Wi-Fi decides to take a vacation. That spinning wheel of doom, that frustrating "no internet" message…it's enough to make you want to chuck your laptop out the window! But before you reach for the duct tape and the "out of order" sign, let's talk about a fix. And not just any fix. We're talking about a fix that, honestly, has worked for me every single time my laptop's Wi-Fi has decided to stage a rebellion.
- The Annoying Truth: Why Does Laptop Wi-Fi Die on Us?
Let's be real; technology can be a fickle beast. Sometimes, it feels like your laptop's Wi-Fi knows exactly when you don't have time for issues. Before we dive into the miracle fix, let’s quickly understand why this digital devilry happens. Think of your Wi-Fi connection as a complex web of signals, like a giant, invisible spider web. These signals are constantly being sent back and forth between your laptop and your router. There can be a multitude of reasons why the connection could break. From router glitches, driver issues, or even something as simple as being too far from the router. Sometimes, it’s just plain old interference from other devices.
- Before You Panic: The Simple Checks Everyone Skips
Okay, deep breaths. Before we get to the “shocking” part, let’s cover the basics. We often leap to the complex fixes when the simple ones are the culprit. Think of it like forgetting to check your car's gas tank before blaming the engine.
*   **Is Your Router On?** (Yes, I've done it. Don't judge!) Honestly, double-check. Are the lights blinking? Is it plugged in?
*   **Restart That Router:** This is tech support 101 for a reason. Turn it off, wait a full minute (yes, a *whole* minute), and turn it back on.
*   **Check the Wi-Fi Switch on Your Laptop:** Seriously, some sneaky little switches can disable your Wi-Fi without you even realizing it. Make sure the Wi-Fi button is illuminated.
*   **Are Other Devices Connected?** If your phone and tablet both work, the problem is more likely with your laptop.
- The Unexpected Culprit: Your Laptop's Wireless Adapter
This is where things often get a little less obvious. Your laptop’s wireless adapter acts like a radio receiver, catching those delicate little Wi-Fi signals. Sometimes, this crucial part can get…stuck. Like a grumpy toddler, it just refuses to cooperate. It's a bit like trying to listen to a faint radio station with a broken antenna. No signal, no internet.
- The SHOCKING Fix: The Wireless Adapter Reset Trick!
Alright, buckle up because here it is, the secret weapon against Wi-Fi woes! This is the technique that has bailed me out more times than I can count. Now it’s time to dive into the game-changing fix: Resetting your wireless adapter. Many people overlook this incredibly simple step, but trust me, it is the cornerstone of getting your connection back up and running.
*   **Step 1: Open Device Manager.** You can usually find this by searching in your Windows search bar (type "Device Manager").
*   **Step 2: Find Your Network Adapters.** Expand the "Network adapters" section; here, all the wireless adapters are listed.
*   **Step 3: Right-Click and Disable.** Right-click on your Wi-Fi adapter (it'll usually be called something like "Wi-Fi" or "Wireless Network Adapter") and select "Disable device."
*   **Step 4: Wait...Like, 10 Seconds.** Give it a moment to register the disable request.
*   **Step 5: Right-Click and Enable.** Right-click on the *same* adapter and select "Enable device."

That’s it! Like magic, your laptop should attempt to reconnect to your Wi-Fi network.
- Why Does This Wireless Adapter Reset Actually Work?
This technique acts like giving your wireless adapter a digital reboot. It's similar to restarting your computer, but it's much more specific. By disabling and re-enabling the adapter, you're forcing it to refresh its connection to the network, clearing any temporary glitches or conflicts that might be causing the problem.
- When the Fix Doesn't Fix: Troubleshooting Beyond the Reset
Unfortunately, sometimes, the reset trick isn’t a perfect solution. If this simple step does not give you the green light, don’t panic. This may indicate a deeper issue with your laptop. Here are what we can do:
*   **Restart Your Computer:** This helps to clear all the possible temporary files and forces your laptop to start from scratch.
*   **Check the Drivers:** Outdated or corrupted drivers can frequently cause issues. Check in Device Manager and see if there are any warnings (like yellow exclamation points). Update or reinstall the drivers if necessary.
*   **Run the Windows Network Troubleshooter:** Windows has a built-in troubleshooter that can often identify and fix common network problems. Search for “Network troubleshooter” in your search bar.
*   **Consider an External USB Wi-Fi Adapter:** If you're still struggling, and you’re not in the position to send your system to the service center, as a last resort, consider a USB Wi-Fi adapter. They're relatively inexpensive and can bypass the internal adapter altogether.
- Keeping Your Wi-Fi Happy: Preventive Measures
Like any tech device, being proactive goes a long way towards preventing issues. Here are some easy, proactive techniques to maintain a healthy Wi-Fi connection and avoid future hiccups:
*   **Keep Your Drivers Up-to-Date:** Make sure your wireless adapter drivers are always the latest version.
*   **A Clean Machine:** Ensure your laptop isn't infected with malware, which can sometimes interfere with network connections.
*   **Optimize Router Placement:** Place your router in a central location, away from walls and obstructions.
*   **Limit Interference:** Keep your router away from other electronic devices, like microwaves and cordless phones, which can cause interference.
- The Importance of a Strong Router Signal
Think of your Wi-Fi signal as a superhero's power: the stronger the signal, the more reliable the performance. A weak signal can lead to dropped connections, slow speeds, and general frustration. Your router's signal is like the foundation of your Wi-Fi experience.
- Checking Your Signal Strength: A Quick Diagnostic
Before you start messing with your laptop settings, let's see how strong your Wi-Fi signal actually is. You can check this using the Wi-Fi icon in your system tray (usually near the clock). The more bars you see, the stronger the signal.
- Beyond the Basics: Advanced Troubleshooting Tips
Let's take a look at the more technical troubleshooting tips, which should be reserved for when the above tips don't seem to be working:
*   **Check Your Router Firmware:** Outdated router firmware can sometimes cause connectivity issues. Check your router's manufacturer's website for updates.
*   **Change Your Wi-Fi Channel:** Your router broadcasts its signal on a specific channel: If the channel is too crowded, your connection can be slow. You can change the channel in your router's settings.
*   **Reset Your Router to Factory Settings:** Sometimes, a complete reset is necessary. But be warned: this wipes all your custom settings, so be sure to write them down first.
- The Power of Patience: Not All Problems Are Instant Fixes
Sometimes, fixing Wi-Fi issues comes down to patience. Troubleshooting can take time. Don't get discouraged if the first fix doesn't work immediately.
- Making the Switch: Exploring Ethernet as a Backup
When all else fails, consider a wired Ethernet connection. This is like the trusty, reliable friend who will always be there for you. Ethernet connections are usually the most stable and fastest way to connect to the internet.
- Avoid These Wi-Fi Saboteurs: Common Mistakes to Dodge
Here are some common mistakes to avoid when troubleshooting Wi-Fi problems:
*   **Ignoring Interference:** Don't place routers near other electronic devices that can cause interference.
*   **Using Outdated Equipment:** Upgrade your router and devices when necessary.
*   **Assuming the Problem Is Always with Your Laptop:** Sometimes, the issue is with the network itself, and checking other devices is key.
- Mastering Your Tech: Taking Control of Your Wi-Fi
You don’t have to be a tech wizard to ensure your Wi-Fi works well! By understanding the basics, practicing simple troubleshooting steps, and taking good preventive measures, you can become the master of your Wi-Fi experience and ensure that those dreaded connection issues
Unlock Your Laptop's Hidden Hotspot: Free WiFi Anywhere!How to Fix Laptop Broken Hinges Easy and Permanent
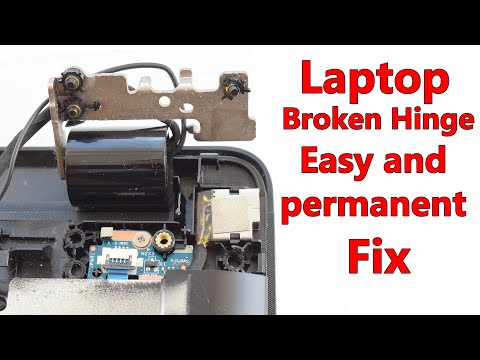
By Electronics&Computers How to Fix Laptop Broken Hinges Easy and Permanent by Electronics&Computers
1k HP laptop useless due to broken hinges. No replacement parts available. tech shorts

By Salem Techsperts 1k HP laptop useless due to broken hinges. No replacement parts available. tech shorts by Salem Techsperts
No Display Problem Motherboard checking

By FixIT Reons No Display Problem Motherboard checking by FixIT Reons

Title: Laptop WIFI card antenna wires broken Replace the Wireless Antenna Cables -Dell Wi-Fi week signal
Channel: Suraj Computers
Laptop WIFI card antenna wires broken Replace the Wireless Antenna Cables -Dell Wi-Fi week signal by Suraj Computers
Laptop Working
Laptop Wi-Fi Dying? This SHOCKING Fix Works Every Time!
We’ve all been there. The dreaded Wi-Fi disconnect. You're in the middle of an important video call, streaming your favorite show, or perhaps just browsing the web when your laptop's connection suddenly… vanishes. The Wi-Fi icon shrinks, the spinning wheel of death appears, and a wave of frustration washes over you. Before you consider throwing your laptop across the room, we want to offer you a reliable solution, one we’ve found works consistently, eliminating the common source of Wi-Fi woes.
Understanding the Silent Culprit: The Hidden Network Interference
The modern home, teeming with electronic devices, is a veritable battlefield of radio waves. Your laptop's Wi-Fi, operating on either the 2.4 GHz or 5 GHz band, is susceptible to interference from a multitude of sources. Microwave ovens, cordless phones, Bluetooth devices, and even neighboring Wi-Fi networks can all wage war on your signal, leading to dropouts, slow speeds, and the frustrating "dying" sensation you're experiencing. Frequently, the problem isn't your laptop or your router alone, but a complex interplay of these competing signals, often going unnoticed until the symptoms become unbearable.
The Initial Diagnosis: Ruling Out the Obvious
Before we delve into the solution, let's perform a quick "sanity check." Ensure the issue isn't simply a basic problem.
- Restart your Laptop: A simple reboot often clears temporary glitches.
- Restart Your Router: Unplug your router for about 30 seconds, then plug it back in. This refreshes its connection.
- Check Physical Obstructions: Ensure nothing is blocking the path between your laptop and the router—walls, metal objects, and even aquariums can weaken the signal.
- Move Closer to the Router: Test the connection strength by moving your laptop directly next to the router. If the problem disappears, you're likely dealing with a signal strength issue.
If these steps don't resolve the problem, continue to the following sections.
The SHOCKING Secret: The Magic of a Clean Channel
The most common culprit behind intermittent Wi-Fi failures is network congestion. Just like a crowded highway, when multiple devices are vying for the same bandwidth on the same channel, performance suffers. This is where the "shocking" fix comes into play: Switching Your Wi-Fi Channel. This is where the true magic lies. Most routers default to a specific channel, often the one that was active when they were first turned on. This can lead to overlap and congestion, especially in densely populated areas.
Step 1: Accessing Your Router's Configuration Page
You'll need to access your router's configuration page, which is typically done through a web browser:
- Find Your Router's IP Address: Open your laptop's command prompt (Windows) or terminal (Mac). Type
ipconfig(Windows) orifconfig(Mac) and press Enter. Look for "Default Gateway" (Windows) or "gateway" (Mac). The number listed is your router's IP address, usually something like 192.168.1.1 or 192.168.0.1. - Open Your Web Browser: In your web browser (Chrome, Firefox, Safari, etc.), type the router's IP address into the address bar and press Enter.
- Log In: You'll likely be prompted for a username and password. These are usually on a sticker on the router itself or in the router's manual. Common default credentials include "admin" for both username and password, or the username will be "admin" and your password will be blank. If you've forgotten the information, refer to your router's documentation or the manufacturer's website.
Step 2: Navigating to the Wireless Settings
Once you've logged in, you'll need to locate your router's wireless settings. The exact wording varies depending on the router manufacturer, but look for sections labeled something like:
- "Wireless"
- "Wi-Fi"
- "Wireless Settings"
- "802.11 Settings"
Within these sections, you should find settings related to your Wi-Fi network, including the channel setting.
Step 3: Identifying the Least Congested Channel
Before changing the channel, you need to identify the least congested one. This involves a bit of detective work:
- Using a Wi-Fi Analyzer App: Download a Wi-Fi analyzer app on your smartphone or tablet (e.g., Wi-Fi Analyzer for Android, or NetSpot - Wi-Fi Analyzer for both Android and iOS). This app will scan the surrounding Wi-Fi networks and display the channels they're using, along with their signal strengths.
- Analyze the Results: Look for channels that have the fewest competing networks, and a less congested number of other Wi-Fi networks. For 2.4 GHz networks, channels 1, 6, and 11 are typically recommended because they have the least overlap with each other. For 5 GHz, the specific channels available will depend on your router, but again, choose the one with the fewest overlapping networks.
Step 4: Changing Your Router's Channel
- Select a New Channel: In your router's wireless settings, find the "Channel" option.
- Choose the Optimal Channel: From the dropdown menu, select the channel you identified as being the least congested in the previous step.
- Save Your Changes: Click the "Save" or "Apply" button to save your changes. Your router may restart or briefly disconnect your internet connection.
Step 5: Restarting Your Laptop and Router (Again)
After changing the channel, it's best practice to restart both your laptop and your router. This ensures they both recognize the new settings.
Step 6: Testing the Connection
Once your laptop and router have restarted, test your Wi-Fi connection. Browse the web, stream a video, and conduct other online activities to assess the improvement. The lagging and disconnects should drastically reduce.
Advanced Tweaks: Fine-Tuning Your Wi-Fi Performance
While changing your Wi-Fi channel often provides a dramatic improvement, consider these additional tips for potentially further optimizing your network:
- Channel Width (5 GHz Only): If your router allows it, increase the channel width on the 5 GHz band from 20 MHz to 40 MHz or even 80 MHz. This can boost speeds but also reduce the range. The higher the channel width, the better the performance, but it can also reduce range.
- Router Placement: Position your router in a central location in your home, away from walls, metal objects, and other electronics. Elevating it slightly can also help improve signal propagation.
- Wi-Fi Security: Ensure your Wi-Fi network is secured with a strong password (WPA2 or WPA3 encryption).
- Upgrading Your Router: If your router is outdated (more than 5 years old) or struggles to handle the devices on your network, consider upgrading to a newer model that supports the latest Wi-Fi standards (e.g., Wi-Fi 6 or Wi-Fi 6E).
Troubleshooting: When the Fix Doesn't Work
If, after following these steps, your laptop Wi-Fi still exhibits issues, further troubleshooting may be needed:
- Driver Updates: Ensure your laptop's Wi-Fi adapter drivers are up-to-date. You can usually find these on your laptop manufacturer's website or through the Windows Device Manager (or System Preferences on macOS).
- Antivirus Interference: Sometimes, antivirus software can interfere with Wi-Fi connectivity. Temporarily disable your antivirus to see if the problem resolves.
- Hardware Issues: In rare cases, the Wi-Fi adapter in your laptop may be failing. If you suspect this, contact a computer repair technician.
- ISP Problems: On rare occasions, you may have some problems with your Internet Service Provider too.
The Power of a Stable Connection:
The intermittent dying of a laptop Wi-Fi connection can be a source of immense frustration. By understanding this issue, systematically diagnosing the potential causes, and implementing the solutions presented here, you're well on your way to resolving many of the common problems associated with laptop Wi-Fi. By implementing these steps, you will finally be able to reclaim a seamless online experience.
