how to reset wifi connection on laptop

Title: Fix any Internet and Network Issues with this simple trick
Channel: HowtoInsider
Fix any Internet and Network Issues with this simple trick by HowtoInsider
how to reset wifi connection on laptop, how to fix wifi connection on laptop, how to fix wifi connection on laptop windows 11, how to fix wifi connection on laptop windows 7, how to fix wifi connection on laptop not showing, how to change wifi connection on laptop, how to fix wifi connection on laptop windows 8, how to fix wifi connection on laptop windows 8.1, how to reset wifi settings on laptop windows 10, how to restart wifi connection on laptop
WiFi Nightmare? Reset Your Laptop's Connection NOW!
WiFi Woes Got You Weeping? Reclaim Your Laptop's Connection!
Are you staring at your laptop, frustrated? Is the WiFi signal a flickering mirage? Don't let those digital demons win. You can wrestle your connection back into submission. We're here to guide you through the process. It's easier to fix than you think, really.
The Annoying WiFi Abyss: Identifying the Culprit
First, let's diagnose the problem. Is your WiFi completely AWOL? Or is it just agonizingly slow? Check other devices in your home. Do they have internet access? If they're also struggling, the issue might be your router or your internet provider. However, if other devices are fine, your laptop is the likely culprit. Therefore, let's focus our efforts there.
Consider what actions you last took. Did you perform a software update? Did you install a new program? Sometimes, these things can conflict with your network settings. Furthermore, consider any recent changes.
The Quickest Fix: A Simple Restart Ritual
Believe it or not, restarting is often the solution. It's the digital equivalent of a good night's sleep. It clears the cobwebs. Try restarting your laptop first. It's the simplest step.
Also, restart your router. Unplug it from the power for about 30 seconds. Then, plug it back in. Give it a minute or two to reboot fully. After that, check your laptop's WiFi connection again. In essence, you're giving everything a fresh start.
Delving Deeper: Troubleshooting Your Network Settings
If a simple restart didn’t work, don't despair. We have more tricks up our sleeves. Let's dive into the system settings. We can often resolve the issue through these settings.
Airplane Mode: The Accidental Activator: Check your laptop's settings for Airplane Mode. Is it turned on? If so, turn it off. Airplane mode disables all wireless connections. It's a common oversight.
WiFi Adapter Troubles: Your laptop has a WiFi adapter. This is its network card.
- Device Manager Discovery: Access the Device Manager. Search for it in your Windows search bar. Or, right-click the Start button. Select "Device Manager" from the menu.
- Adapter Examination: Look for "Network adapters." Expand this section. Your WiFi adapter will be listed.
- Driver Check: Right-click your WiFi adapter. Select "Update driver." Choose the "Search automatically for drivers" option. Windows will search for updated drivers.
- Driver Reinstall: If updating doesn't help, consider reinstalling the driver. Right-click the adapter. Select "Uninstall device." Restart your laptop. Windows will reinstall the driver automatically.
Network Reset: A Factory Reset for Your Network: Sometimes, network settings get corrupted. Windows offers a "Network reset" option. This is a more thorough fix.
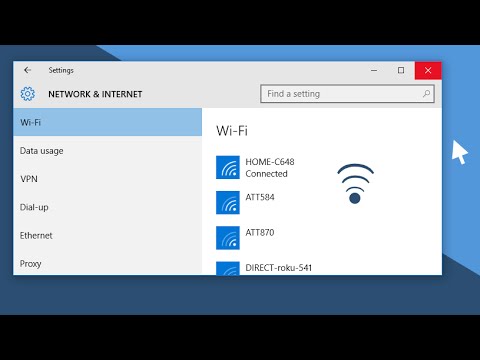
- Find the Reset Button: Go to Settings. Click on "Network & Internet." Then, click "Network reset."
- Confirm the Action: Click "Reset now." Your computer will restart. This resets all network configurations.
Advanced Tactics: Unveiling Hidden Solutions
Still no luck? Don't give up. Some more advanced techniques are available.
Flush the DNS Cache: Your computer stores website addresses. This helps speed up browsing. However, this cache can sometimes cause problems. You can clear this cache.
- Open Command Prompt: Search for "cmd" in the Windows search bar. Open Command Prompt as an administrator.
- Enter the Command: Type
ipconfig /flushdns. Press Enter. You should see a confirmation message. This clears the DNS.
IP Address Configuration: Ensure your IP address settings are correct.
- Access Adapter Settings: Go to Network and Sharing Center. Click "Change adapter settings."
- Adapter Properties: Right-click your WiFi adapter. Select "Properties."
- IP Settings: Look for "Internet Protocol Version 4 (TCP/IPv4)." Select it. Click "Properties."
- Automatic Configuration: Ensure "Obtain an IP address automatically" and "Obtain DNS server address automatically" are selected.
Check Your Router's Configuration: Log in to your router's settings. This often involves typing its IP address into your web browser. Look for settings related to your WiFi network. Check your network password is correct. Ensure your network is broadcasting.
Preventative Measures: Keeping the WiFi Spirits High
Once you've fixed your connection, you can take steps to prevent future issues.
Regular Updates: Keep your operating system and drivers up to date. These updates often contain fixes for network-related problems. Always update your drivers.
Router Health: Regularly reboot your router. Place it in an open area. Do not obstruct it. These actions help improve your WiFi performance.
Security Solutions: Use a strong password for your WiFi network. You should also consider installing a firewall. These measures protect your network.
Conclusion: Reclaiming Your Online Freedom
Having WiFi troubles can be incredibly frustrating. Nonetheless, you can overcome them. By following these steps, you can troubleshoot and fix most connection problems. Remember patience is key. Don't panic. Just work through the process systematically. Embrace the digital world again. With these solutions, you'll reclaim your laptop's connection. Thus, you can get back to enjoying your online activities!
WiFi Nightmare? Reset Your Laptop's Connection NOW!
We’ve all been there, haven’t we? That moment of digital despair when your Wi-Fi decides to throw a temper tantrum. You stare at the screen, the spinning circle of doom mocking your every click. The words “no internet connection” flash tauntingly, and suddenly, your entire digital life – work, entertainment, cat videos – feels like it’s vanished into thin air. Fear not, friends! We’re here to navigate the choppy waters of wireless woes and guide you through the essential steps to reclaim your internet connection. Think of this as your personal Wi-Fi rescue mission. Let’s dive in!
1. The Unseen Enemy: Why Your Wi-Fi Might Be Failing You
Before we grab the digital crowbar and start prying open your laptop’s settings, let’s understand why this Wi-Fi headache is happening in the first place. It's like trying to fix the leaky faucet without knowing where the leak is coming from, right? We need to diagnose the problem before we apply the fix. Often, the issue isn't your laptop itself. It's the router, the signal strength, interference, or simply a glitch in the matrix of your internet connection. Picture your Wi-Fi signal as a delicate whisper, constantly battling noise and distractions. Sometimes, that whisper gets lost in the crowd.
2. The Obvious First Step: Power Cycling Your Modem and Router
This is the digital equivalent of turning it off and on again. It's simple, effective, and often the solution to a multitude of Wi-Fi problems. Think of your modem and router as the workhorses of your internet connection. They run constantly, and occasionally, they get… well, tired. A quick reboot can clear out the cobwebs and get them back in fighting shape.
Here's how to do it:
- Unplug: Unplug both your modem and your router from the power outlet.
- Wait: Give them a good 30-60 seconds of rest. Think of it as a digital vacation.
- Plug back in: Plug the modem back in first. Wait for the lights to stabilize (this can take a couple of minutes).
- Router's turn: Once the modem is fully powered up, plug in your router and wait for it to come back online.
- Test: Try connecting your laptop (and other devices) to the Wi-Fi. Problem solved? Hopefully!
3. Laptop Connection Check: Is It Really Your Wi-Fi?
Before we blame the internet, let's make sure the problem isn't your laptop itself. We need to rule out the possibility that your device believes it is connected when it's actually not. This can happen due to software glitches or outdated drivers. Think of this like checking the engine before assuming the car needs a new transmission.
4. The Digital Restart: Restarting Your Laptop
A simple restart can often work wonders. It’s like hitting the reset button on your entire system, clearing out temporary files and refreshing the software.
Steps to Restart:
- Click the Windows icon in the bottom-left corner (or the Apple icon in the top-left, depending on your laptop).
- Click the power button.
- Select "Restart". Let it fully start up again.
- Re-test your Wifi.
It’s a basic step, but often surprisingly effective.
5. The Wireless Troubleshooter: Unleashing Windows' Built-in Tool
Windows has a built-in troubleshooter designed specifically for Wi-Fi issues. It's like having a digital handyman who can diagnose common problems and offer solutions.
Here's how to access it:
- Click the Windows icon in the bottom-left corner.
- Go to "Settings" (the gear icon).
- Click on "Network & Internet."
- Select "Status".
- Click on "Network troubleshooter."
- Follow the on-screen instructions.
Let the troubleshooter work its magic and see if it can identify and fix the problem.
6. For Mac Users: Navigating the Wi-Fi Diagnostics
Mac users, fear not! Your operating system also has built-in tools to help diagnose Wi-Fi issues. It’s like having a sophisticated digital doctor on call.
Here's how to access it:
- Hold down the "Option" key and click the Wi-Fi icon in your menu bar (top-right corner).
- This will open a hidden menu with advanced options.
- Select "Open Wireless Diagnostics."
- Follow the on-screen instructions to run a scan and identify any problems.
7. Reconnecting to Your Network: Forgetting and Remembering
Sometimes, your laptop might be clinging to outdated Wi-Fi settings. Reconnecting can refresh the connection, providing a fresh start. It’s like wiping the slate clean and starting over.
Here’s the process:
- Click the Wi-Fi icon in your system tray (bottom-right corner for Windows, top-right for Mac).
- Select your Wi-Fi network.
- Click the "Forget" (or "Remove") option (it may require you to enter your password again).
- Re-select your Wi-Fi network and re-enter your password.
- Retry connect.
This resets the connection, often resolving persistent issues.
8. Driver Dilemmas: Updating Your Wireless Network Adapter Driver
Outdated drivers are like outdated maps – they can lead you astray! Your wireless network adapter driver is the software that allows your laptop to communicate with your Wi-Fi. If it's out of date, you might experience connection problems. It’s like upgrading your car's engine to the latest model.
How to Update (Windows):
- Right-click the Windows icon and select "Device Manager."
- Expand "Network adapters."
- Right-click your wireless network adapter (it might say "Intel Wireless-AC," "Realtek," etc.).
- Select "Update driver."
- Choose "Search automatically for drivers."
How to Update (Mac):
- Updates are usually handled through macOS updates. Go to "System Preferences" > "Software Update."
- Install any available updates.
9. The Router's Red Light District: Checking Your Router's Status
If your laptop isn't the only device with problems, your router might be the culprit. The lights on your router can tell a story. If the internet light is blinking red or orange, it means your router isn't connected to the internet.
- Check the Cables: Ensure the Ethernet cable connecting your router to your modem is securely plugged in.
- Check the Modem: Ensure the modem is powered on and connected to the internet.
- Reboot the Router: As mentioned earlier, often the simplest solution is to restart.
10. Signal Strength Secrets: Improving Your Wi-Fi Range
A weak Wi-Fi signal is like a faint whisper – easily lost. Location matters. Walls, distance, and other electronics can interfere.
Consider these ideas:
- Move Closer to the Router: The simplest solution sometimes works best.
- Reduce Obstacles: Remove obstacles between your laptop and the router.
- Router Placement: Elevate your router and place it in a central, open location.
- Use a Wi-Fi Extender: If your home is large, consider adding a Wi-Fi extender.
11. Interference Interlopers: Identifying and Avoiding Interference
Microwaves, Bluetooth devices, and even other Wi-Fi networks can cause interference. It's like trying to have a quiet conversation in a crowded room.
Consider these remedies:
- Change Router Channel: Access your router's settings (usually through a web browser) and change the Wi-Fi channel.
- Minimize Bluetooth Use: Reduce the number of Bluetooth devices in use near your laptop.
- Avoid Microwaves: Microwave ovens can temporarily disrupt Wi-Fi.
12. Network Password Problems: Double-Checking Your Password
It might seem obvious, but it's easy to mistype your Wi-Fi password. Even a single wrong character can prevent you from connecting. It’s like having a secret code and getting one number wrong.
Here's what to do:
- Double or triple-check: Make sure you're entering the correct password.
- Password Case Sensitivity: Passwords are often case-sensitive.
- Reset the Router Password: If you've forgotten your password, you may need to reset your router.
13. Malware Mayhem? Scan Your Laptop For Viruses
Sometimes, malware can interfere with your internet connection. It’s like a digital saboteur wreaking havoc.
Scan your System:
- Run a Full Scan: Run a scan with your antivirus software.
- Malware scanners: Use a malware scanner for additional help.
14. The Tech Support Tango: When to Call for Professional Help
If you've tried everything and still can't connect, it might be time to call in the professionals. There’s no shame in admitting you need assistance.
When to call:
- If the Problem Persists: If the problem persists for more than a day or two.
- Complex Issues: If you
Cara Reset Semua Pengaturan Internet & WIFI di Windows 11 dan 10 Perbaiki Masalah Internet & Wifi

By WINTECH id Cara Reset Semua Pengaturan Internet & WIFI di Windows 11 dan 10 Perbaiki Masalah Internet & Wifi by WINTECH id
Forget or Remove a Wireless Network on Windows 10 How-To
By Windows Explained Forget or Remove a Wireless Network on Windows 10 How-To by Windows Explained
Windows laptop not connecting to Wi-Fi Method 1 shorts windows laptop wifi fix

By Tuto2Info Videos Windows laptop not connecting to Wi-Fi Method 1 shorts windows laptop wifi fix by Tuto2Info Videos

Title: Cara Reset Pengaturan Wifi di Laptop
Channel: LAPTOP TUTORIAL
Cara Reset Pengaturan Wifi di Laptop by LAPTOP TUTORIAL
WiFi Nightmare? Reset Your Laptop's Connection NOW!
Life grinds to a halt when the WiFi fails. Suddenly, the flow of emails, streaming movies, and vital online meetings stutters, then disappears entirely. We've all been there. The dreaded "no internet" message can transform a productive afternoon into a frustrating exercise in troubleshooting. This article cuts through the tech jargon and offers straightforward, actionable solutions to reignite your laptop's connection to the digital world. Forget the endless spinning wheel of doom; let's get you back online.
Identifying the Source of the WiFi Woes: Pinpointing the Problem
Before diving into solutions, it's crucial to understand precisely where the problem lies. Is it your laptop, your router, or something else entirely? A systematic approach will save time and frustration.
Check the Obvious First: Is the WiFi switch on your laptop activated? Many laptops have a physical switch or a function key combination (often denoted by an airplane icon) that disables WiFi. Check for this. Also, examine the taskbar (Windows) or menu bar (macOS) for the WiFi icon. A little "x" or a question mark often signals a connection issue.
Analyze Your Other Devices: Does your smartphone, tablet, or another laptop connect to the internet via the same WiFi network? If they do, the problem is likely with your specific laptop, not the router or internet service. If no devices can connect, the issue might be with your router, modem, or your internet service provider (ISP).
Note the Error Messages: Pay close attention to any error messages displayed on your laptop. These cryptic messages often offer valuable clues. For instance, "Limited connectivity" might indicate an IP address conflict, while "Unable to connect to network" suggests a problem with the network password or the router's broadcasting capabilities.
Consider Recent Changes: Did you recently update your operating system, install new software, or change your network settings? Sometimes, these actions can inadvertently disrupt your WiFi connection.
Laptop-Specific Solutions: Troubleshooting Your Connection
Once you've determined that the problem lies within your laptop, several steps can be taken to restore your connection.
1. The Simplest Solution: Restarting Your Laptop
Often, a simple reboot is all it takes. Restarting your laptop clears temporary files, resets network configurations, and refreshes the system's memory. This is the digital equivalent of turning something off and on again. It's a quick and surprisingly effective fix.
- Windows: Click the Start button, then select the power icon and choose "Restart."
- macOS: Click the Apple menu in the top-left corner of the screen and select "Restart."
After the restart, your laptop should automatically attempt to reconnect to available WiFi networks. Try connecting to your network and see if the internet connection is restored.
2. Disabling and Re-enabling Your WiFi Adapter
Your laptop's WiFi adapter (the hardware responsible for connecting to WiFi networks) can sometimes malfunction. Disabling and re-enabling the adapter forces it to reset its connection and configurations.
- Windows:
- Type "Device Manager" in the Windows search bar and press Enter.
- Expand the "Network adapters" category.
- Right-click on your WiFi adapter (e.g., "Intel Wireless-AC 9260") and select "Disable device."
- Wait a few seconds, then right-click the adapter again and select "Enable device."
- macOS:
- Click the Apple menu and select "System Preferences."
- Click "Network."
- Select "Wi-Fi" in the left-hand pane.
- Click "Turn Wi-Fi Off," wait a few seconds, then click "Turn Wi-Fi On."
Try connecting to your WiFi network again after completing these steps.
3. Forgetting and Reconnecting to Your WiFi Network
Sometimes, a corrupted or incorrect network password is the culprit. Forgetting your network and then re-entering the password can resolve these issues. This forces your laptop to refresh its authentication information.
- Windows:
- Click the WiFi icon in the taskbar.
- Right-click on your WiFi network and select "Forget."
- Click on your network again, enter your password, and attempt to reconnect.
- macOS:
- Click the WiFi icon in the menu bar.
- Select "Open Network Preferences."
- Select "Wi-Fi" in the left-hand pane.
- Click "Advanced…"
- Select your network from the list and click the "-" (minus) button to remove it.
- Click "Apply."
- Click on your network again, enter your password, and attempt to reconnect.
4. Running the Network Troubleshooter
Both Windows and macOS offer built-in network troubleshooters designed to automatically diagnose and fix common network problems. These tools are a valuable resource for quickly resolving connectivity issues.
- Windows:
- Right-click the WiFi icon in the taskbar.
- Select "Troubleshoot problems."
- Follow the on-screen instructions.
- macOS:
- Click the Apple menu and select "System Preferences."
- Click "Network."
- Click "Assist me…" and select "Diagnostics."
- Follow the on-screen instructions.
The troubleshooter will attempt to identify and resolve any underlying issues.
5. Updating Your Network Adapter Driver
Outdated network adapter drivers can cause connectivity problems. Updating these drivers ensures your adapter is compatible with your operating system and the latest network standards.
- Windows:
- Type "Device Manager" in the Windows search bar and press Enter.
- Expand the "Network adapters" category.
- Right-click on your WiFi adapter and select "Update driver."
- Choose "Search automatically for drivers."
- Follow the on-screen instructions.
- macOS:
- macOS typically updates drivers automatically through system updates. Ensure that your operating system is up-to-date by checking the "Software Update" section in System Preferences.
6. Checking Your Router's IP Address (If Applicable)
In some instances, your computer may have an IP address conflict with another device on your network. If you understand your network better, you can address IP address issues. However, this process is beyond the scope of this article.
Router-Related Solutions: Investigating Your Home Network
If the above steps don't resolve the issue, the problem likely lies with your router.
1. Restarting Your Router and Modem
Similar to restarting your laptop, rebooting your router and modem can often resolve connection issues. This clears temporary files, resets the router's settings, and helps it establish a fresh connection with your internet service provider.
- Unplug both your router and your modem from their power outlets.
- Wait for at least 30 seconds. This ensures a complete reset.
- Plug in your modem first and wait for it to power on and establish a connection (this may take a few minutes; watch the lights).
- Plug in your router and wait for it to power on and establish a connection.
Try connecting to your WiFi network again.
2. Checking Your Router's Configuration
- Accessing the Router's Settings: You'll need to access your router's settings to check its configuration. This typically involves opening a web browser and typing your router's IP address into the address bar (e.g., 192.168.1.1 or 192.168.0.1). You'll need to find the IP address. You can find this address using the "Network connections" menu in windows.
- Router Username and Password: You will be prompted to enter the router's username and password. This information is usually found on a sticker on the router itself or in the router's documentation. If you've changed the password, ensure you're using the correct one.
- Checking the WiFi Configuration: Once you're in the router's settings, look for the "Wireless" or "WiFi" section. Ensure that WiFi is enabled and that the network name (SSID) and password are correct.
- Channel Selection: Routers operate on different channels. If your network is congested, changing the channel can improve performance. Review your router manual.
3. Updating Your Router's Firmware
Outdated router firmware can cause compatibility and connectivity problems. Updating the firmware ensures your router is running the latest software and is compatible with your devices.
- Access Router Settings: As with the previous step, access your router's settings through a web browser.
- Locate Firmware Update: Look for a "Firmware" or "Update" section within the router's settings. The exact location varies depending on the router's make and model.
- Download and Install Firmware: Follow the on-screen instructions to download and install the
